
Перейти к контенту
![]()
Русские электронные инструкции по эксплуатации
Постоянно обновляемый большой каталог документации по эксплуатации и использованию современных устройств и оборудования на русском языке. Бесплатное скачивание файлов.
Поиск:
Главная
♥ В закладки
Просмотр инструкции в pdf


Инструкция по эксплуатации робота-пылесоса VITEK VT-1805.
Скачать инструкцию к роботу-пылесосу VITEK VT-1805 (6,46 МБ)

Инструкции по эксплуатации роботов-пылесосов VITEK
« Инструкция к роботу-пылесосу ProfiCare PC-BSR 3042
» Инструкция к роботу-пылесосу Mi Robot Vacuum-Mop P White
Вам также может быть интересно

Инструкция к тостеру VITEK VT-1578 BW

Инструкция к тостеру Vitek VT-7163

Инструкция к тостеру Vitek VT-1584 BK

Инструкция к фену VITEK VT-2316 Colorful

Инструкция к фену VITEK VT-8220

Инструкция к миксеру VITEK VT-1416

Инструкция к обогревателю VITEK VT-1707 W

Инструкция к фену VITEK VT 8223
Добавить комментарий
Имя *
Email *
Сайт
Комментарий


![]()


Сохранить моё имя, email и адрес сайта в этом браузере для последующих моих комментариев.
- Добавить инструкцию
- Заказать инструкцию
- Политика конфиденциальности
| Тип аккумуляторная батарея | Li-Ion |
| Время заряда аккумулятора | 5 ч |
| Время работы от аккумулятора | 2 ч |
| Кол-во режимов работы | 4 |
| Wi-Fi управление | есть |
| Гироскопическая система навигации | есть |
| Автоматическая установка на зарядку | есть |
| HEPA-фильтр | есть |
| Влажная уборка | есть |
| Встроенная вращающаяся основная щетка | есть |
| Допустимая высота коврового покрытия | 1 см |
| Звуковая индикация | есть |
| Индикация степени зарядки и застревания | есть |
| Кол-во инфракрасных датчиков препятствий | 11 пар |
| Кол-во пар инфракрасных датчиков определения ступенек | 3 |
| Магнитная лента | есть |
| Насадка для мытья полов | 1 |
| Объем пылесборника | 0,5 л |
| Объем резервуара для воды | 0,1 л |
| Кол-во боковых щеток | 2 |
| Мощность всасывания | 500 Па |
| Таймер | есть |
| Уровень шума | 65 |
| Корпус | алюминий/пластик |
показать все характеристики
Робот-пылесос VITEK VT-1805 обожает свою работу и делает ее поистине безупречно! Он способен производить не только сухую уборку пола и коврового покрытия высотой до 1 см, но и качественную влажную уборку. Управлять устройством можно непосредственно со смартфона через специальное приложение: выберите один из четырех режимов работы прибора и включите его! Благодаря особой — гироскопической — системе навигации прибор двигается по правильной траектории и не совершает ненужных хаотических движений, сокращая таким образом время уборки. Звуковая индикация робота-пылесоса делает «общение» с ним очень комфортным и приятным.
![]()
VT-1805
Robotic vacuum cleaner
Робот-пылесос
3
13
1
|
IM VT-1805.indd 1 |
13.06.2019 9:56:33 |

|
IM VT-1805.indd 2 |
13.06.2019 9:56:34 |

ENGLISH
ROBOTIC VACUUM CLEANER VT-1805
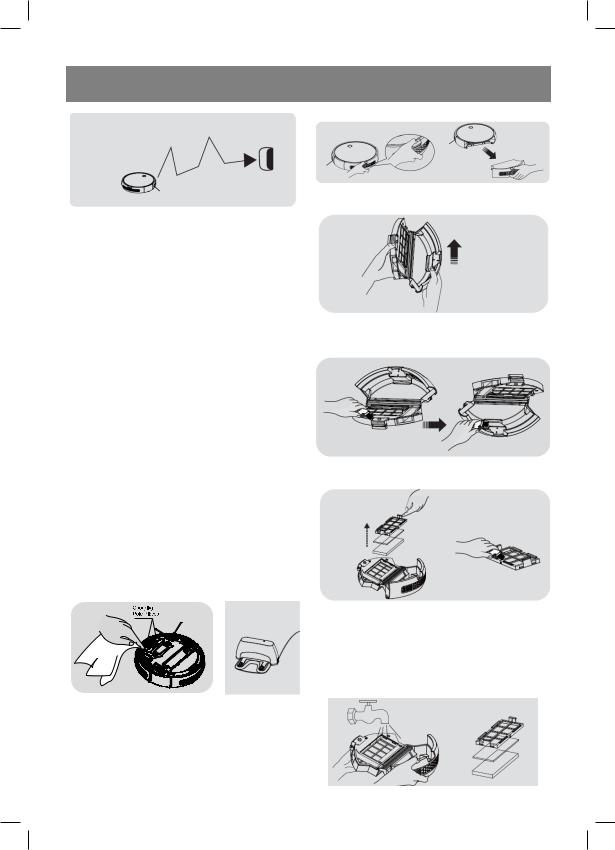
The robotic vacuum cleaner is intended for room cleaning in automatic mode.
DESCRIPTION
1.Start/stop button
2.Vacuum cleaner body
3.Dust bin lock
4.Front bumper
5.Side brushes
6.Sensor window
7.Fall protection sensors
8.Front wheel
9.Rechargeable battery
10.Traction wheels
11.Rotating brush
12.Brush frame
13.Battery charging poles
Dust bin
14.Dust compartment
15.Filter holder with mesh filter
16.Foam prefilter
17.HEPA filter
18.Filter installation place
Charging station
19.Charging station body
20.Pilot light
21.AC/DC adapter connection socket
22.Battery charging terminals
23.Power adapter
Accessories
24.Magnetic tape
25.Water tank with wet-cleaning attachment
26.Spare side brush
SAFETY MEASURES AND OPERATION RECOMMENDATIONS
Read this instruction manual carefully before using the robotic vacuum cleaner and keep it for the whole operation period. Mishandling the unit may lead to its breakage and cause harm to the user or damage to his/her property.
To avoid the risk of fire, electric shock and to prevent injury, observe the following safety measures.
•• Use the unit in strict accordance with the instruction manual.
•• Use only the accessories supplied with the unit.
3
•• Before charging the battery for the first time, make sure that the voltage of the mains corresponds to the operating voltage of the power adapter.
•• Do not charge the rechargeable battery in places with high moisture and high temperature. Charge the battery at the temperature from +5° C to +35° C and relative humidity no more than 80%.
•• If you don’t use the charging station for a long time, unplug the power adapter.
•• Do not touch the power adapter body with wet hands.
•• Do not use the vacuum cleaner outdoors, for cleaning wet and damp floors.
•• Do not use the vacuum cleaners in rooms with unsteady furniture, especially if there are fragile objects or burning candles placed on it.
•• Do not place or install foreign objects on the vacuum cleaner body, make sure that your pets are not on the vacuum cleaner body.
•• Do not switch the unit on if the air inlet is blocked by a foreign object.
•• Keep hair, free hanging clothes and objects of the interior away from the vacuum cleaner’s path.
•• Set additional barriers for the vacuum cleaner when cleaning stair landings.
•• Do not use the vacuum cleaner for collecting such inflammable liquids as gasoline or solvents. Do not use the vacuum cleaner in places where such liquids are stored.
•• Do not use the vacuum cleaner for collecting burning or smoking cigarettes, matches, cinders as well as fine dust, for example, of plaster, concrete, flour or ashes.
•• Do not use the vacuum cleaner if:
–the dust bin is not installed;
–the filters in the dust bin are not installed.
•• Do not immerse the vacuum cleaner, the power adapter and the charging station into water or any other liquids.
•• Close supervision is necessary when children or people with disabilities are near the operating unit.
•• This unit is not intended for usage by children.
•• During the unit operation and breaks between operation cycles, place the unit out of reach of children.
•• The unit is not intended for usage by physically or mentally disabled persons (including
|
IM VT-1805.indd 3 |
13.06.2019 9:56:34 |
ENGLISH
children) or by persons lacking experience or knowledge if they are not under supervision of a person who is responsible for their safety or if they are not instructed by this person on the usage of the unit.
•• Do not leave children unattended to prevent using the unit as a toy.
•• For children safety reasons do not leave polyethylene bags used as packaging unattended.
Attention! Do not allow children to play with polyethylene bags or packaging film. Danger of suffocation!
•• Do not use the connecting cord of the power adapter to carry the charging station. Provide that the connecting cord does not touch sharp edges of furniture and hot surfaces. Provide that the vacuum cleaner does not run over the connecting cord of the power adapter.
•• Periodically check that the power adapter and the connecting cord are not damaged.
•• Never use the unit if the power adapter or connecting cord are damaged, if the unit works improperly or after it was dropped.
•• Do not attempt to repair the unit. Do not disassemble the unit by yourself, if any malfunction is detected or after it was dropped, unplug the unit and apply to any authorized service center at the contact addresses given in the warranty certificate and on the website www.vitek.ru.
•• To avoid damage, transport the unit in the original packaging only.
Charging station
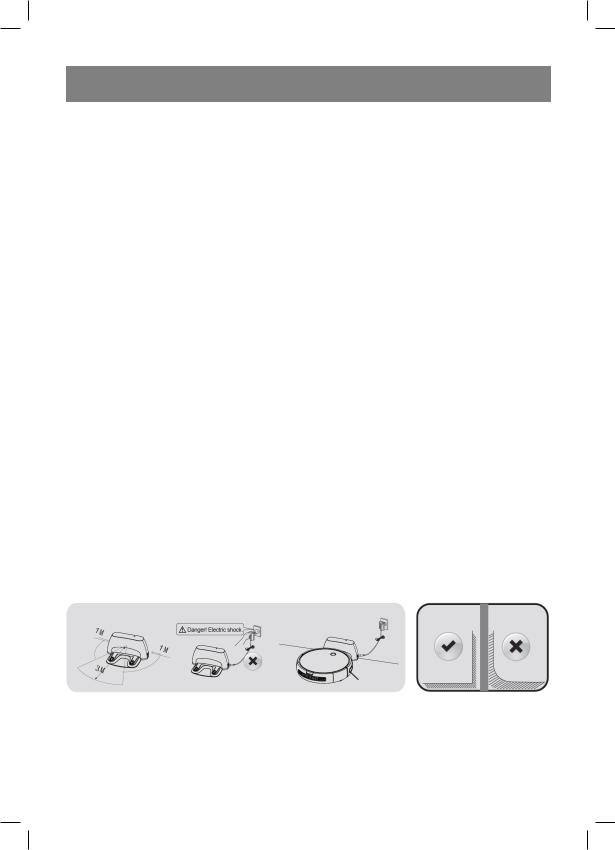
•• Connect the cord jack of the power adapter (23) to the socket (21) on the charging station (19).
•• Place the charging station on a flat floor surface next to the wall, the charging station base must be perpendicular to the floor.
4
•• Before you dispose of the vacuum cleaner, remove the battery and hand it over to an appropriate collection point for recycling. Do not burn the vacuum cleaner even if it is badly damaged without removing the battery to avoid the battery explosion.
•• Transport the unit in the original packaging only.
•• Keep the unit in a dry cool place out of reach of children and people with disabilities.
THE UNIT IS INTENDED FOR HOUSEHOLD USE ONLY, ITS COMMERCIAL USAGE AND USAGE IN PRODUCTION AREAS AND WORK SPACES IS PROHIBITED.
BEFORE THE FIRST USE
After unit transportation or storage under cold (winter) conditions, it is necessary to keep it for at least three hours at room temperature before switching on.
•• Unpack the vacuum cleaner and remove any promo-stickers and package materials.
•• Keep the original package.
•• Check the unit for damage, do not use it in case it is damaged.
•• Read the safety instructions and the vacuum cleaner operation manual.
•• Make sure that the operating voltage of the power adapter corresponds to the voltage of your mains.
•• The unit is intended for operation from AC mains with 50 Hz or 60 Hz frequency, the unit does not need any additional settings for operating with the required rated frequency.
•• There should be at least 3 meters of free space in front of the charging station and at least 1 meter on the sides (see the picture).
|
IM VT-1805.indd 4 |
13.06.2019 9:56:34 |
ENGLISH
BEFORE USING THE VACUUM CLEANER
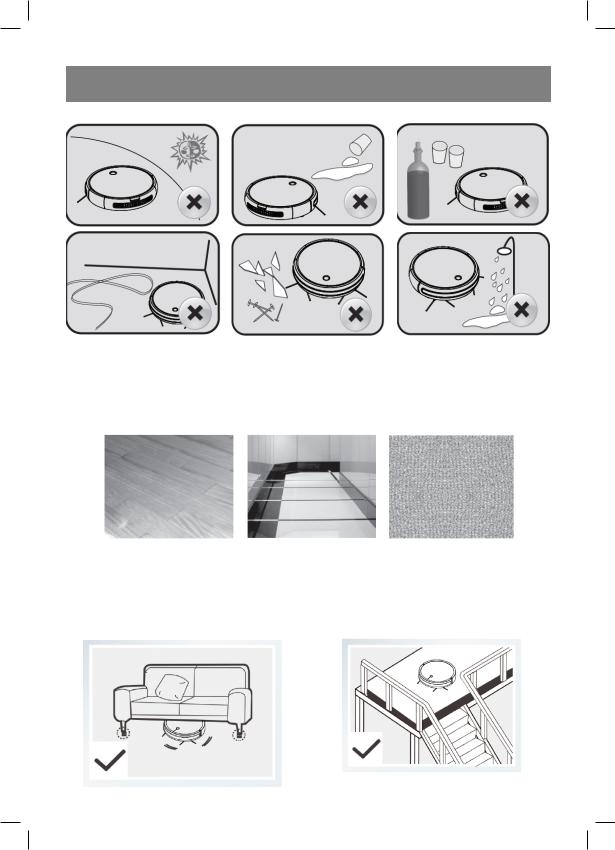
•• Do not use the vacuum cleaner outdoors, do not use it for collecting spilled liquids, do not use the vacuum cleaner in rooms with unsteady furniture, especially if there are fragile objects or burning candles placed on it.
•• Remove all kinds of power cords, power
•• The vacuum cleaner is intended for operation on a smooth floor or on a carpet with low pile (no more than 1 cm). Do not use the vacuum cleaner for cleaning floors and carpets with high pile.
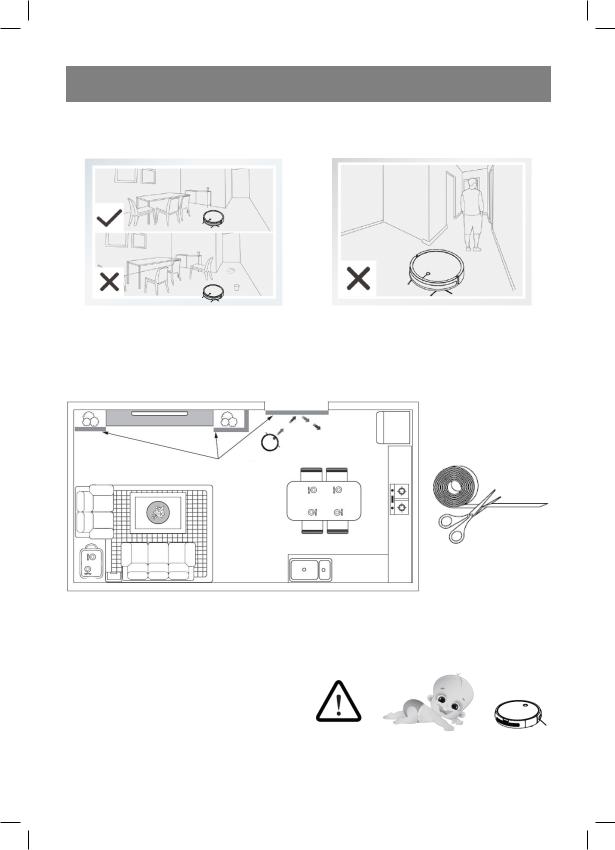
•• Make sure that there are no tablecloths, curtains or other furnishings hanging to the floor along the path of the vacuum cleaner.
extension cords and other similar items from the floor that may interfere with the movement of the vacuum cleaner, remove sharp and cutting objects from the floor.
•• Do not use the vacuum cleaner in humid rooms and in places where inflammable liquids are stored and used.
•• There must be at least 8 centimeters of free space under the furniture, otherwise the vacuum cleaner will simply get stuck under the furniture.
•• If the distance from the floor to the furniture is less than 8 centimeters, it is necessary to lift the furniture or to place a barrier to prevent the vacuum cleaner from getting in such places.
5
|
IM VT-1805.indd 5 |
13.06.2019 9:56:34 |
ENGLISH
|
•• Provide additional barriers for the vacuum |
•• Do not place or install foreign objects on the |
|
cleaner when cleaning the stair landings. |
vacuum cleaner body, make sure that your |
|
pets are not on the vacuum cleaner body. |
|
•• Arrange furniture for free movement of the |
•• Before using the vacuum cleaner make sure |
|
vacuum cleaner, remove foreign objects from |
that there are no narrow places in the path of |
|
the floor. |
the vacuum cleaner. |
Magnetic tape
•• Use the magnetic tape (24) to create “restricted areas” for the vacuum cleaner.
•• You can create “restricted areas” around power cords, protect fragile objects of the interior, restrict the vacuum cleaner from running through doorways, arrange cleaning of stair landings, not to let the vacuum cleaner to drive under low furniture and into narrow places between the furniture items.
•• Cut a piece of magnetic tape at least 50 cm long and stick it on in the places you want to prevent the vacuum cleaner from rolling through.
Note: — stick on the magnetic tape at least 5 cm away from the object or place you want to protect.
•• Do not leave children unattended to prevent using the unit as a toy.
6
|
IM VT-1805.indd 6 |
13.06.2019 9:56:34 |
ENGLISH
USING THE VACUUM CLEANER
Note: — the vacuum cleaner operating modes are confirmed by utterances.
•• Install the charging station. The installation recommendations are given above.
•• Insert the power adapter (23) into the mains socket, the pilot light (20) will light up.
•• Set the vacuum cleaner on the charging station (19), the contact poles (13) on the vacuum cleaner should match the contact terminals (22) on the charging station (19). You will hear a sound signal, and the start/ stop button (1) light will be glowing white and the pilot light (20) on the charging station (19) will go out.
WET FLOOR CLEANING
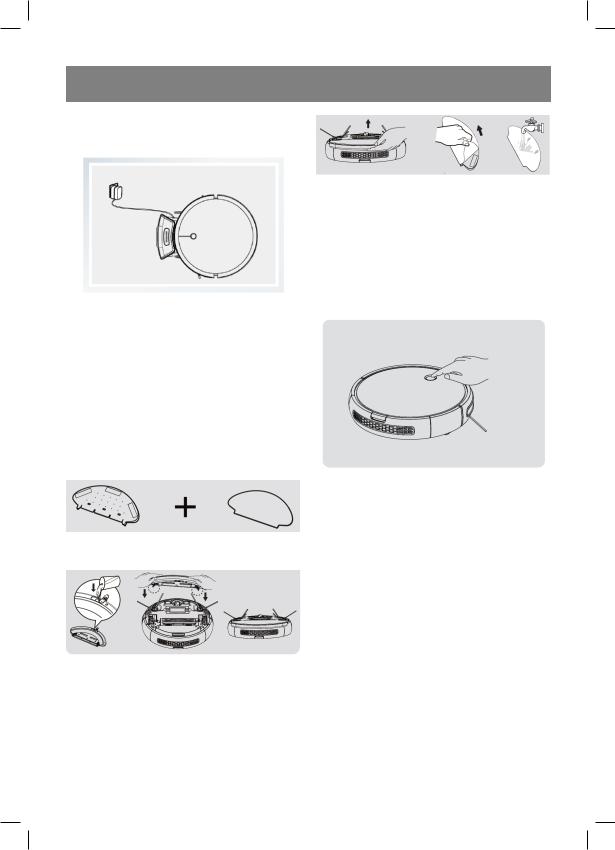
•• Use the water tank (25) and the fabric attachment for wet floor cleaning.
•• After wet cleaning of the room, turn the vacuum cleaner over and remove the water tank. Take the water tank by the rear part and lift it upwards.
•• Remove the fabric attachment, wash it under a warm water jet and dry.
MANUAL OPERATION MODE OF THE VACUUM CLEANER
Automatic room cleaning mode
•• Press and hold the start/stop button (1), the vacuum cleaner will switch to the standby mode and the button (1) light will glow orange. Press the start/stop button (1) again, the button (1) light will glow white, the vacuum cleaner will switch on and start cleaning the room in the automatic mode.
•• To switch the standby mode on, press the start/stop button (1) once, the vacuum cleaner will stop and the button (1) light will glow orange.
•• To switch the vacuum cleaner off, press and hold the start/stop button (1), the vacuum cleaner will switch off and the light will go out.
•• Open the water inlet lid and fill the water tank with water.
•• Put a fabric attachment on the front part of the water tank, smooth out the fabric and fix it with the hook-and-loop fasteners.
•• Turn the vacuum cleaner over and install the water tank on the vacuum cleaner body, matching the locks on the water tank with the openings on the vacuum cleaner body.
7
Automatic battery charging
•• In case the battery charge is not enough for the room cleaning, the start/stop button (1) light will turn on and start flashing white, the vacuum cleaner will stop cleaning and automatically return to the charging station (19). After the vacuum cleaner returns to the charging station (19), the start/stop button (1) light will be glowing white.
|
IM VT-1805.indd 7 |
13.06.2019 9:56:34 |
ENGLISH
Cleaning the dust bin
•• You can direct the vacuum cleaner to the charging station (19), to do this, press and hold the start/stop button (1), the vacuum cleaner will switch to the standby mode, the button (1) light will be glowing orange.
•• Press the start/stop button (1) twice, the button (1) light will be flashing white and the vacuum cleaner will start moving to the charging station (19).
Note: — if, after the automatic battery charging mode has switched on, you press the start/stop button (1) and the vacuum cleaner goes into the standby mode, it will switch on again in 45 seconds and continue moving to the charging station (19).
CLEANING AND CARE
•• It is recommended to clean the dust bin after every use of the vacuum cleaner.
•• Before cleaning, switch the vacuum cleaner off by pressing and holding the start/stop button (1), the start/stop button (1) light will go out.
•• Disconnect the power adapter (23) from the mains, remove the cord jack of the power adapter from the socket (21) on the charging station (19).
•• After you finish using the vacuum cleaner, turn it over and wipe the battery charging poles (13).
•• Wipe the battery charging terminals (22) on the charging station (19).
8
•• Press on the dust bin lock (3) downwards and remove the dust bin.
Hold the dust bin (3) lock, open the dust bin and remove dust and garbage from the compartment (14).
•• Clean the compartment (14) and other surfaces from dust with a suitable brush.
•• Take the side ledges and remove the filter holder (15), clean the holder (15) and the mesh filter from dust.
•• Remove the foam prefilter (16) and clean it from dust.
•• Remove the HEPA filter (17) and clean it from dust as well.
|
IM VT-1805.indd 8 |
13.06.2019 9:56:35 |
•• Wash the dust bin, the filter holder (15), the prefilter (16) and the HEPA filter (17) under a warm water jet and dry thoroughly.
Notes:
–do not wash the filter holder (15), the prefilter (16) and the HEPA filter (17) in a dishwashing machine;
–do not dry the HEPA filter (17) with a hairdryer.
•• Before installing the filters (17, 16) and the filter holder (15) make sure that they are dry.
•• Install the HEPA filter (17) to the installation place (18), install the prefilter (16) and the filter holder (15).
•• Close the dust bin.
•• Install the dust bin into the vacuum cleaner body (2).
•• Make sure that the dust bin is fixed properly.
ENGLISH
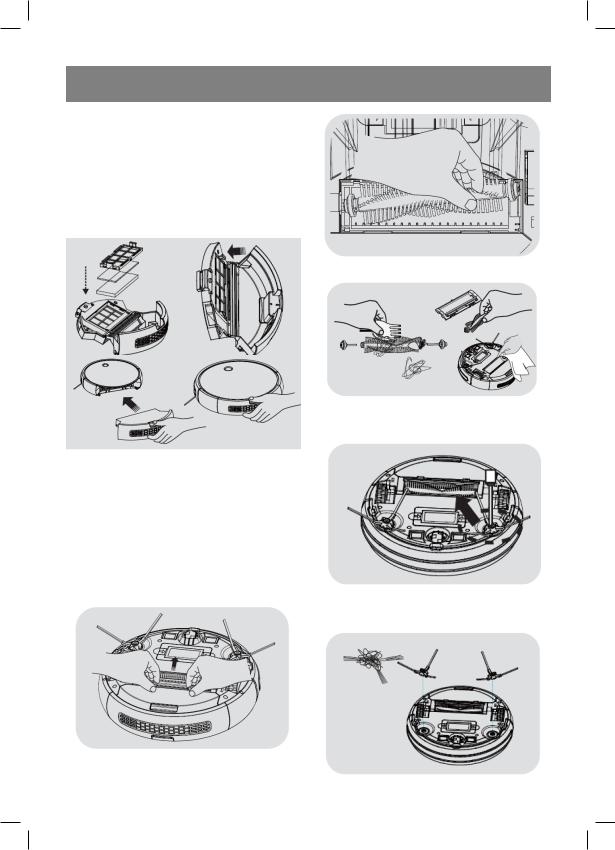
•• Remove the brush (11).
•• Clean the brush (11) from hair and dirt.
•• Wipe the brush (11) installation place with a slightly damp cloth.
Cleaning the rotating brush (11)
•• Press on the locks and remove the frame (12).
•• Install the brush (11) back to its place.
•• Install the frame (12) back to its place, make sure that the frame (12) is fixed properly.
9
|
IM VT-1805.indd 9 |
13.06.2019 9:56:35 |
ENGLISH
•• Unscrew the fastening screws of the side brushes (5) with a screwdriver (not included), turning them counterclockwise, and remove the brushes (5).
•• Clean the brushes (5) from hair and dirt, wipe the brushes (5) with a slightly damp cloth.
•• Wipe the brush (5) installation places from dust and garbage.
•• Install the brushes (5) back to their places and fix them with the screws, screwing them clockwise.
•• Wipe the vacuum cleaner body with a slightly damp cloth and then wipe it dry.
•• Do not immerse the vacuum cleaner body (2), the charging station (19), the power adapter (23) and the connecting cord of the power adapter into water or any other liquids. Provide that no liquid gets inside the vacuum cleaner body (2).
•• Do not use solvents or abrasives for cleaning the vacuum cleaner body (2), the charging station (19) and the power adapter (23).
•• Clean the front wheel (8) from dust and garbage and wipe it. Remove hairs, if there are any, make sure that nothing hinders the wheel’s (8) free rotation.
•• Clean the traction wheels (10).
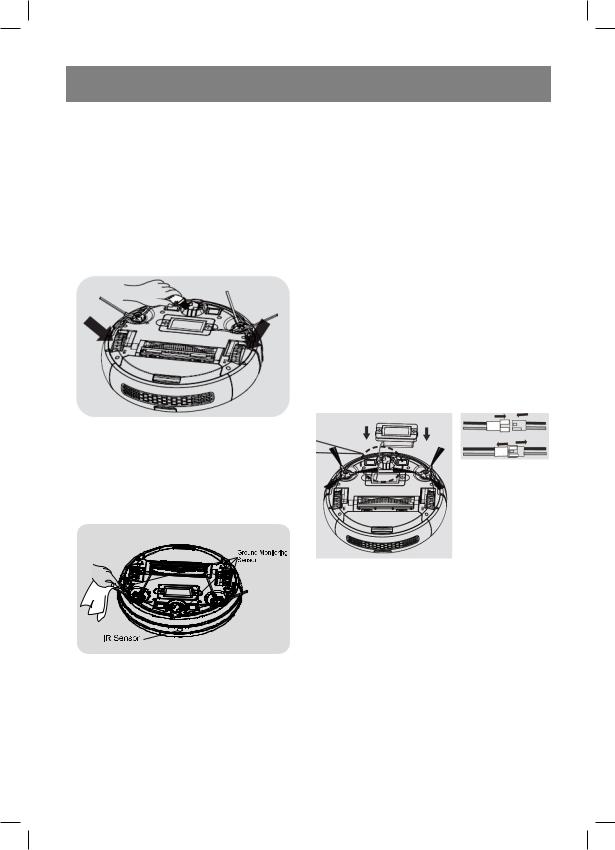
Removing the battery (9)
•• Before you dispose of the vacuum cleaner, remove the battery and hand it over to an appropriate collection point for recycling. Do not burn the vacuum cleaner even if it is badly damaged without removing the battery to avoid the battery explosion.
•• It is recommended to remove the battery (9) for long storage of the vacuum cleaner.
 – black cord
 – red cord
•• Simultaneously press on the battery (9) locks and remove it.
•• Detach the slot and remove the battery (9).
•• Clean and wipe the fall protection sensors (7) on the bottom part on the vacuum cleaner body.
•• Wipe the front bumper (4). Keep the front bumper (4) clean since there are infrared sensors in it.
10
STORAGE
•• Before taking the vacuum cleaner away for long storage, clean its body (2), the dust bin and the filters (15, 16, 17).
•• Use the original package for storage.
•• Keep the vacuum cleaner in a dry cool place out of reach of children and disabled persons.
|
IM VT-1805.indd 10 |
13.06.2019 9:56:36 |
![]()
ENGLISH
Light and sound signals that accompany the pressing of the start/stop button (1)
|
# |
Mode |
Indication color |
Actions |
|
1 |
Switching the |
The light doesn‘t glow |
1. In the standby mode (orange color of the |
|
vacuum cleaner |
light, press and hold the start/stop button for |
||
|
off |
3 seconds, you will hear a sound signal and |
||
|
the light will go out, release the button). |
|||
|
2. In the standby mode with low battery, and |
|||
|
if the vacuum cleaner stays in the standby |
|||
|
mode for more than 12 hours. In this case the |
|||
|
vacuum cleaner will switch off automatically. |
|||
|
2 |
Switching the |
Orange light color |
Press and hold the start/stop button |
|
vacuum cleaner |
for 3 seconds, you will hear a sound signal, |
||
|
on (standby |
the light will glow orange and the vacuum |
||
|
mode) |
cleaner will switch to the standby mode. |
||
|
3 |
Automatic room |
White light color |
Press the start/stop button once, the light |
|
cleaning mode |
will turn on white and the vacuum cleaner will |
||
|
switch to the automatic room cleaning mode. |
|||
|
4 |
Automatic |
White flashing light |
Press the start/stop button twice, the |
|
battery charging |
color |
vacuum cleaner will start moving and |
|
|
mode |
searching for the charging station. After |
||
|
finding the charging station, the vacuum |
|||
|
cleaner will connect to it for battery charging. |
|||
|
5 |
Battery charging |
White light color |
|
|
mode |
|||
|
6 |
Error |
Orange flashing light |
|
|
and repeated sound |
|||
|
signal |
|||
|
7 |
The battery is |
White light color |
|
|
fully charged |
|||
|
8 |
WI-FI connection |
The light is flashing |
In the standby mode (orange light color) |
|
mode |
white and orange |
press and hold the start/stop button for 3 |
|
|
seconds, you will hear a sound signal and the |
|||
|
light will go out. Hold the start/stop button |
|||
|
for 3 more seconds, you will hear a sound |
|||
|
signal and the light will start flashing white |
|||
|
and orange alternately, release the start/stop |
|||
|
button. |
|||
|
9 |
Sleep mode |
The light doesn‘t glow |
The vacuum cleaner switches to the sleep |
|
mode after 5 minutes in the standby mode. |
|||
|
11 |
|
IM VT-1805.indd 11 |
13.06.2019 9:56:36 |
ENGLISH
DELIVERY SET
Robotic vacuum cleaner — 1 pc. Charging station — 1 pc.
Power adapter – 1 pc.
Side brushes — 3 pcs. (one spare) Water tank – 1 pc.
Wet cleaning attachment — 1 pc. Magnetic tape — 1 pc. Instruction manual – 1 pc.
TECHNICAL SPECIFICATIONS Vacuum cleaner
Power supply: 14.4 V, Rechargeable battery: Li-Ion 14.4 V 2500 mAh
Battery charging time: 5 hours Power: 24 W
Dust bin capacity: 0.5 l Water tank capacity: 0.1 l Noise level: 65 dB
Power adapter
Power supply: 100-240 V ~50/60 Hz 0.4 A Output voltage: 19 V 

 0.6 A
0.6 A
Charging station
Input voltage: 19 V 

 0.6 A Output voltage: 19 V

 0.6 A
0.6 A
RECYCLING
For environment protection do not throw out the unit and the batteries (if included), do not discard the unit and the batteries with usual household waste after the service life expiration; apply to specialized centers for further recycling.
The waste generated during the disposal of the unit is subject to mandatory collection and consequent disposal in the prescribed manner.
For further information about recycling of this product apply to a local municipal administration, a disposal service or to the shop where you purchased this product.
The manufacturer preserves the right to change design, structure and specifications not affecting general principles of the unit operation without a preliminary notification due to which insignificant differences between the manual and product may be observed. If the user reveals such differences, please report them via e-mail info@vitek.ru for receipt of an updated manual.
The unit operating life is 3 years
Guarantee
Details regarding guarantee conditions can be obtained from the dealer from whom the appliance was purchased. The bill of sale or receipt must be produced when making any claim under the terms of this guarantee.
This product conforms to the EMC Directive 2014/30/EU and to the Low Voltage Directive 2014/35/EU.
12
|
IM VT-1805.indd 12 |
13.06.2019 9:56:36 |
 Loading…
You can only view or download manuals with
Sign Up and get 5 for free
Upload your files to the site. You get 1 for each file you add
Get 1 for every time someone downloads your manual
Buy as many as you need
Table of Contents: Vitek VT-1805 Vacuum Cleaner Owner’s Manual
-
Vitek VT-1805 20 русский тельный фильтр (16) и держатель филь- тров (15). • Закройте контейнер-пылесборник. • Установите контейнер-пылесборник в кор- пус (2) пылесоса. • Убедитесь в надёжной фиксации контей- нера-пылесборника. Чистка вращающейся щётки (11) • Нажмите на фиксаторы и снимите рамку (12). • Выньте щётку (11) • Оч
-
Vitek VT-1805 18 русский • После проведения влажной уборки поме- щения, переверните пылесос и снимите резервуар, возьмитесь за заднюю часть резервуара и приподнимите его по направ- лению вверх. • Снимите тканевую насадку, промойте её под струёй тёплой воды, после чего про- сушите. РУЧНО�
-
11 E N G L I S H Light and sound signals that accompany the pressing of the start/stop button (1) # Mode Indication color Actions 1 Switching the vacuum cleaner off The light doesn‘t glow 1. In the standby mode (orange color of the light, press and hold the start/stop button for 3 seconds, you will hear a sound signal and the light will go out, release the button). 2. In the standby mode with low battery, and if the vacuum cleaner stays in the standby mode for more than 1
-
Vitek VT-1805 16 русский • Пылесос предназначен для работы на глад- ком полу, или на ковровом покрытии с низ- ким ворсом (не более 1 см). Запрещается использовать пылесос для чистки ковро- вых покрытий с длинным ворсом. • Убедитесь, что по пути движения пыле- соса отсутствуют свисающие до пола скатерти, шторы или другие предметы интерьера. • Свобо
-
Vitek VT-1805 1 VT-1805 3 13 Robotic vacuum cleaner Робот-пылесос IM VT-1805.indd 1 13.06.2019 9:56:33
-
Vitek VT-1805 4 ENGLISH children) or by persons lacking experience or knowledge if they are not under supervision of a person who is responsible for their safety or if they are not instructed by this person on the usage of the unit. • Do not leave children unattended to prevent using the unit as a toy. • For children safety reasons do not leave polyethylene bags used as packaging unat- tended. Attention! Do not allow children to play with polyethylene bags or packaging film. Danger of suffocation!
-
8 ENGLISH • You can direct the vacuum cleaner to the charging station (19), to do this, press and hold the start/stop button (1), the vacuum cleaner will switch to the standby mode, the button (1) light will be glowing orange. • Press the start/stop button (1) twice, the but- ton (1) light will be flashing white and the vac- uum cleaner will start moving to the charging station (19). Note: — if, after the automatic battery charging mode has switched on, you press the start/stop but
-
6 ENGLISH • Provide additional barriers for the vacuum cleaner when cleaning the stair landings. • Arrange furniture for free movement of the vacuum cleaner, remove foreign objects from the floor. • Do not place or install foreign objects on the vacuum cleaner body, make sure that your pets are not on the vacuum cleaner body. • Before using the vacuum cleaner make sure that there are no narrow places in the path of the vacuum cleaner. • Use the magnetic tape (24) to create “restricted areas” for the vacuum cleaner. • Y
-
Vitek VT-1805 10 ENGLISH • Unscrew the fastening screws of the side brushes (5) with a screwdriver (not included), turning them counterclockwise, and remove the brushes (5). • Clean the brushes (5) from hair and dirt, wipe the brushes (5) with a slightly damp cloth. • Wipe the brush (5) installation places from dust and garbage. • Install the brushes (5) back to their places and fix them with the screws, screwing them clockwise. • Clean the front wheel (8) from dust and gar- bage and wipe it. Remove hairs, if there are any, make sure
-
Vitek VT-1805 5 E N G L I S H BEFORE USING THE VACUUM CLEANER • Do not use the vacuum cleaner outdoors, do not use it for collecting spilled liquids, do not use the vacuum cleaner in rooms with unsteady furniture, especially if there are fragile objects or burning candles placed on it. • Remove all kinds of power cords, power extension cords and other similar items from the floor that may interfere with the movement of the vacuum cleaner, remove sharp and cut- ting objects from the floor. • Do not use the vacuum cleaner in humid rooms and in places where
-
Vitek VT-1805 12 ENGLISH DELIVERY SET Robotic vacuum cleaner — 1 pc. Charging station — 1 pc. Power adapter – 1 pc. Side brushes — 3 pcs. (one spare) Water tank – 1 pc. Wet cleaning attachment — 1 pc. Magnetic tape — 1 pc. Instruction manual – 1 pc. TECHNICAL SPECIFICATIONS Vacuum cleaner Power supply: 14.4 V, Rechargeable battery: Li-Ion 14.4 V 2500 mAh Battery charging time: 5 hours Power: 24 W Dust bin capacity: 0.5 l Water tank capacity: 0.1 l Noise level: 65 dB Power adapter Power supply: 100-240 V ~50/60 Hz 0.4 A Output voltage: 19 V 0.6 A Charging station Input voltage: 19 V 0.6
-
Vitek VT-1805 7 E N G L I S H USING THE VACUUM CLEANER Note: — the vacuum cleaner operating modes are confirmed by utterances. • Install the charging station. The installation recommendations are given above. • Insert the power adapter (23) into the mains socket, the pilot light (20) will light up. • Set the vacuum cleaner on the charging station (19), the contact poles (13) on the vacuum cleaner should match the contact terminals (22) on the charging station (19). You will hear a sound signal, and the start/ st
-
19 русский • После использования пылесоса, перевер- ните его и протрите контакты для зарядки аккумуляторной батареи (13). • Протрите контакты для зарядки аккуму- ляторной батареи (22) на зарядной стан- ции (19). Чистка контейнера-пылесборника • Нажмите
-
21 русский • Очистите переднее колесо (8) от пыли и мусора и протрите его, при наличии волос, удалите их, убедитесь, что сво- бодному вращению колеса (8) ничего не мешает. • Очистите ведущие колёса (10). • Очистите и протрите датчики защиты от падения (7), расположен�
-
14 русский сперсную пыль – например, от штукатурки, бетона, муки или золы. • Запрещается использовать пылесос, если: – не установлен контейнер для сбора пыли и мусора; – в контейнере — пылесборнике не уста- новлены фильтры. • Не погружайте пылесос, сетевой адаптер и зарядную с�
-
15 русский Зарядная станция • Вставьте штекер соединительного шнура сетевого адаптера (23) в гнездо (21) на зарядной станции (19). • Установите зарядную станцию на ров- ную поверхность пола у стены, основание зарядной станции должно быть перпенди- кулярно полу. • Свободное прост�
-
Vitek VT-1805 GB A production date of the item is indicated in the serial number on the technical data plate. A serial number is an eleven-unit number, with the first four figures indicating the production date. For example, serial number 0606ххххххх means that the item was manufactured in June (the sixth month) 2006. RUS Дата производства изделия указана в серийном номере на табличке с техническими данными. Серийный номер представляет собой одиннад�
-
Vitek VT-1805 22 русский № Режим Цвет индикации Действия 2 Включение пылесоса (режим ожидания) Оранжевый цвет индикатора Нажмите и удерживайте кнопку старт/стоп 3 секунды, прозвучит звуковой сигнал, индикатор будет светиться оранжевым цветом, пылесос перейдёт в режим ожидания. 3 Режим авт�
-
IM VT-1805.indd 2 13.06.2019 9:56:34
-
Vitek VT-1805 17 русский • Отрежьте магнитную ленту длинной не менее 50 см. и наклейте её в местах, которые хотите защитить от проезда пыле- соса. Примечание: — наклеивайте магнитную ленту на расстоянии не менее 5 см. от того предмета или места, который необходимо защитить. • Осуществляй
-
Vitek VT-1805 9 E N G L I S H • Wash the dust bin, the filter holder (15), the prefilter (16) and the HEPA filter (17) under a warm water jet and dry thoroughly. Notes: – do not wash the filter holder (15), the prefil- ter (16) and the HEPA filter (17) in a dishwash- ing machine; – do not dry the HEPA filter (17) with a hair- dryer. • Before installing the filters (17, 16) and the filter holder (15) make sure that they are dry. • Install the HEPA filter (17) to the installation place (18), install the prefilter (16) and the fil- ter holder (15). • Close the dust bi
-
13 русский РОБОТ-ПЫЛЕСОС VT-1805 Основное назначение пылесоса-робота, это уборка помещений в автоматическом режиме. ОПИСАНИЕ 1. Кнопка старт/стоп 2. Корпус пылесоса 3. Фиксатор контейнера-пылесборника 4. Передний бампер 5. Боковые щетки 6. Окно датчиков 7. Датчики защиты от падения 8. Перед
-
Vitek VT-1805 23 русский УТИЛИЗАЦИЯ В целях защиты окружающей среды, после окончания срока службы прибора и эле- ментов питания (если входят в комплект), не выбрасывайте их вместе с обычными быто- выми отходами, передайте прибор и эле- менты питания в специализированные пункты для дальнейшей утилизации. Отходы, образующиеся при
Questions, Opinions and Exploitation Impressions:
You can ask a question, express your opinion or share our experience of Vitek VT-1805 device using right now.
Главная » Обзоры » Робот-пылесос Vitek VT-1805 с мощностью всасывания 500 Вт
Время чтения статьи ⏳ 6 минут
Робот-пылесос Vitek VT-1805 – это новый девайс популярной в России марки Vitek. Устройство приспособлено для проведения влажной и сухой уборки, способно ориентироваться в пространстве и обходить препятствия. Оснащено мягким бампером, который позволяет ему не получать повреждения и не наносить их при столкновении со стенами или ножками мебели. Цена на робот-пылесос Vitek-1805 установлена на уровне 20 тыс. рублей. Производитель относит его в бюджетный ценовой сегмент.

Содержание
Преимущества и недостатки
Мы изучили для вас всю доступную информацию про Vitek VT-1805. Вот основные плюсы и минусы:
Плюсы
возможность проведения влажной и сухой уборки.
можно управлять со смартфона и встроить гаджет в систему «умного» дома.
время автономной работы – до двух часов.
Минусы
отзывы о роботе-пылесосе Vitek-1805 говорят, что для качественной влажной уборки лучше мочить тряпочку вручную.
робот приходится несколько раз перезапускать в одной и той же комнате, чтобы добиться чистоты.
иногда робот-пылесос Витек-1805 теряет связь с базой и не может её найти.
отсутствует пульт управления.
маленький объём мешка для пыли.
не убирает мелкий мусор.
ненадёжный пластик.
Вердикт
Модель Витек VT-1805 не соответствует заявленным характеристикам. Качество уборки, как отмечают пользователи, не на высоте. Раньше стоимость этого устройства составляла 30 тыс. рублей, но даже нынешняя цена не оправдывается его возможностями. Вероятно, наиболее подходящая стоимость для робота-пылесоса Vitek-1805 при учёте его качества могла бы составить 10 тыс. рублей.
Однако у него есть и некоторые плюсы. Например, наличие гарантии и сервиса, поскольку Vitek – это российская фирма, которая на контрактной основе производит бытовую технику, климатическое оборудование, аудио- и видеотехнику в Китае. На этом все достоинства данного робота-пылесоса заканчиваются.
Прочитайте «Гид для начинающего роботовладельца: как выбрать робот-пылесос». Наш эксперт простым и понятным языком объясняет на что в первую очередь обратить внимание, какие характеристики второстепенны, и как не идти на поводу у маркетологов.
Рейтинг лучших моделей роботов-пылесосов
Комплектация
В комплект поставки входит:
- робот-пылесос;

- зарядная станция;
- сетевой адаптер;
- боковые щетки (3 шт., одна запасная);
- резервуар для воды;
- насадка для влажной уборки пола;
- магнитная лента;
- инструкция.

Внимание! Лучший робот-пылесос по мнению редакции нашего сайта! Читать подробный обзор 👈
Внешний вид
Робот-пылесос Vitek VT-1805 имеет стандартную для таких устройств круглую форму. Его диаметр составляет 32,5 см, а высота – 8 см, что позволяет ему без проблем заезжать под диваны и кресла. Вес устройства составляет 3 кг.
Данная модель представлена в одном цвете – бело-голубой корпус с серебристыми кнопками и черным бампером. Материал корпуса – алюминий и пластик. Оформление гаджета минималистичное, не перегруженное лишними кнопками и экранами.

При взгляде на устройство сверху можно увидеть логотип компании и кнопку включения. В конструкции робота-пылесоса Витек-1805 есть одна основная турбощетка для уборки, а также две дополнительные боковые щеточки для выметания пыли из углов и из-под плинтусов. Есть место для насадки из микрофибры для влажной уборки.
Робот легко перемещается в пространстве квартиры с помощью двух ведущих колёс и опорного ролика.
Функциональные возможности
Данный робот-пылесос – воплощение всех базовых функций, которые могут предложить покупателю производители подобной техники.
В этой модели имеется 11 датчиков, позволяющих устройству ориентироваться в пространстве и объезжать большинство препятствий. Также в него встроена одна инфракрасная камера. В сочетании со специальной магнитной лентой, входящей в комплект, она позволяет создать виртуальную стену, дальше которой пылесос не проедет. Датчики помогают технике вовремя останавливаться перед ступеньками.

Для робота можно выбрать один из четырех маршрутов движения: обычный, вдоль стен, по кругу или по заданной траектории. Гироскопическая система навигации позволяет пылесосу поворачиваться с высокой точностью и сохранять правильную траекторию движения. Заметив ковер, пылесос автоматически начинает работать мощнее, чтобы улучшить качество уборки.
Если помощник столкнется с какими-то трудностями в процессе уборки, то он оповестит об этом с помощью звукового сигнала на русском языке. В настройках можно выбрать дни и часы, когда гаджет должен будет проводить уборку.
Внимание! Vitek-1805 робот-пылесос имеет низкий уровень шума. Для этой модели он составляет 65дБ.
Приложение
Робот-пылесос Витек-1805 можно запустить дистанционно. Например, с работы, чтобы к приходу владельца пылесос успел убраться и вернуться на подзарядку. Для этого достаточно будет установить приложение. Своего собственного программного обеспечения производителем не предусмотрено, но можно использовать Tuya Smart App. Существует версия для iOS и Android.
Влажная уборка
Нужно понимать, что влажная уборка не заменит обычное мытье полов. Однако поддерживать квартиру в опрятном виде эта функция позволит. Особенно она актуальна для квартир, в которых содержатся животные, есть маленькие дети или живут аллергики. Как гласят отзывы покупателей на робот-пылесос Vitek VT-1805, эта функция работает исправно, хотя и с оговорками.
Внимание! Эксперты нашего сайта подготовили подробный гид для начинающего роботовладельца — как выбрать робот-пылесос. Читайте здесь 👈
Технические характеристики
|
Уборка |
сухая и влажная |
|
Высота преодолеваемых препятствий |
до 1 см |
|
Объём контейнера для сбора мусора |
500 мл |
|
Объем бака для воды |
100 мл |
|
Габариты |
32,5*8*8 см |
|
Вес |
3 кг |
|
Время работы |
120 мин |
|
Время подзарядки |
5 часов |
|
Скорость вращения щетки |
130 об/мин |
Инструкция по эксплуатации
В комплектацию робота-пылесоса Vitek VT-1805 входит инструкция по эксплуатации на русском и английском языках. В руководстве есть полное описание из чего состоит робот-пылесос, а также рекомендации по правильному использованию гаджета.
Внимание! Купить роботы-пылесосы по самым лучшим ценам можно в интернет-магазине нашего партнера botmania.ru. Бесплатная доставка по всей России!
Несмотря на то, что производитель характеризует свой гаджет как бюджетный продукт, его цена достаточно ощутима. Если оценить отзывы на робот-пылесос Витек-1805, то можно прийти к выводу, что данный гаджет не оправдывает обещаний производителей и ожиданий покупателя. Лучше присмотреть какую-то другую модель в той же ценовой категории. Наша рекомендация – iPlus L100.
Видео обзор
От автора

Николай Семенов
Приветствую! Меня зовут Николай Семенов. Более 5 лет работал продавцом консультантом в известной торговой сети. На данный момент занимаюсь ремонтом бытовой техники и пишу статьи для сайта robotratings.ru на основе своего опыта. Каждая статья написана мной лично и основана на собственном опыте работы с роботами-пылесосами.
17 марта 2020
Table of Contents: Vitek VT-1805 Vacuum Cleaner Owner’s Manual
-
Vitek VT-1805 1 2 9 VT-1805 Robotic vacuum cleaner Робот-пылесос Инструкция по использованию программы TUYA SMART APP IM VT-1805_2_3.indd 1 10/8/19 12:22 PM
-
6 ENGLISH Step 20 1. When you press the “AUTO” icon, the vacuum cleaner will switch on and start cleaning in the automatic mode. 2. The schematic movement of the vacuum cleaner during cleaning will be shown on the smartphone display. Step 21 1. When you press the “SPOT” icon, the vacuum cleaner will start cleaning the room moving in a spiral. 2. Set the vacuum cleaner where you need it and press the spiral cleaning mode button “SPOT”. 3. Schematic movement of the vacuum cleaner during cleaning will be shown on the smartphone display. Step 22 1.
-
Vitek VT-1805 14 РУССКИЙ Шаг 25 При нажатии на символ «Timer», откроется вкладка для установки временных интервалов работы пылесоса. Шаг 26 Установите время включения пылесоса и нажмите «Повторить» «Один раз». Шаг 24 При нажатии на символ «Find», пылесос будет отвечать звуковым сигналом, таким образом, вы можете быстро найти пылесос. Шаг 27 Вы може�
-
Vitek VT-1805 9 РУССКИЙ ИНСТРУКЦИЯ ПО ИСПОЛЬЗОВАНИЮ ПРОГРАММЫ Tuya Smart APP Tuya Smart APP – интеллектуальное приложение для дома, разработанное для платформ Android и IOS. Издатель приложения Tuya Smart APP, предоставил программное обеспечение и техническую поддержку пользовате- лей. Для ознакомления и правилами предоставления данного приложения, пож
-
GB A production date of the item is indicated in the serial number on the technical data plate. A serial number is an eleven-unit number, with the first four figures indicating the production date. For example, serial number 0606ххххххх means that the item was manufactured in June (the sixth month) 2006. RUS Дата производства изделия указана в серийном номере на табличке с техническими данными. Серийный номер предста
-
Vitek VT-1805 3 E N G L I S H Step 6 Enter the received confirmation code. Step 4 Press “continue”. Step 7 Make up a password for logging in the Tuya Smart app. Step 5 You can select your country of residence. Step 8 Create your virtual home. Step 9 Select smart devices in the various rooms of your home. IM VT-1805_2_3.indd 3 10/8/19 12:22 PM
-
Vitek VT-1805 11 РУССКИЙ Шаг 12 Добавьте умное устройство. Шаг 10 Введите название дома. Шаг 13 Выберите раздел мелкая бытовая техника и выберите пылесос-робот. Шаг 11 Завершите создание дома. Шаг 14 1. Убедитесь, что ваш смартфон имеет устойчивое соединение с сетью WI-FI. 2. Включите режим сопряжения п�
-
Vitek VT-1805 15 РУССКИЙ Шаг 30 На этой вкладке будет отображаться время и дата включения пылесоса. Шаг 31 На этой вкладке будет отображаться информация о ресурсе элементов пылесоса и расходных материалов. Шаг 32 На вкладке «Информация об устройстве», вы можете ввести необходимые данные и использовать их в качеств
-
10 РУССКИЙ Шаг 6 Введите полученный код подтверждения. Шаг 4 Нажмите продолжить. Шаг 7 Придумайте пароль для входа в приложение «Tuya Smart». Шаг 5 Вы можете выбрать свою страну проживания. Шаг 8 Создайте свой виртуальный дом. Шаг 9 Выберите умные устройства в различных комнатах дома. IM VT-1805_2_3.indd 10 10/8/19 12:22 PM
-
Vitek VT-1805 13 РУССКИЙ Шаг 20 1. При нажатии на символ «AUTO», пылесос включится и начнёт уборку помещения в автоматическом режиме. 2. Схематичное движение пылесоса во время уборки будет отображаться на дисплее смартфона. Шаг 21 1. При нажатии на символ «SPOT», пылесос будет убирать помещение, дви
-
Vitek VT-1805 2 ENGLISH Tuya Smart APP SOFTWARE INSTRUCTION MANUAL Tuya Smart APP is a smart home applica- tion developed for Android and IOS plat- forms. Tuya Smart APP developer provides the software and technical support for users. Please read the user agreement to learn about the terms of provision of this appli- cation. – Your device must support Android 4.0 / IOS 7.0 or later versions. – Make sure that your smartphone or tab- let has stable connection with a Wi-Fi, 3G or 4G network. – Yo
-
Vitek VT-1805 8 ENGLISH Step 30 This tab will show the time and date of the vacuum cleaner switching on. Step 31 This tab will show the information about the service life of the vacuum cleaner components and consumables. Step 32 You can enter the necessary data in the “Information about the device” tab and use it for reference or delete unnecessary devices. RECYCLING For environment protection do not throw out the unit and the batteries (if included), do not discard the unit and the batteries with usual househo
-
Vitek VT-1805 4 ENGLISH Step 12 Add a smart device. Step 10 Enter the name for your home. Step 13 Select the small appliances section and select the robotic vacuum cleaner. Step 11 Finish creating the home. Step 14 1. Make sure that your smartphone has a stable connection with a WI-FI network. 2. Switch on the vacuum cleaner WI-FI connection mode. 3. In the standby mode (orange light color), press and hold the start/stop button on the vacuum cleaner body for 3 seconds, you will hear a sound signal and the light will go out.
-
5 E N G L I S H Step 15 Select a WI-FI network and enter the password to connect to the network. Press “Confirm”. Step 16 The device search will start. Step 17 After the device is found, press “Finish”. Step 18 The device is found, you can switch it on or off. For the voice control, we make an improvement, the sound indication can be turned on/off via tuya App, by pressing «Mute». Step 19 1. When you press the “Manual” icon, the vacuum cleaner manual control panel will open. 2. You can see the vacuum cleaner oper
-
7 E N G L I S H Step 25 Pressing the “Timer” icon will open the tab for setting the operation time of the vacuum cleaner. Step 26 Set the vacuum cleaner switch-on time and press “Repeat” “Once”. Step 24 When you press the “Find” icon, the vacuum cleaner will respond with a sound signal, so that you can find it quickly. Step 27 You can select the day of vacuum cleaning. Step 28 Select the cleaning mode on the “Mode” tab and confirm it. Step 29 Switch to the “Add timer”
Questions, Opinions and Exploitation Impressions:
You can ask a question, express your opinion or share our experience of Vitek VT-1805 device using right now.