
-
Инструкции по эксплуатации
1

Samsung RCD-S75 инструкция по эксплуатации
(33 страницы)
- Языки:Русский
-
Тип:
PDF -
Размер:
1.53 MB -
Описание:
Акустическая система
Просмотр
На NoDevice можно скачать инструкцию по эксплуатации для Samsung RCD-S75. Руководство пользователя необходимо для ознакомления с правилами установки и эксплуатации Samsung RCD-S75. Инструкции по использованию помогут правильно настроить Samsung RCD-S75, исправить ошибки и выявить неполадки.
Выберите свое местоположение и язык.
Руководства Samsung RCD-S75 Размер файлов: 7635 KB, Язык: English, Формат: pdf, Платформа: Windows/Linux, Дата: 2015-12-23
На данной странице вы можете скачать руководства Samsung RCD-S75. Мы предлагаем вам ознакомиться с руководством пользователя, инструкцией по сервисному обслуживанию и ремонту.
Также здесь вы найдете список заказных номеров на комплектующие Samsung RCD-S75.
Все файлы предоставляются исключительно в ознакомительных целях. И не являютя руководством по ремонту, а направлены лишь на то чтобы помочь вам более детально ознакомиться с принципом построения устройства.
Содержимое представленных здесь руководств требуют от вас знания технического английского языка.
Если вы собираетесь скачать руководство по сервисному обслуживанию Samsung RCD-S75, иными словами сервис мануал, вы дожны обладать хотя бы минимальными познаниями в области электроники и пониманием базовых принципов работы электромеханических устройств.
Для просмотра руководств вам понадобится Adobe Acrobat Reader версии 9 и выше либо другая программа для просмотра pdf файлов.
В связи с популярностью информации представленной на сайте и ее бесплатного предоставления конечному пользователю, убедительная просьба использовать специальные программные продукты для многопотокового скачивания файлов.
Руководства для Samsung RCD-S75
- Руководство пользователя (User manual)
- Руководство по сервисному обслуживанию (Service manual)
- Руководство по ремонту (Repair manual)
- Перечень комплектующих (PartList)
More products and manuals for CD players Samsung
| Models | Document Type |
|---|---|
|
MAX-ZS950 |
User Manual
26 pages |
|
MAX-ZJ550 |
User Manual
24 pages |
|
RCD-Y95 |
Instruction Manual
33 pages |
|
MAX-C570 |
User Manual
24 pages |
|
MM-C6DAB |
Instruction Manual
15 pages |
|
Z-300M |
User Manual
132 pages |
|
MCD-CF570 |
User Manual
18 pages |
|
MCD-CM300 |
User Manual
18 pages |
|
RCD-S70S |
User Manual
17 pages |
|
RCD-S70B |
User Manual
33 pages |
|
MCD-SM55 |
Instruction Manual
13 pages |
|
MM-E320 |
User Manual
15 pages |
|
MCD-HM920H |
Technical Information
12 pages |
|
MCD-CF570 |
User Manual
18 pages |
|
Z-530M |
Specifications
25 pages |
|
MM-C330 |
User Manual
27 pages |
|
HT-TZ212 |
User Manual
2 pages |
|
MAX-G85 |
User Manual
24 pages |
|
MM-ZL7 |
Instruction Manual
24 pages |
|
MAX-A66 |
User Manual
24 pages |


![]()
CD CASSETTE
CD-R/RW PLAYBACK
RCD-S70/75
Instruction Manual
Before operating the unit, please read this manual throughly and
retain it for future reference.
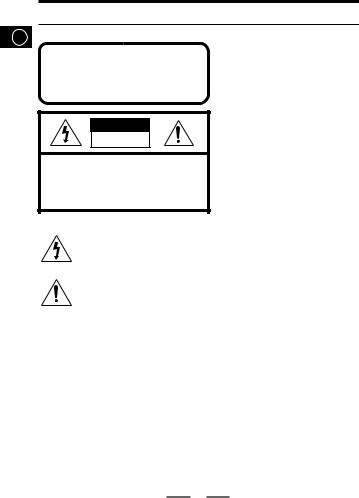
Safety Warnings
GB
CLASS 1 LASER PRODUCT
KLASSE 1 LASER PRODUKT
LUOKAN 1 LASER LAITE
KLASS 1 LASER APPARAT
PRODUCTO LASER CLASE 1
CAUTION
RISK OF ELECTRIC
SHOCK. DO NOT OPEN
Use of controls, adjustments or performance of procedures other than those specified herein may result in hazardous radiation exposure.
CAUTION-INVISIBLE LASER RADIATION WHEN OPEN AND INTER LOCKS DEFEATED, AVOID EXPOSURE TO BEAM.
CAUTION:
TO REDUCE THE RISK OF ELECTRIC SHOCK, DO NOT REMOVE REAR COVER, NO USER SERVICEABLE PARTS INSIDE, REFER SERVICING TO QUALIFIED SERVICE PERSONNEL.
CLASS 1 LASER PRODUCT
This Compact Disc player is classified as a CLASS 1 LASER product.
This symbol indicates that dangerous voltage which can cause electric shock is present inside this unit.
This symbol alerts you to important operating and maintenance instructions accompanying the unit.
WARNING: To reduce the risk of fire or electric shock, do not expose this appliance to rain or moisture.
CAUTION: TO PREVENT ELECTRIC SHOCK, MATCH WIDE BLADE OF PLUG TO WIDE SLOT, FULLY
INSERT.
1

Contents |
|||
|
GB |
|||
|
………………………………………………………………………………………. |
|||
|
Safety Warnings |
1 |
||
|
■ |
Front Panel View ……………………………………………………………………………………….. |
3 |
|
|
■ |
Remote Control…………………………………………………………………………………………. |
4 |
|
|
■ |
Power Sources ………………………………………………………………………………………….. |
5 |
|
|
■ |
Setting the Clock ……………………………………………………………………………………….. |
6 |
|
|
Tuner |
|||
|
■ |
Listening to the Radio ……………………………………………………………………………….. |
7 |
|
|
■ |
Searching For and Storing the Radio Stations ……………………………………………. |
8 |
|
|
■ |
Selecting a Stored Station …………………………………………………………………………. |
9 |
|
|
■ |
Improving Radio Reception………………………………………………………………………… |
9 |
|
|
CD-Player |
|||
|
■ |
Listening to the Compact Disc…………………………………………………………………. |
10 |
|
|
■ |
Selecting a Track/+10 Function…………………………………………………………………. |
11 |
|
|
■ |
Searching for a Specific Music Passage………………………………………………….. |
12 |
|
|
■ |
Random Playback Function …………………………………………………………………. |
13 |
|
|
■ |
CD Repeat Function………………………………………………………………………………… |
14 |
|
|
■ |
Repeat A B Function……………………………………………………………………………… |
15 |
|
|
■ |
Programming the order of Playback ………………………………………………………….. |
16 |
|
|
Tape Deck |
|||
|
■ |
Listening to the Cassette………………………………………………………………………….. |
18 |
|
|
■ |
Various Functions for tape………………………………………………………………………… |
19 |
|
|
■ REV. Mode Function …………………………………………………………………………………… |
19 |
||
|
■ Selecting the side of a tape ………………………………………………………………………….. |
19 |
||
|
■ Tape Speed Function………………………………………………………………………………….. |
19 |
||
|
■ Tape Counter ……………………………………………………………………………………………. |
19 |
||
|
■ |
Copying a Cassette (Dubbing)………………………………………………………………….. |
20 |
|
|
■ |
Recording from Radio………………………………………………………………………………. |
21 |
|
|
■ |
Recording from CD………………………………………………………………………………….. |
22 |
|
|
Other Functions |
|||
|
■ |
CD Synchro Function ………………………………………………………………………………. |
23 |
|
|
■ |
Timer Function ………………………………………………………………………………………… |
24 |
|
|
■ |
Sleep Timer/Display Color………………………………………………………………………… |
26 |
|
|
■ |
Equalizer Mode ……………………………………………………………………………………….. |
27 |
|
|
■ |
Power Surround/Mute Function ………………………………………………………………… |
28 |
|
|
■ |
MIC Function(Option) ………………………………………………………………………………. |
29 |
|
|
Recommendations for Use |
|||
|
■ |
Precautions when using Compact Discs……………………………………………………. |
30 |
|
|
■ |
Maintaining the Sound Quality………………………………………………………………….. |
30 |
|
|
■ |
Before Contacting the After-Sales Service…………………………………………………. |
31 |
|
|
■ |
Specifications ………………………………………………………………………………………….. |
32 |
2

Front Panel View
GB
|
1 |
14 |
||
|
2 |
15 |
||
|
3 |
16 |
||
|
4 |
17 |
||
|
5 |
18 |
||
|
6 |
19 |
||
|
20 |
|||
|
7 |
|||
|
8 |
21 |
||
|
9 |
22 |
||
|
10 |
RCD-S70 |
||
|
11 |
23 |
||
|
12 |
24 |
||
|
25 |
|||
|
13 |
26 |
||
|
1. |
Skip or Search |
14. |
Tape Speed (refer to p.19) |
|
2. |
Program/Set (refer to p.16,17) |
15. |
Normal/High Dubbing (refer to p.20) |
|
3. |
Beat Cut (refer to p.21) |
16. |
Volume |
|
4. |
Function(TUNER/CD/TAPE) |
17. |
Display Color (refer to p.26) |
|
5. |
MO/ST (refer to p.9) |
18. |
REV. Mode (refer to p.19) |
|
6. |
Mode (refer to p.8) |
19. |
REC/Pause |
|
7. |
Random (refer to p.13) |
20. |
Deck A/B (refer to p.18) |
|
8. |
CD Repeat (refer to p.14) |
21. |
3 Mode EQ (refer to p.27) |
|
9. |
STOP |
22. |
P. SURR (refer to p.28) |
|
10. |
Clock/Timer (refer to p.6, p.24) |
23. |
Repeat A↔B (refer to p.15) |
|
11. |
Timer On/Off (refer to p.25) |
24. |
Sleep (refer to p.26) |
|
12. |
Standby/On |
25. |
Open/Close |
|
13. |
Phones (refer to p.29) |
26. |
Mic (refer to p.29) |
3
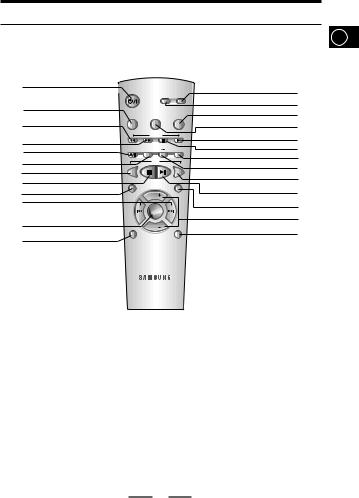
Remote Control
Surround Mute
|
2 |
Sleep |
Counter |
EQ |
|
|
Reset |
||||
|
3 |
||||
|
TAPE |
||||
|
4 |
REC/Pause |
Repeat |
||
|
5 |
CD SYN A |
B |
Deck A/B |
|
|
6 |
CD |
|||
|
7 |
||||
|
8 |
Repeat |
+10 |
||
|
9 |
Program/ |
VOL. |
Random |
|
|
10 |
Set |
|||
|
Mode |
||||
|
11 |
VOL. |
|||
|
12 |
Mono/ST |
Band |
GB
13
14
15
16
17
18
19
20
21
22
23
24
25
1.Standby/On
2.Sleep (refer to p.26)
3.Tape Rewind
4.Tape Fast-Forward
5.REC/Pause
6.CD Synchro (refer to p.23)
7.CD Repeat (refer to p.14)
8.CD Stop
9.Program/Set (refer to p.16, p.17)
10.Skip or Search
11.Mode (refer to p.8)
12.Mono/ST (refer to p.9)
13.Mute (refer to p.28)
14.Power Surround (refer to p.28)
15.EQ (refer to p.27)
16.Tape Counter Reset (refer to p.19)
17.Tape Play
18.Tape Stop
19.Deck A/B (refer to p.18)
20.Repeat A↔B (refer to p.15)
21.CD+10/Tape Speed (refer to p.11, p.19)
22.CD Play/Pause
23.Random (refer to p.13)
24.Volume
25.Band (refer to p.7)
4
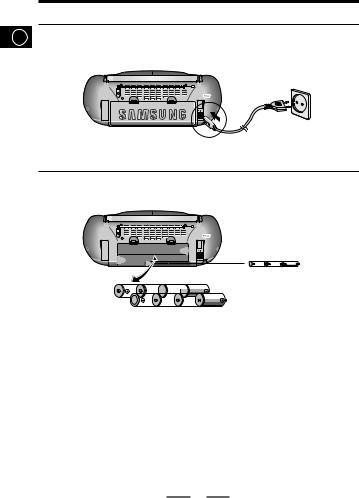
Power Sources
GB House Current
■ 1 to AC IN
230V
■ 2 to wall outlet
■ AC power cord (supplied)
Batteries
CLOCK BATTERY
4.5V; AA,Size X 3
12V ; D, R20, size X 8
For critical recordings or disc playing
Operating the unit using the AC power is recommended.
Note: ■ If the battery power is low, «BATT-LOW» will be displayed during playback and the playback will stop.
■The unit will not operate from the internal batteries while the AC power cord is connected to the unit.
■Be sure to install batteries (“AA” x 3) to prevent the program preset in the memory and the active countdown of the Timer from being cleared accidently in case of power failure of disconnection of the power cord.
5
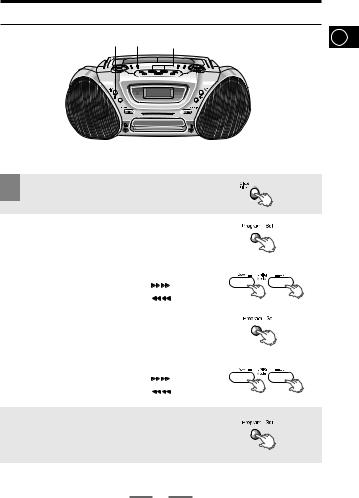
For each step, you have a few seconds to set the required options. If you exceed this time, you must start again.
1 Press Clock /Timer twice. Result: CLOCK is displayed.
|
2 |
Press Program/Set. |
|||||||
|
Result: The hour flashes. |
||||||||
|
3 |
IncreaseTo… |
Press… |
||||||
|
the hours |
||||||||
|
Decrease the hours |
||||||||
|
4 |
When the correct hour is displayed, |
|||||||
|
press Program/Set. |
||||||||
|
Result: The minutes flash. |
||||||||
|
5 |
IncreaseTo… |
the minutes |
Press… |
|||||
|
Decrease the minutes |
||||||||
|
6 |
When the correct time is displayed, press |
|||||||
|
Program/Set. |
Result: The clock starts and is displayed, even when the system is in standby mode.
 You can display the time, even when you are using another function, by pressing Clock/Timer once.
6
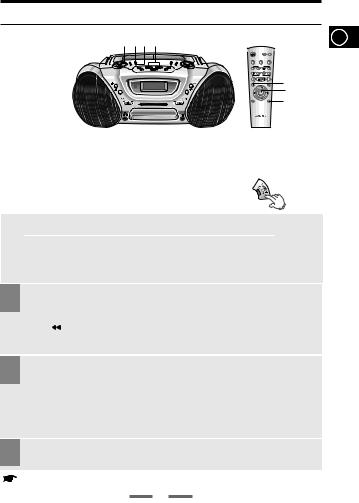
Listening to the Radio
GB
1 2 3
Power
Surround Mute
|
TAPE |
|||
|
REC/Pause |
CD SYN |
Repeat |
Deck A/B |
|
A |
B |
|
Program/ |
VOL. |
Random |
3 |
|
Set |
|||
|
Mode |
|||
|
VOL. |
1 |
||
|
Mono/ST |
Band |
||
|
2 |
|
1 |
Select the required frequency band by pressing |
||||||||||||
|
TUNER/BAND. |
|||||||||||||
|
2 |
Press the TUNING( |
, |
) button. |
||||||||||
|
3 |
Press the Volume button. |
||||||||||||
To improve broadcast reception.
Reorient the antenna for FM.
Reorient the player itself for AM(MW) or LW(option).
For FM
For AM(MW) or LW (option)
7
Searching for and Storing the Radio Stations
|
1 |
4 2 3 |
GB |
|
Power |
||
|
Surround Mute |
||
|
Counter |
||
|
Sleep Reset EQ |
|
TAPE |
|||
|
REC/Pause |
CD SYN |
Repeat |
Deck A/B |
|
A |
B |
|
CD |
4 |
||
|
Repeat |
+10 |
||
|
Program/ |
VOL. |
Random |
2 |
|
Set |
|||
|
Mode |
|||
|
VOL. |
1 |
||
|
Mono/ST |
Band |
You can store up to:
|
15 FM stations |
15 FM stations |
|||||||||
|
8 MW stations |
(option) |
15 AM stations |
(option) |
|||||||
|
7 LW stations |
||||||||||
|
1 |
Select the required frequency band by pressing |
|||||||||
|
TUNER/BAND on the front panel or Band on the |
||||||||||
|
remote. |
||||||||||
|
2 |
To search for a |
Press Mode button |
||||||||
|
station… |
One or more times until MANUAL is displayed. |
|||||||||
|
Manually |
||||||||||
|
Automatically |
One or more times until AUTO is displayed. |
 PRESET function is explained in detail in the section “Selecting a Stored Station” on.
Select the station to be stored by:
 Pressing
 or
or 

 buttons to increase or decrease the frequency respectively.
 To scroll through the frequencies faster when searching manually, hold down the
  or
or 

 buttons.
 The automatic search procedure may stop on a frequency that does not correspond to a radio station. If this happens, use the manual search mode.
If you do not want to store the radio station found, revert to Step 3 and search for another station.
Otherwise:
a Press Program/Set.
Result: The MEMORY is displayed for a few seconds.
b Press 
 or
or 

 to assign a program number between 1 and 15.
cPress Program/Set to store the radio station.
Result: MEMORY is no longer displayed and the station is stored.
5 To store any other radio frequencies required, repeat Steps 3 to 4.
The PROGRAM function can be used to assign a new station to an existing program number.
8
Selecting a Stored Station
GB
1 2 3
Power
Surround Mute
|
TAPE |
|||
|
REC/Pause |
CD SYN |
Repeat |
Deck A/B |
|
A |
B |
|
CD |
3 |
||
|
Repeat |
+10 |
||
|
Program/ |
VOL. |
Random |
|
|
Set |
|
VOL. |
1 |
||
|
Mono/ST |
Band |
||
|
2 |
You can listen to a stored radio station as follows:
|
1 |
Select the required frequency band by pressing |
||||
|
TUNER/BAND on the front panel or Band on the |
|||||
|
remote control. |
|||||
|
2 |
Press Mode until “PRESET” is displayed. |
||||
|
Press |
, |
on the front panel or |
, |
on the remote control |
|
|
3 to select the required program. |
Mode
Improving Radio Reception
You can improve the quality of radio reception by:
 Rotating the FM or AM(LW, MW) aerial
If reception from a specific FM radio station is poor, press MO/ST on the front panel or Mono/ST on the remote control to swich from stereo mode to mono. The quality of the sound will be improved.
9

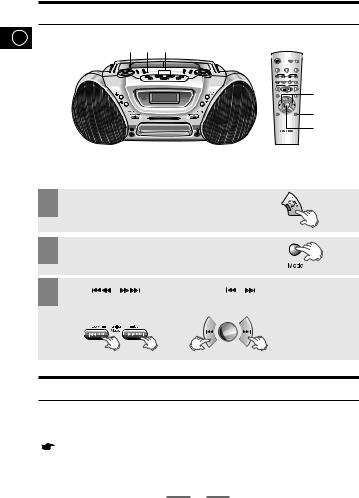
Listening to the Compact Disc
|
Power |
||
|
Surround |
Mute |
|
|
Sleep |
Counter |
EQ |
|
Reset |
||
|
TAPE |
||
|
REC/Pause |
Repeat |
|
|
CD SYN A B |
Deck A/B |
Select the CD function by pressing CD( 
 ).
).
Press the Open/Close(  ) button.
Result: The CD tray is opened.
Place the CD on the tray so that the CD label faces upward.
Press the Open/Close(  ) button to close the tray. Result: Number of tracks and the total playback time
are shown on the display.
Press the CD( 
 ) button for playback.
If it is desired to stop while the playback is processing, press the CD(
 ) button.
Press the CD( 
 ) button once again to playback again.
7 To stop playback, press the STOP (■) button.
10