
This article will explain the steps for importing and exporting data using the SQL Server Import and Export Wizard.
Depending on the options that are selected in the SQL Server Import and Export Wizard, some steps may be different than those described in this article.
For the purpose of this example, exporting data from the SQL Server database to an Excel file will be shown.
There are several ways to initiate the SQL Server Import and Export Wizard:
- Using the Start menu
- Using the Command prompt
- Using SQL Server Management Studio
- Using Visual Studio with SQL Server Data Tools
Start menu
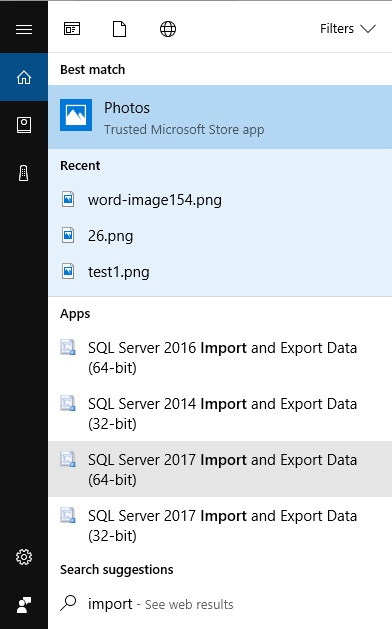
In the Start menu, type the word Import or Export and choose one of the offered:
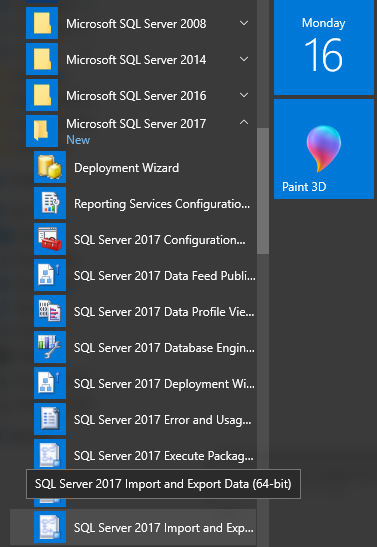
Or, in the Start menu under the Microsoft SQL Server 2017, choose one of the offered options:
- SQL Server 2017 Import and Export Data (32-bit)
- SQL Server 2017 Import and Export Data (64-bit)
Command prompt
In the Command prompt, type the following: C:\Program Files\Microsoft SQL Server\140\DTS\Binn\ DTSWizard.exe for the 64-bit version:
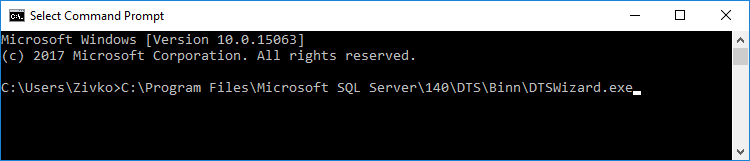
Or, type the following C:\Program Files (x86)\Microsoft SQL Server\140\DTS\Binn DTSWizard.exe for the 32-bit version.
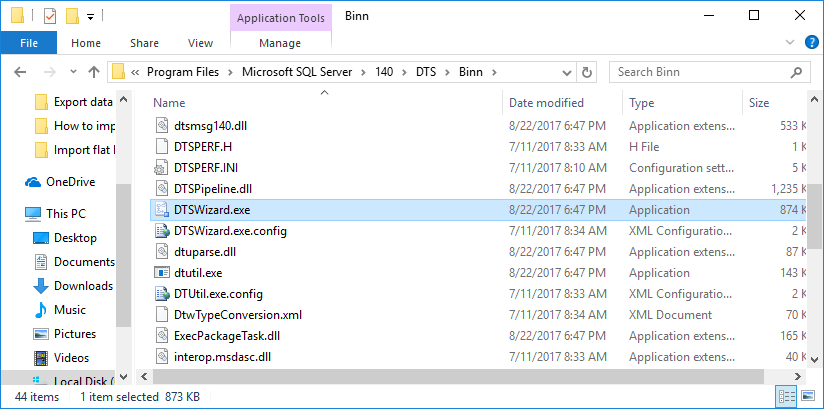
Or, go to above mentioned locations and, from there, run DTSWizard.exe:
SQL Server Management Studio (SSMS)
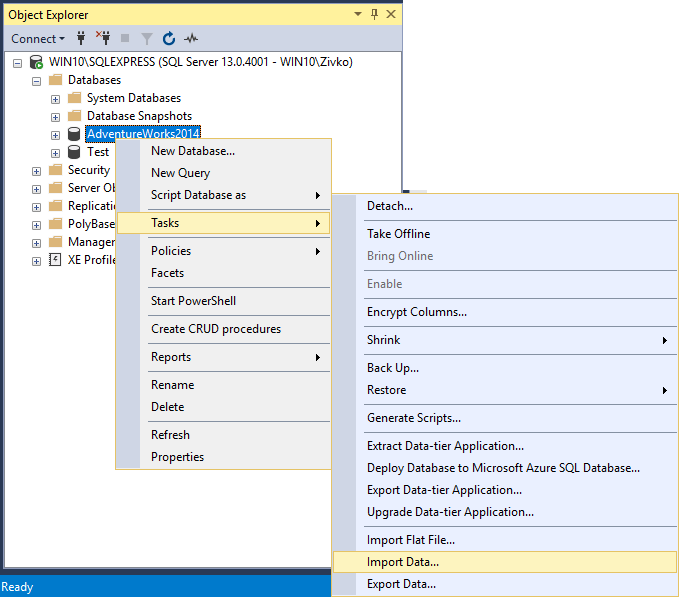
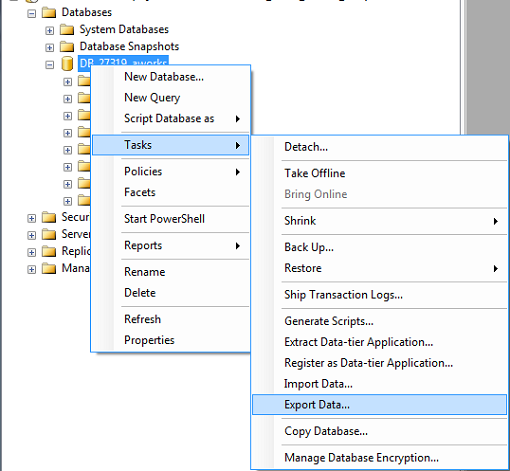
To start the SQL Server Import and Export Wizard using SSMS, go to Object Explorer, right click on a database for which want to export or import data; from the context menu under the Task sub-menu, choose the Import Data or Export Data option:
The latest version of SSMS can be downloaded from the Download SQL Server Management Studio (SSMS) page
SQL Server Data Tools (SSDT)
Another way to launch the SQL Server Import and Export Wizard is by using SQL Server Data Tools (SSDT) via Visual Studio.
SQL Server Data Tools (SSDT) can be downloaded from the Download SQL Server Data Tools (SSDT) page:
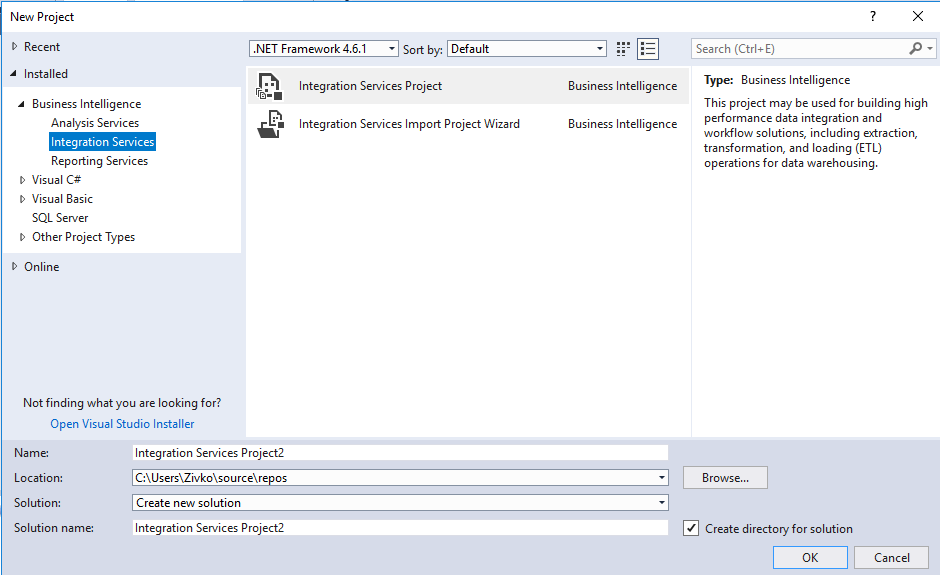
Under the Integration Services project:
Go to the Project menu and choose the SSIS Import and Export Wizard option:
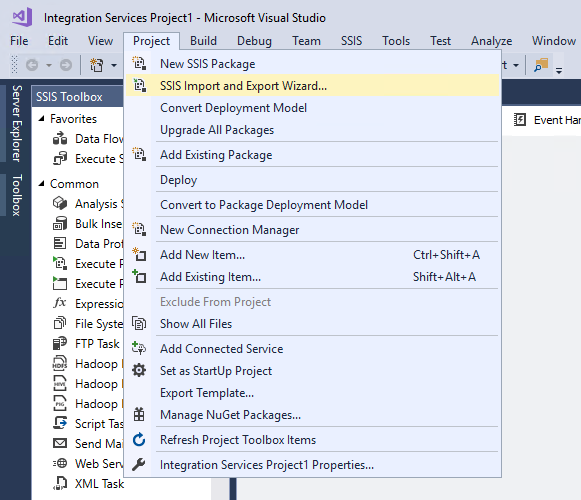
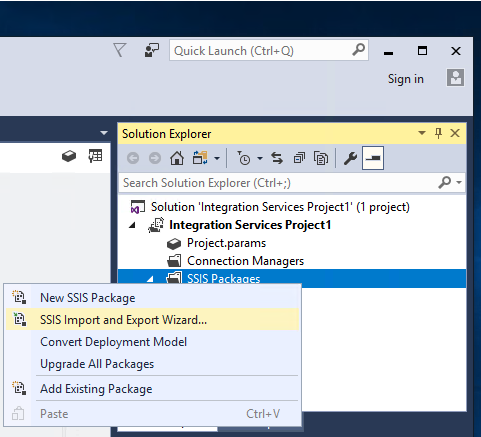
Or in Solution Explorer, right click the SSIS Packages folder and, from the context menu, choose the SSIS Import and Export Wizard option:
The common warning message that appears when using the SQL Server Import and Export Wizard is:
The operation could not be completed.
“ADDITIONAL INFORMATION:
The ‘Microsoft.ACE.OLEDB.12.0’ provider is not registered on the local machine. (System.Data)”
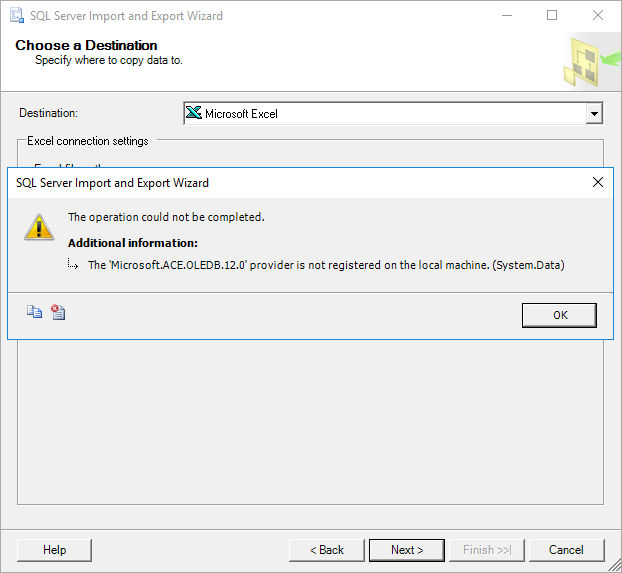
This happens because of the choice of the wrong version (32-bit or 64-bit) of the SQL Server Import and Export Wizard. For example, if exporting data from the 64-bit version of SQL Server and using the SQL Server Import and Export Wizard via SSMS which is 32-bit application and include 32-bit version of the SQL Server Import and Export Wizard and, because of that, the above warning message will appear. To resolve this, launch 64-bit version of the SQL Server Import and Export Wizard.
Bear in mind that SQL Server Data Tools (SSDT) is a 32-bit application, too.
Also, when the SQL Server Import and Export Wizard is used, make sure that you have adequate permissions, otherwise one of the following messages may appear:
More about necessary permissions in order to use the SQL Server Import and Export Wizard successfully can be found on this page
The SQL Server Import and Export Wizard uses SQL Server Integration Services (SSIS) to copy data. The SQL Server Import and Export Wizard creates an SSIS package in the memory while you set the options in the wizard. In the end, provide an option to save the SSIS package:
More about SSIS package can be found on the SQL Server Integration Services page.
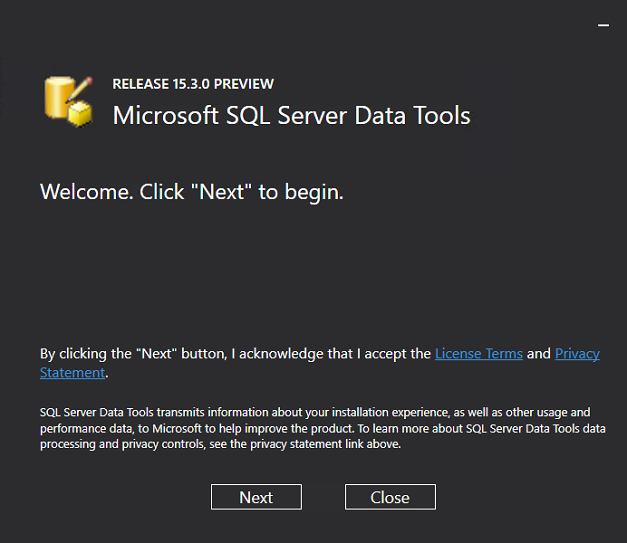
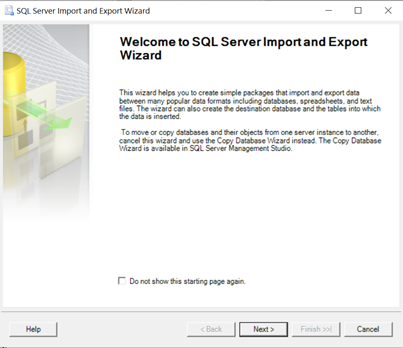
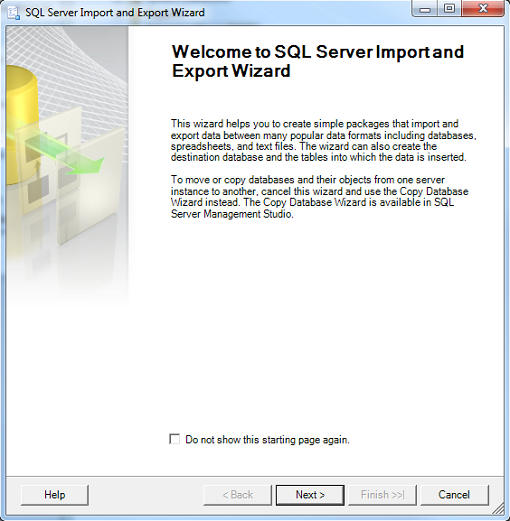
After launching the SQL Server Import and Export Wizard Welcome page, the following will appear:
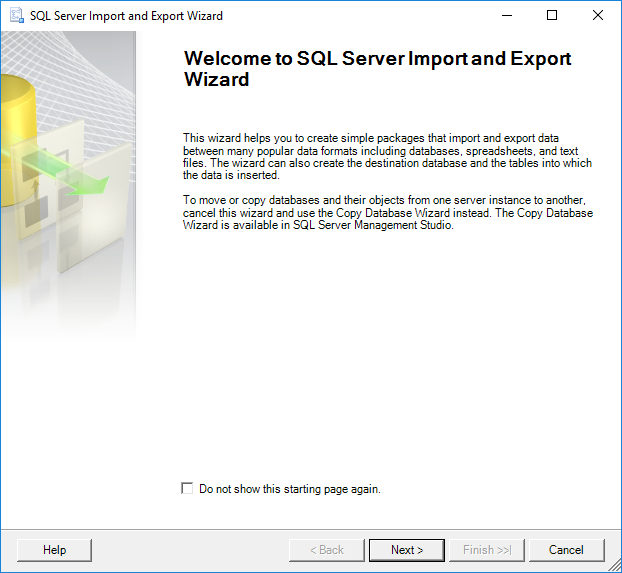
To prevent this page to appear next time when the SQL Server Import and Export Wizard is launched, check the Do not show this starting page again. checkbox.
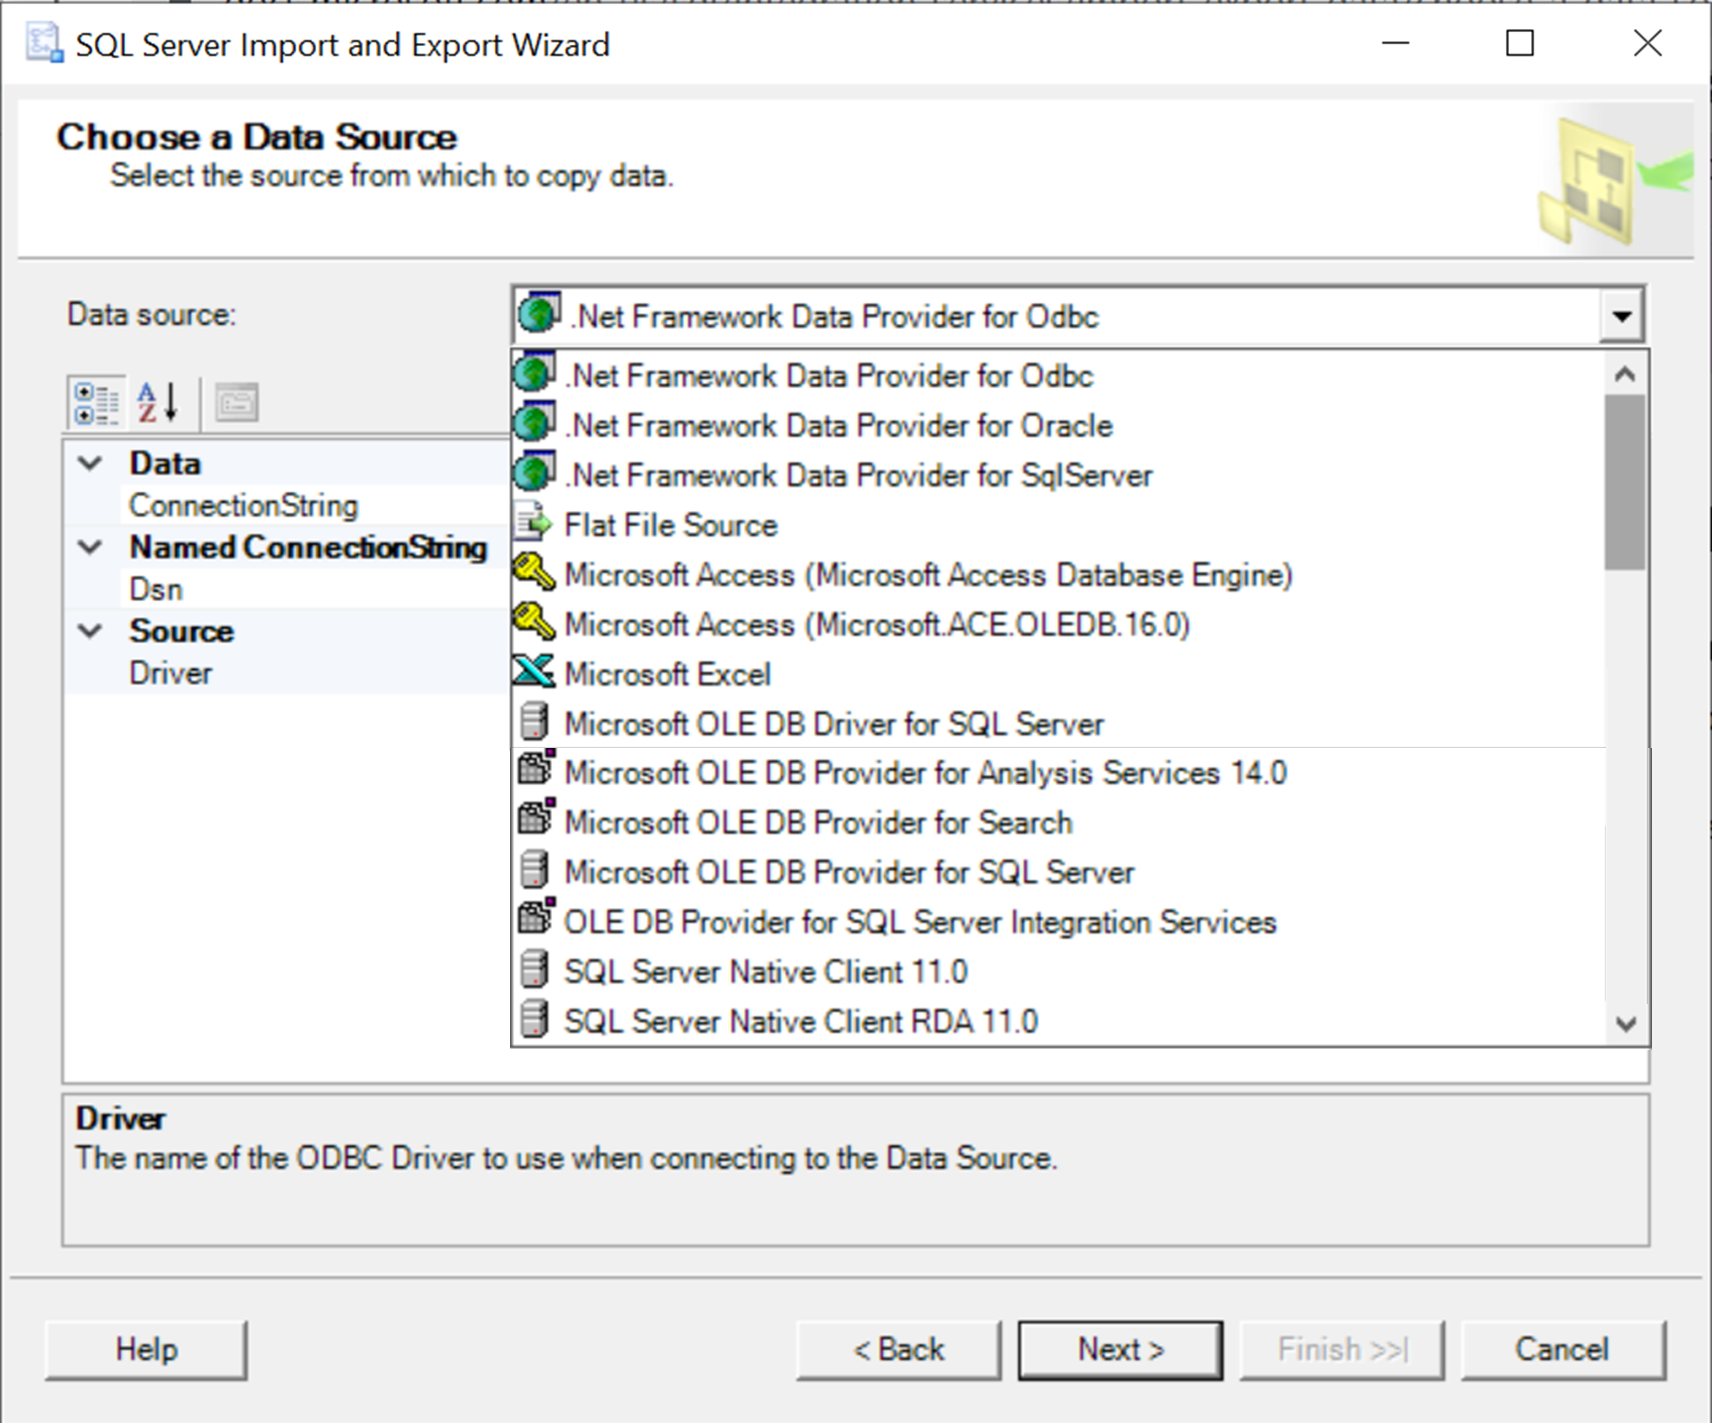
To proceed, click the Next button, the Choose a Data Source page will be shown:
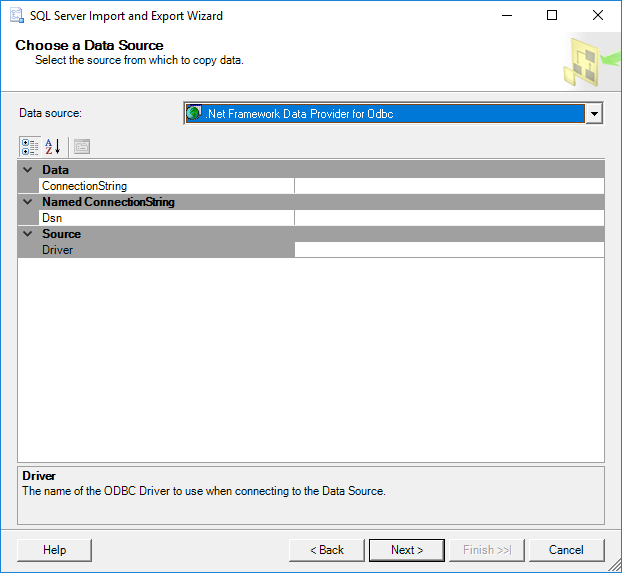
On this page, the info about data source and how to connect to the data source must be provided.
From the Data source combo box, select the data provider that will connect to the data source. The name of the data provider typically contains a name of the data source. For example, the data driver for connecting to SQL Server is SQL Server Native Client 11.0 or for connecting to the Excel files is Microsoft Excel etc.

The Data source combo box lists only the data providers that are installed on your machine. Also, if the 64-bit SQL Server Import and Export Wizard is used in the Data source combo box, won’t be listed installed 32-bit providers.
Pressing the F1 key from the keyboard while on any page of the SQL Server Import and Export Wizard will open the corresponding documentation for that page.
The same thing can be achieved by clicking the Help button on the SQL Server Import and Export Wizard pages:
Options that will be shown on the SQL Server Import and Export Wizard pages depend on the selected data source in the Data source combo box.
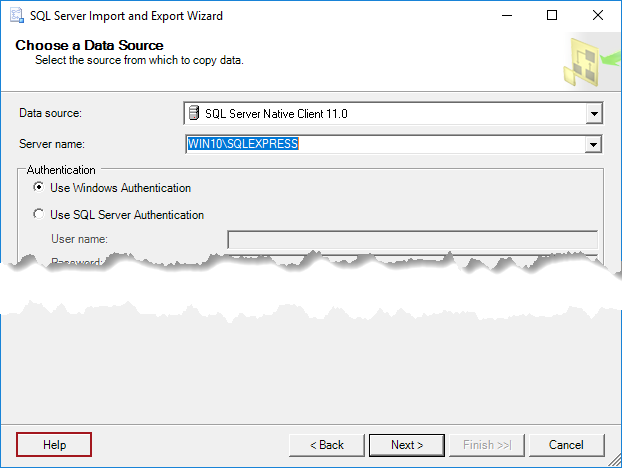
In our example, the SQL Server Native Client 11.0 provider will be used.
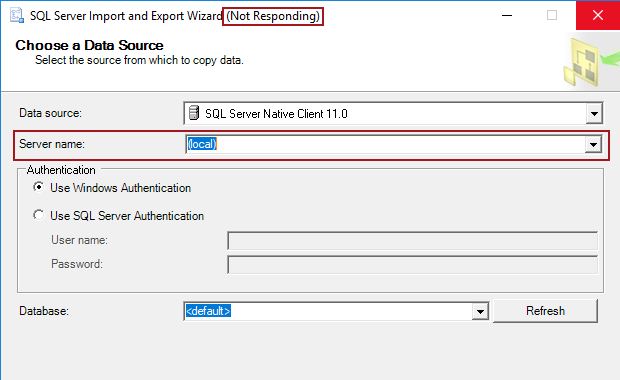
In the Server name combo box, select the SQL Server instance that contains the source data.
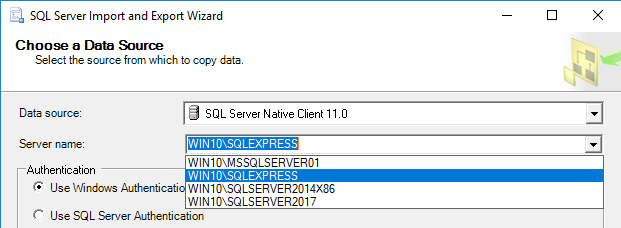
Note: If you are work with multiple servers or on a network, it is better to enter the name of the server instead to expand the combo box, because it may take a long time to list all available servers and it can cause the Not Responding state:
Under the Authentication part, choose how to connect to the data source, by using Windows or SQL Server authentication.
In the Database combo box, select a database from which want to export data:

When everything is set on the Choose a Data Source page, press the Next button to continue. The next page in the SQL Server Import and Export Wizard is the Choose a Destination page:
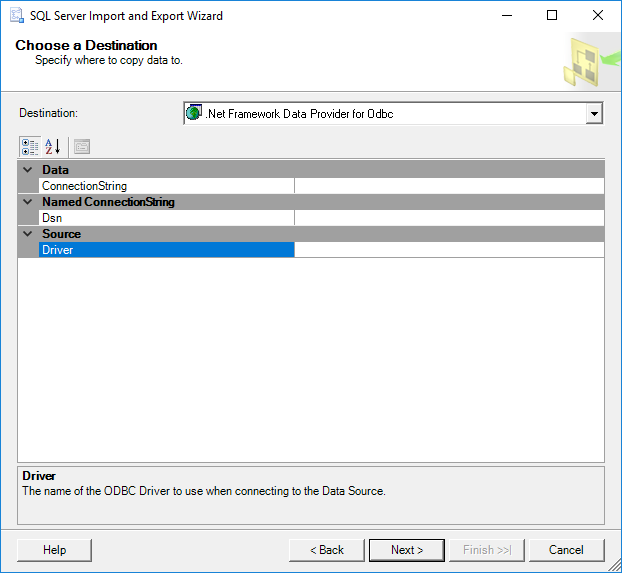
On this page, the information about where the data will be placed and how to connect to the destination must be provided.
To specify destination from the Destination combo box, select the provider that will import data to the destination.
A number of options that will be shown on this page depends of the selected provider in the Destination combo box.
For the purpose of this article, the Microsoft Excel provider will be selected in the Destination combo box for importing data to the Microsoft Excel file:
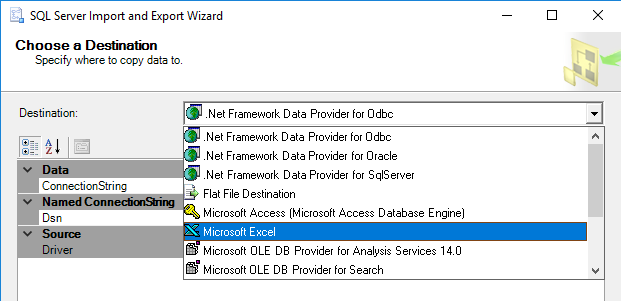
From the name of the provider, it can be determined which destination the provider is intended for. For example, the Microsoft Access (Microsoft Access Database Engine) provider is intended to import data to Microsoft Access, the .Net Farmworker Data Provider for Oracle is for importing the Oracle database, etc.
The Destination combo box lists only the data providers that are installed on your machine. Also, if the 64-bit SQL Server Import and Export Wizard is used in the Destination combo box won’t be listed installed 32-bit providers.
As soon as the provider is chosen in the Destination combo box, additional options for settings will appear.
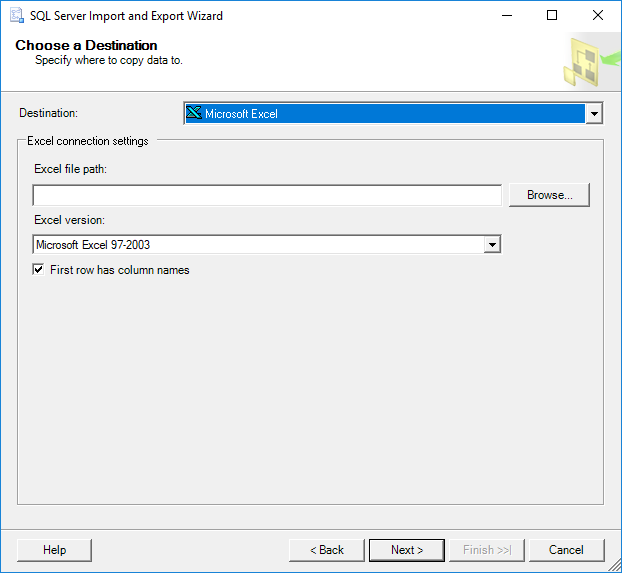
In the Excel file path box, type the destination to the Excel file, for example:
- For the destination on the local machine: C:\Users\Zivko\Desktop\ExportData.xlsx
- For the destination on the network: \\Example\Excel\ExportData.xlsx
Or use the Browse button on the Choose a Destination page to locate the Excel file:
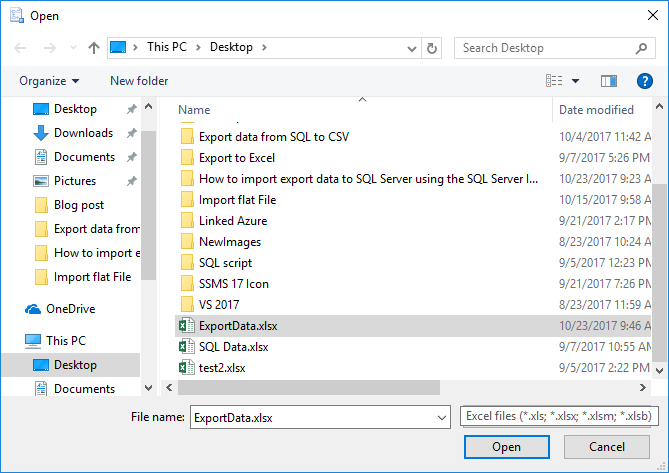
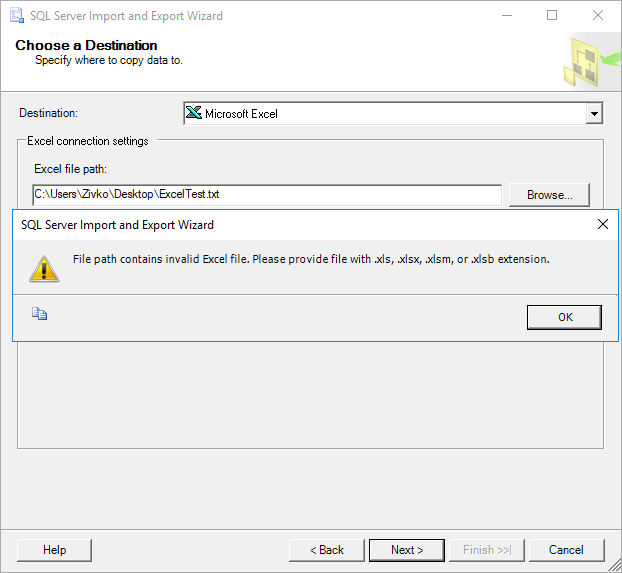
Using the Open dialog, other files rather than Excel can be selected, but when press the Next button on the Choose a Destination page, the following warning message will appear:
“File path contains invalid Excel file. Please provide file with .xls, .xlsx, .xlsm, or .xlsb extension.”
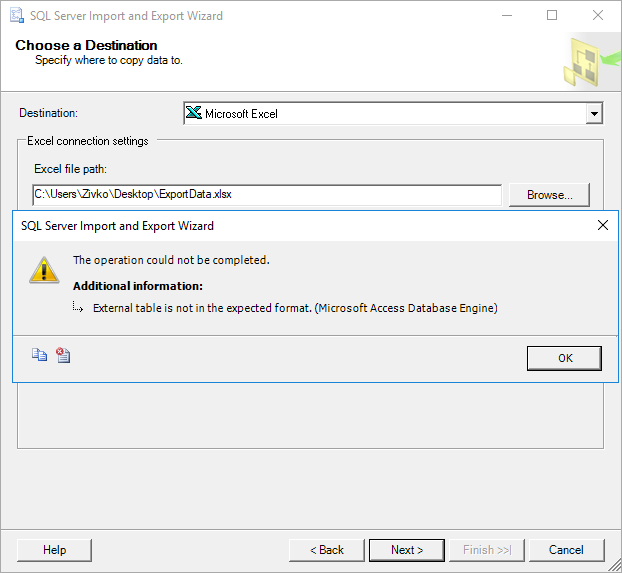
The SQL Server Import and Export Wizard does not support a password-protected Excel file. In case that password-protected Excel file is used, the similar warning message may appear:
“The operation could not be completed.
External table is not in the expected format. (Microsoft Access Database Engine)”
Under the Excel version combo box, choose the version of Excel for the Excel file.
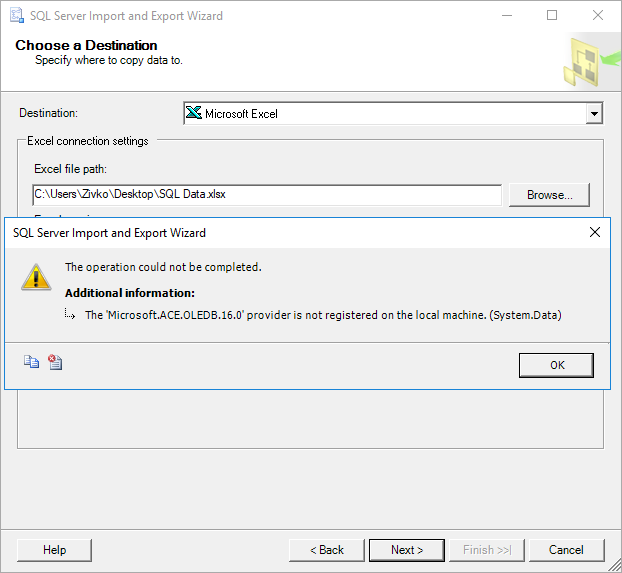
In some cases, an additional file must be installed in order to successfully connect to the Excel file, otherwise, the following warning message may appear:
“The operation could not be completed.
The ‘Microsoft.ACE.OLEDB.16.0’ provider is not registered on the local machine. (System.Data)”
The next page in the SQL Server Import and Export Wizard is the Specify Table Copy or Query page:
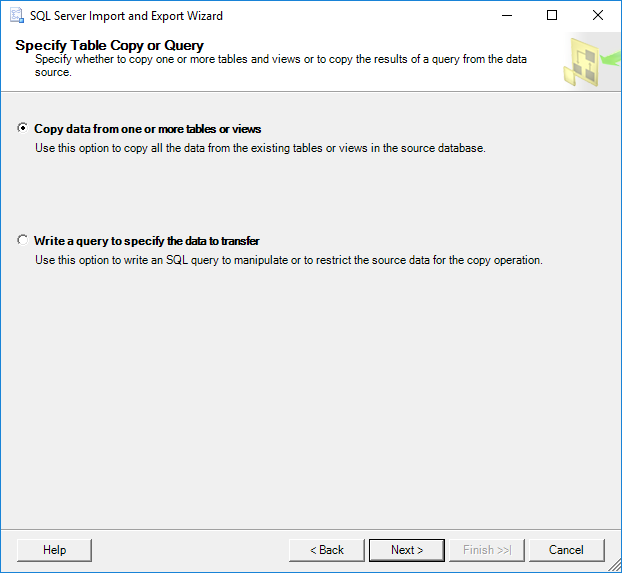
On this page, two radio buttons exist:
- Copy data from one or more tables or views
- Write a query to specify the data to transfer
The Copy data from one or more tables or views option is for copying all data from the existing tables or views in the source database.
The Write a query to specify the data to transfer option is for copying specific data from the source database by using a query.
To copy more than one database or database objects that are not tables and views, use the Copy Database Wizard instead of the SQL Server Import and Export Wizard.
Choose the Copy data from one or more tables or views or Write a query to specify the data to transfer radio button and click the Next button.
Copy data from one or more tables or views
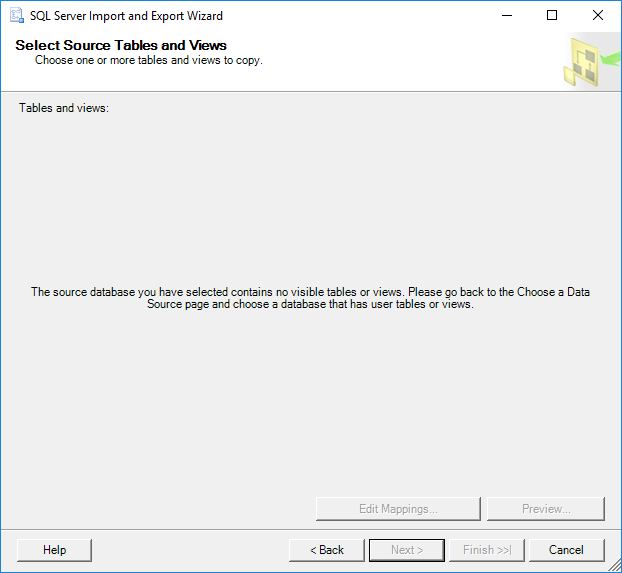
If the Copy data from one or more tables or views radio button is chosen, then, the next page in the SQL Server Import and Export Wizard will be the Select Source Tables and Views page:
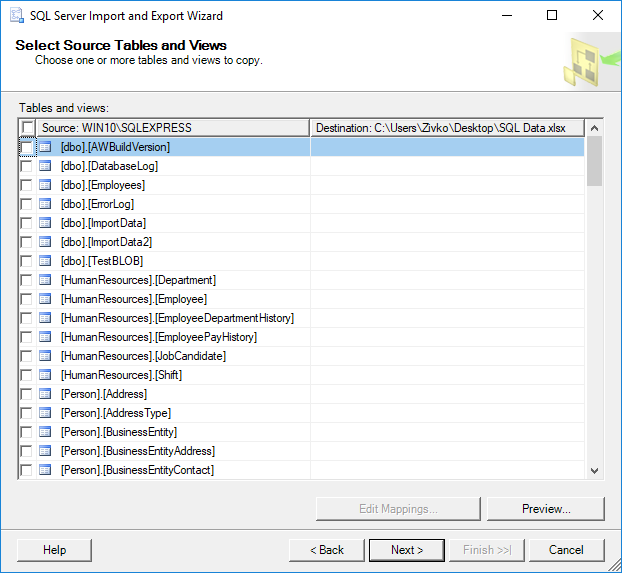
In the Tables and views grid under the Source column, all available views and tables from the AdventureWorks2014 database will be listed.
Use the check box next to the table/view to copy data from source to destination:
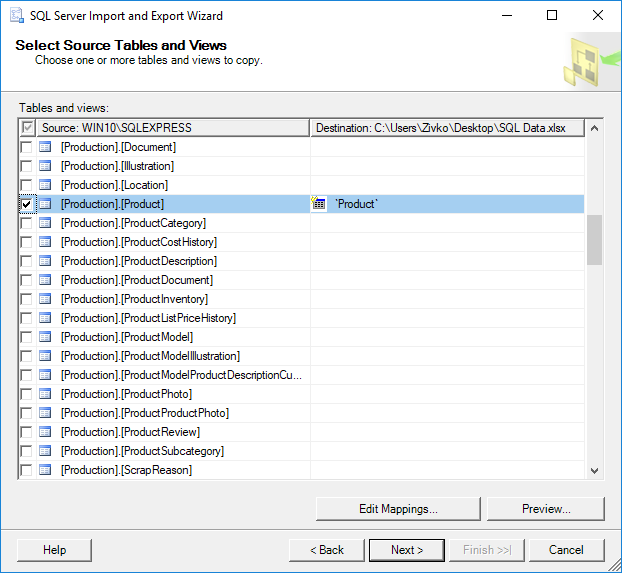
The name of the copied view/table in the Destination column can be changed by clicking on the name of the view/table:
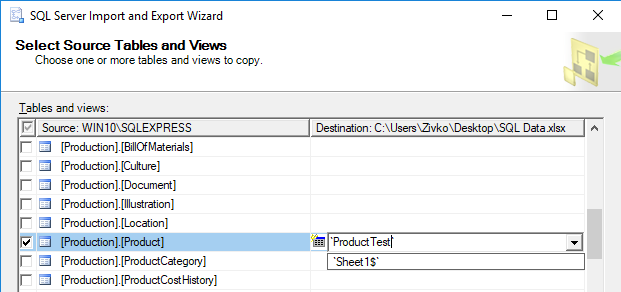
The name sets here will be used as the name of the worksheet in the Excel file:
By clicking the Edit Mappings button, the Column Mappings dialog will appear:
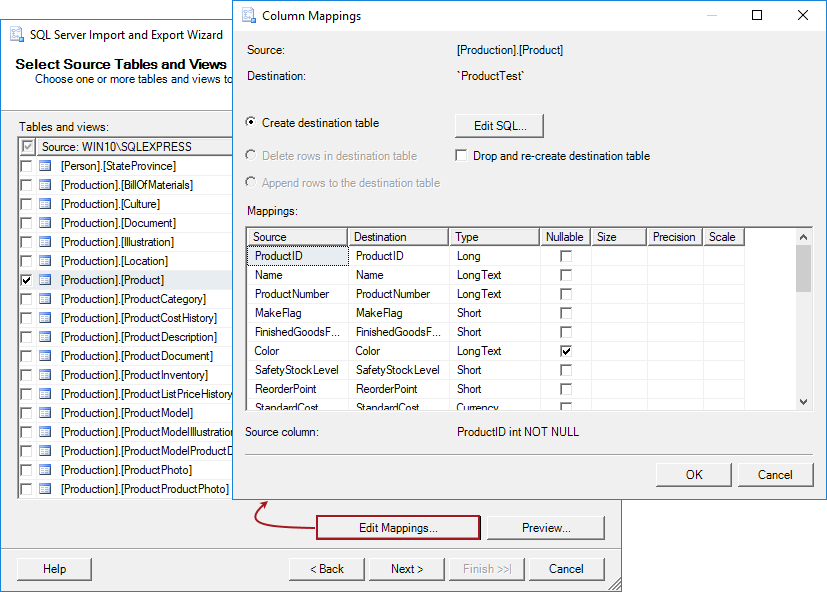
Here can be set additional options of how and which data will be exported.
At the beginning of the Column Mappings dialog, under Source, the name of the source query, view, or table is shown. In Destination, the name of the destination view or table is shown:
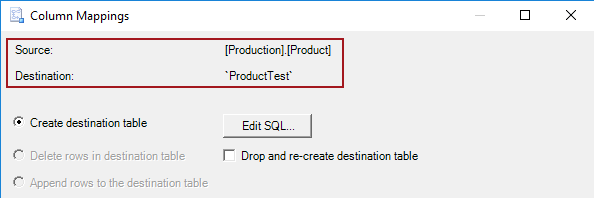
The Create destination table option, if the destination table does not exist, creates a new destination table (e.g. ProductTest).
When clicking the Edit SQL button, the Create Table SQL Statement dialog will appear:
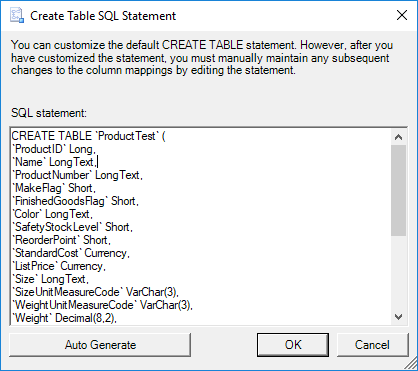
This box automatically generates the CREATE TABLE statement that can be modified/customized, more about this can be found on the Create Table SQL Statement page.
The Create destination table radio button and Edit SQL button are disabled if the destination name already exists:

If the destination name exists the Delete rows in destination table and Append rows to destination table radio buttons are enabled:
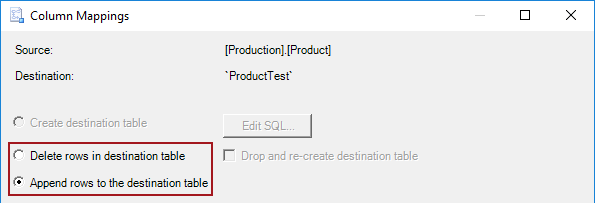
If the Delete rows in destination table radio button is selected, this will clear all data from the existing table/files before importing the new data.
If the Append rows to destination table radio button is selected, this will put the new data to the data that already exist to the destination table/file.
The Drop and re-create destination table checkbox is only enabled when the package that the SQL Server Import and Export Wizard creates is saved and then the package runes again.
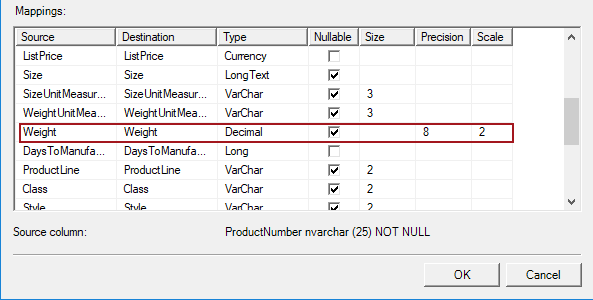
The Mappings section of the Column Mappings dialog shows the column of the data source and corresponding the columns in the destination:
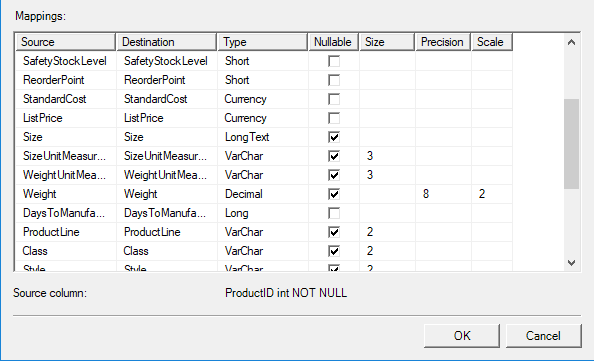
The Source column lists all columns from the source column.
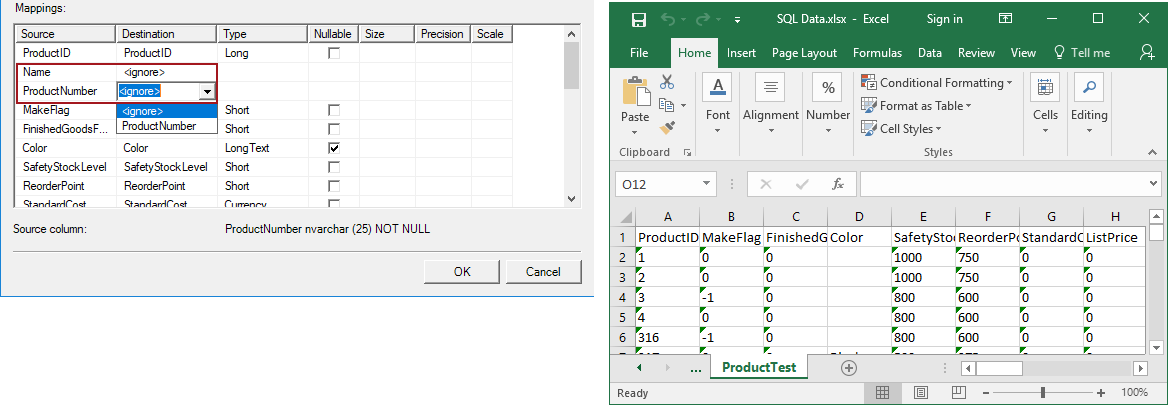
The Destination column lists the name of the mapped destination column. In this column, the column that you don’t want to import into destination file can be excluded by selecting the <ignore> item from the combo box:
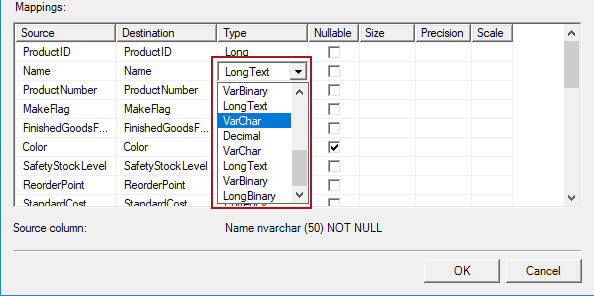
The Type column shows the data type for the destination columns. The data type can be changed by selecting other type from the combo box:
In the Nullable column, it can be specified whether the destination column allowed a null value or not.
In the Size column, the size of the destination column can be specified:
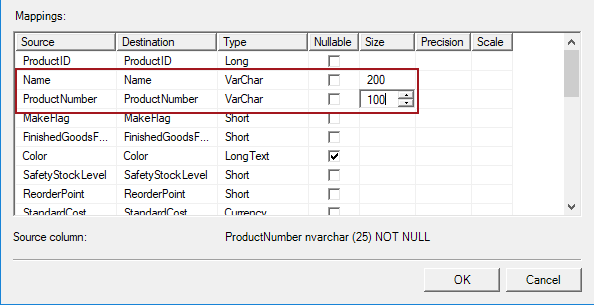
In the Precision column, the precision of the numeric data for the destination column can be specified, here can be set the number of the digits.
In the Scale column, the number of the decimal place for the numeric destination column can be set:
To preview data that will be copied to the destination, under the Select Source Tables and Views page, click the Preview button. This will open the Preview Data dialog box:
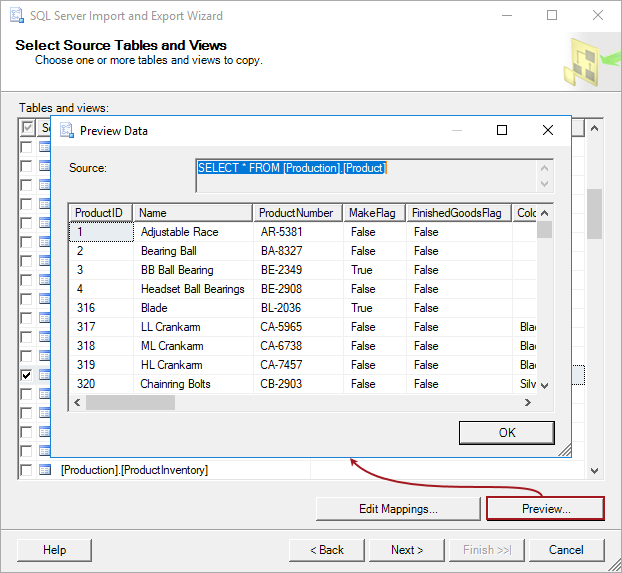
The Preview Data dialog box displays up to 200 rows of data from the data source.
Write a query to specify the data to transfer
If the Write a query to specify the data to transfer radio button is chosen on the Specify Table Copy or Query page of the SQL Server Import and Export Wizard, then the Provide a Source Query dialog box will appear:
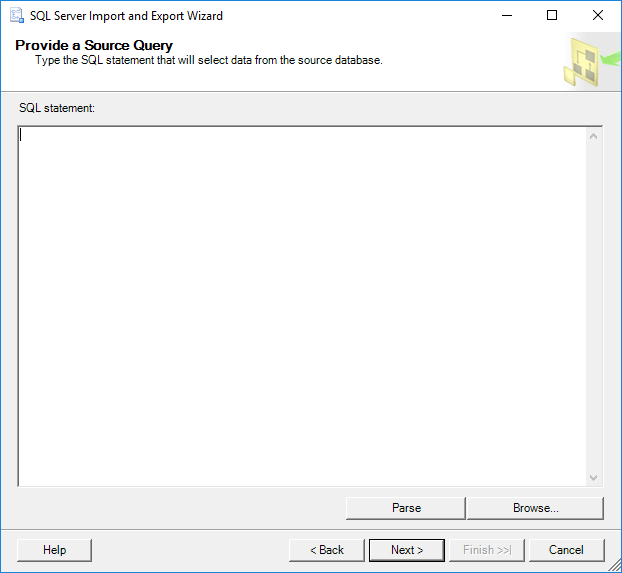
In this dialog, a query from the file can be written, pasted or loaded by clicking the Browse button, which selects source data to copy to the destination.
In the SQL statement editor, put the desired query and press the Parse button to check if the SQL statement is valid:
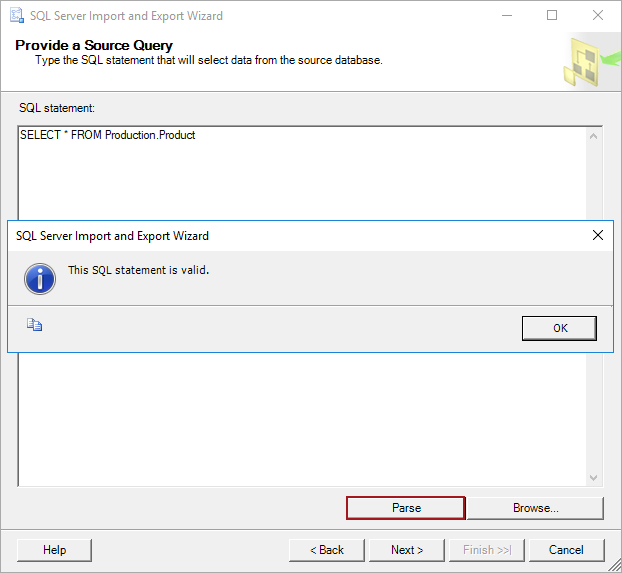
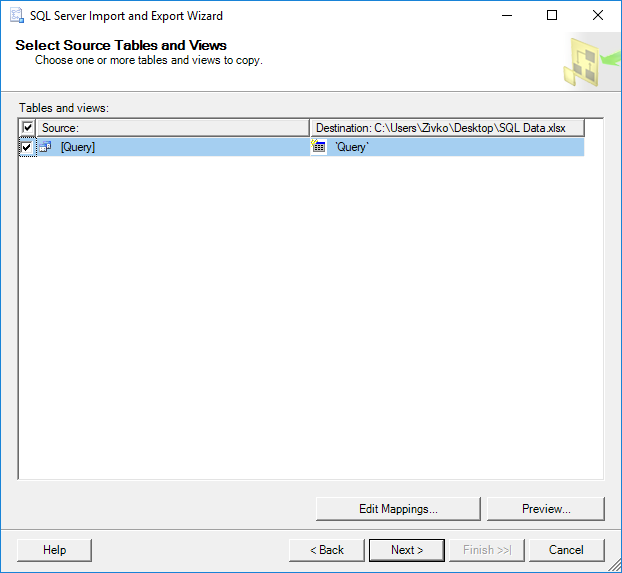
Now, when press the Next button, the Select Source Tables and Views page will appear; in the Tables and view grid the [Query] item that represents the query that is written in the Provide a Source Query page will be shown:
The next page of the SQL Server Import and Export Wizard is the Review Data Type Mapping page:
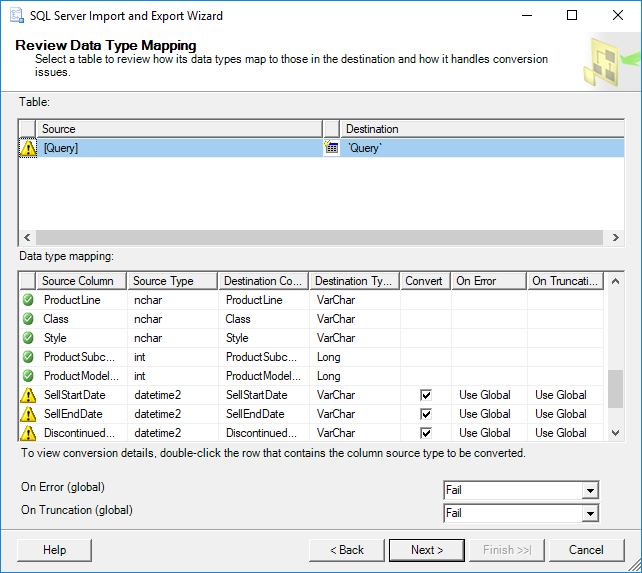
This page shows information about data type conversation that will be performed to make the source data compatible with the destination.
If a problem with data type conversation exists, the warning icon next to the data source in the Table list will appear and, in the Data type mapping list, the warning icons will appear next to the source columns which indicates that this conversation may cause a loss of data:
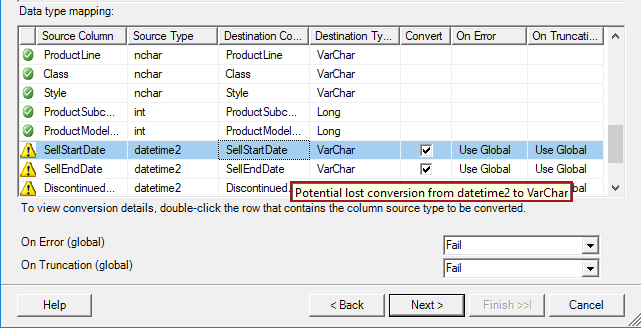
To view additional information about an individual column, double click on that column and the Column Conversion Details dialog will appear:
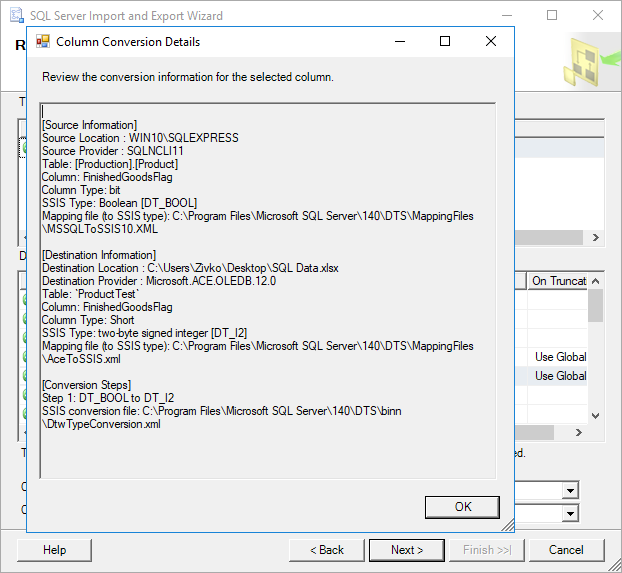
On this page, source and destination information will be shown as well as the data type of the source and destination column, conversion steps etc.
On the Review Data Type Mapping page, the data type cannot be changed, but it can be returned to the Select Source Tables and Views page by clicking the Back button. On the Select Source Tables and Views page, click the Edit Mappings button to open the Column Mappings dialog box and, from there, change the data type.
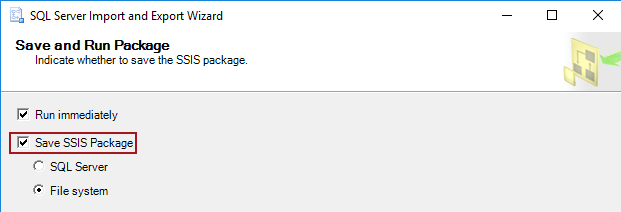
After the data source and destination are specified and configured, click the Next button. The SQL Server Import and Export Wizard shows the Save and Run Package page:
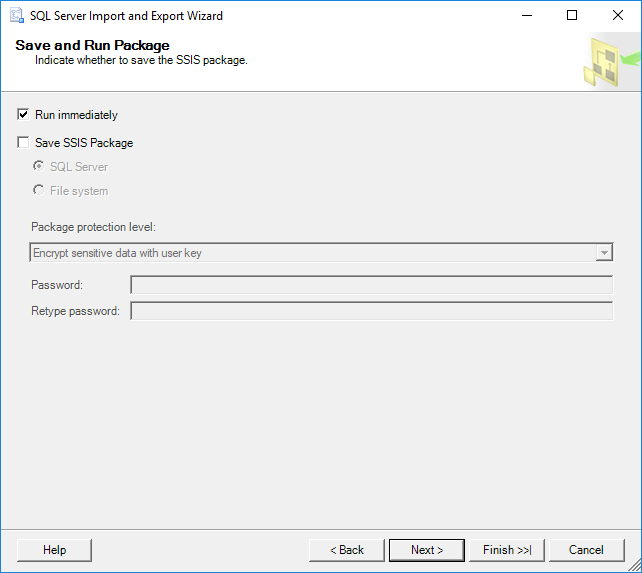
By default, the Run immediately option for the import and export data immediately is checked. To save the settings as the SSIS package, the Save SSIS Package check box needs to be checked.
If the Save SSIS Package check box is checked, additional page will be shown when clicking the Next button:

On the Save SSIS Package page, additional options for saving the SSIS package can be specified. More about these options can be found on the Save SSIS Package page.
The next page of the SQL Server Import and Export Wizard is the Complete the Wizard page:
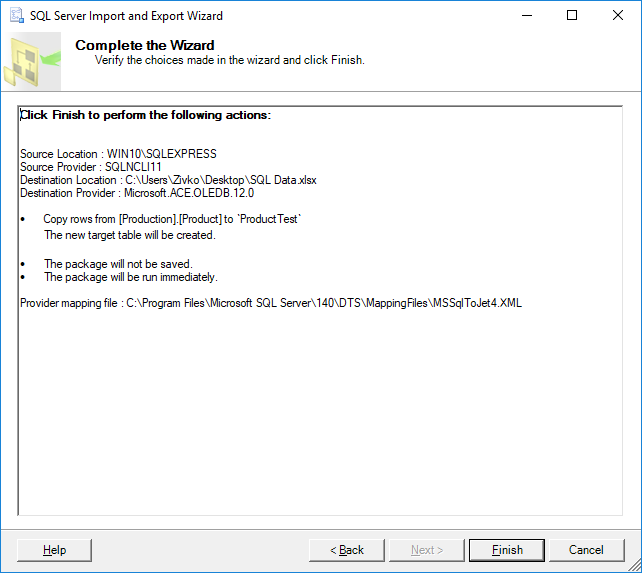
On this page, all choices that are made in this wizard will be shown. This page will show the following information:
- Data source location
- Destination location
- The data that to be copied
- Whether will be the package run immediately or saved etc.
To finalize the exporting process, click the Finish button. The SQL Server Import and Export Wizard will show the Performing Operation page:
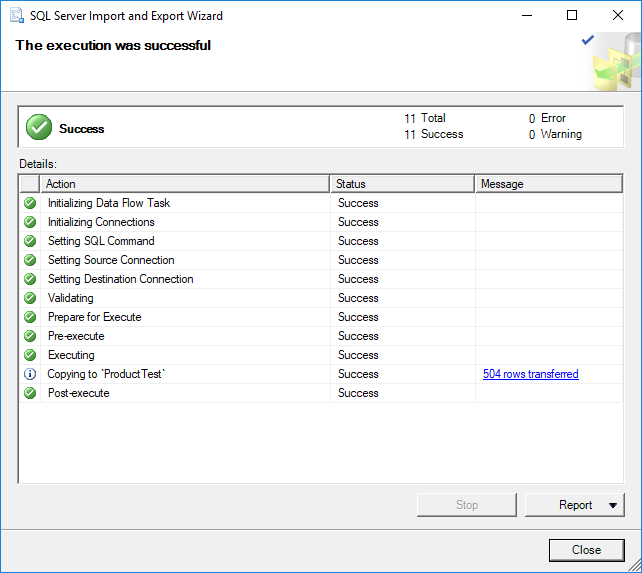
This page shows the state of the data has been successfully exported or some errors occurred during exporting data.
The Action column shows the steps of the operation.
The Status column shows if the step finished successfully or with an error.
The Message shows the informational or error messages for each step.
To get more information about the step click on the displayed item:
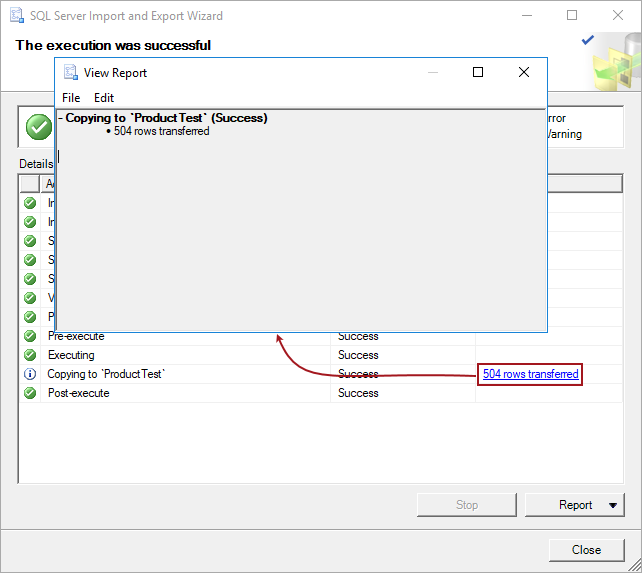
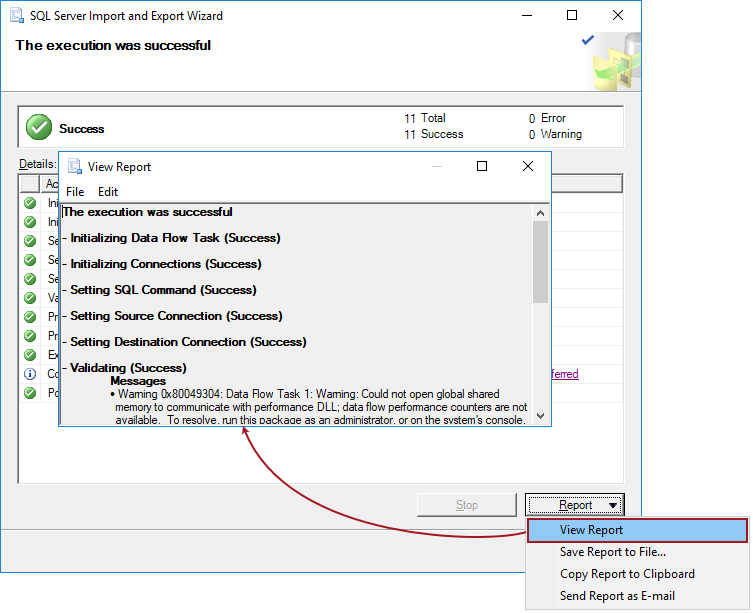
To view a report of the results, save the report, copy report or send the report vie e-mail, click the Report button and from the menu, choose a desired option:
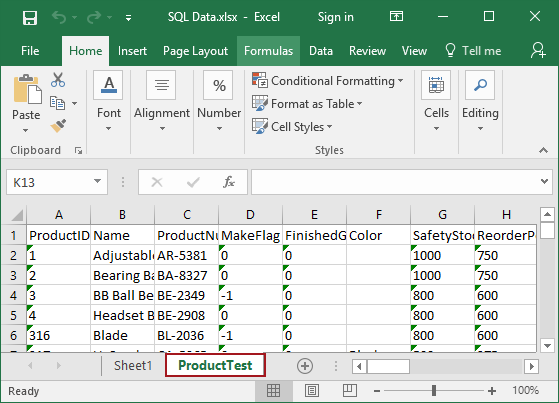
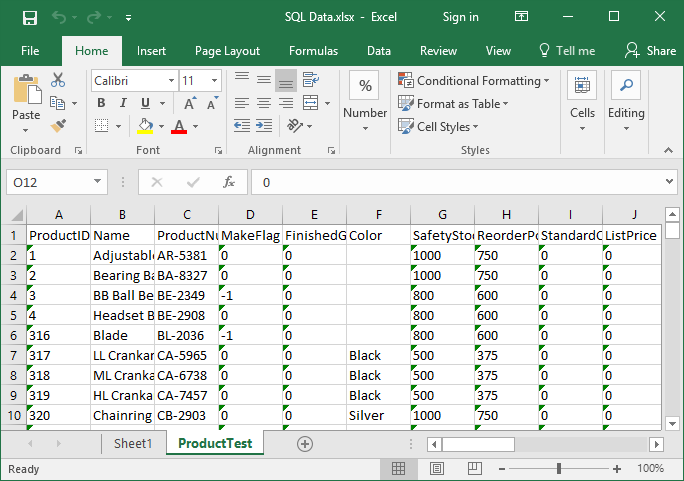
To verify that the SQL Server Import and Export Wizard successfully has exported data to the Excel file, find and open that Excel file, in our case that is the SQL Data.xlsx file:
- Author
- Recent Posts

Marko aka “Zivko” is a senior software analyst from Nis, Serbia focusing on SQL Server and MySQL as well as client technologies like SSMS, Visual Studio, and VSCode. He has extensive experience with quality assurance, issue escalation/resolution, and product evangelism.
He is a prolific author of authoritative content related to SQL Server including a number of “platinum” articles (top 1% in terms of popularity and engagement). His writing covers a range of topics on MySQL and SQL Server including remote/linked servers, import/export, LocalDB, SSMS, and more.
In his part-time, Zivko likes basketball, foosball (table-soccer), and rock music.
See more about Marko at LinkedIn
View all posts by Marko Zivkovic
This guide explains how to use the SQL Server Import and Export Wizard to get data into a SQL Server database.
Table of contents
- 1. What is the SQL Server Import and Export Wizard?
- 2. What data sources and destinations can be used?
- a. Some example scenarios
- 3. How to use the SQL Server Import and Export Wizard
- a. Step (1): Start the Wizard
- b. Step (2): Pick the source of the data
- c. Step (3): Pick the destination for the data
- d. Step (4): Specify what you want to copy
- e. Step (5): Configure the copy operation
- f. Step (6): Copy the data
- 4. Summary
What is the SQL Server Import and Export Wizard?
SQL Server Import and Export Wizard is a simple way to copy data from a source to a destination. It is most commonly used to get data into or out of a SQL Server database, but it caters to several scenarios.
Although like most Microsoft wizards you are guided through the process quite easily, there are a few key steps in the process that you need to be aware of. There are also quite a few dialogs to go through in the wizard, some of which need more attention than others.
This guide describes the data sources and destinations that can be used and goes through the step-by-step process by way of an example.
If you are looking for a simple way of importing/exporting data specifically from Excel to SQL Server, try the SQL Spreads Excel add-in.
What data sources and destinations can be used?
The SQL Server Import and Export Wizard has a number of options available when it comes to selecting the data source and destination. The main options are:
- Enterprise Databases (eg Microsoft SQL, Oracle)
- Open-source database (eg PostgreSQL, MySQL)
- Microsoft Excel
- Microsoft Access
- Text files (eg flat files like csv)
- Any source for which an ODBC driver, a .Net Framework Data Provider, or OLE DB Provider is available.
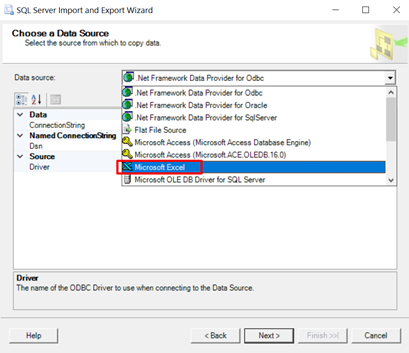
The list of available data sources that you’ll see when you run the wizard includes only the providers installed on your computer. For example, the screenshot below shows the data sources that I can choose from. As you can see, I don’t have MySQL installed, so the provider for the MySQL data source is not available for me.
Some example scenarios
The range of options for data sources and destinations means that there are quite a few theoretical scenarios for using the SQL Server Import and Export Wizard. The following are some of the more common ones:
- Importing data from a csv (comma-separated values) file to a SQL Server table
- Importing data from an Excel spreadsheet to a SQL Server table
- Exporting data from a SQL Server table to an Excel spreadsheet
- Importing data from an open-source database (eg MySQL) to SQL Server
- Exporting data from SQL Server to an open-source database
The scenario for importing data from a csv file to SQL Server is particularly common, and we’ve described this process in a previous article. We’ve also described a simple and often overlooked method of importing data from Excel to SQL Server in this article.
How to use the SQL Server Import and Export Wizard
The SQL Server Import and Export Wizard is installed when you install SQL Server. It is commonly used from within SQL Management Studio. It can, however, be downloaded and installed as a stand-alone utility.
The way you launch the application depends on your use case. For example, if you need to import data from a csv file to a SQL Server table, and you’re not a SQL user, you may launch the stand-alone version.
NOTE: If you launch the wizard from SQL Server Management Studio (select a database, right-click and selection Tasks > Import Data) and try and import from Excel, you may see an error message along the lines of “The operation could not be completed. The ‘Microsoft.ACE.OLEDB.16.0’ provider is not registered on the local machine.” This message appears because SSMS is a 32-bit application and you have a 64-bit version of Excel. In this case, you’ll need to use the stand-alone version of SQL Server Import and Export Wizard.
Whichever way you launch the application – as a stand-alone or from within SQL Management Studio – the process is the same.
The steps we’re going to work through are summarized below:
- Start the Wizard
- Pick the source of the data
- Pick the destination for the data
- Specify what you want to copy
- Configure the copy operation
- Copy the data
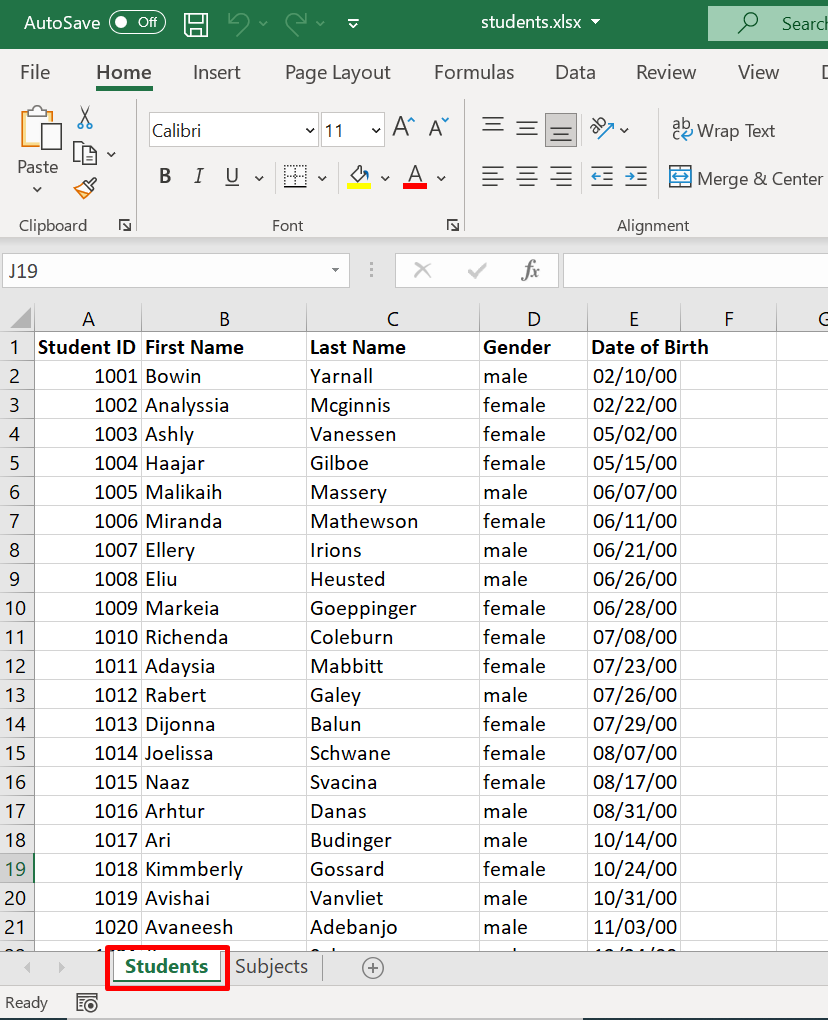
The example scenario we’re going to work through involves importing data from an Excel spreadsheet into a new SQL Server table. The Excel spreadsheet is here if you want to follow along yourself. It contains two sheets: one containing a list of students, and one containing a list of subjects. For this example, we are only interested in importing the list of students into SQL Server.
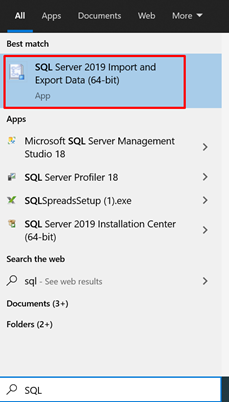
Step (1): Start the Wizard
In our example, I am a user that doesn’t use SQL Server Management Studio, so I’m going to launch the SQL Server Import and Export Wizard from my Start menu.
When you launch the application, the Welcome page is displayed, and you can go ahead and click ‘Next’.
Step (2): Pick the source of the data
Our source data is in Excel, so on the Choose a Data Source page, we can select “Microsoft Excel”.
When we select a data source, we need to specify some more information about it. In this case, we need to provide the location of the Excel file and the version. We can also indicate that the first row has column headers which should be used as the column names in the SQL Server table.
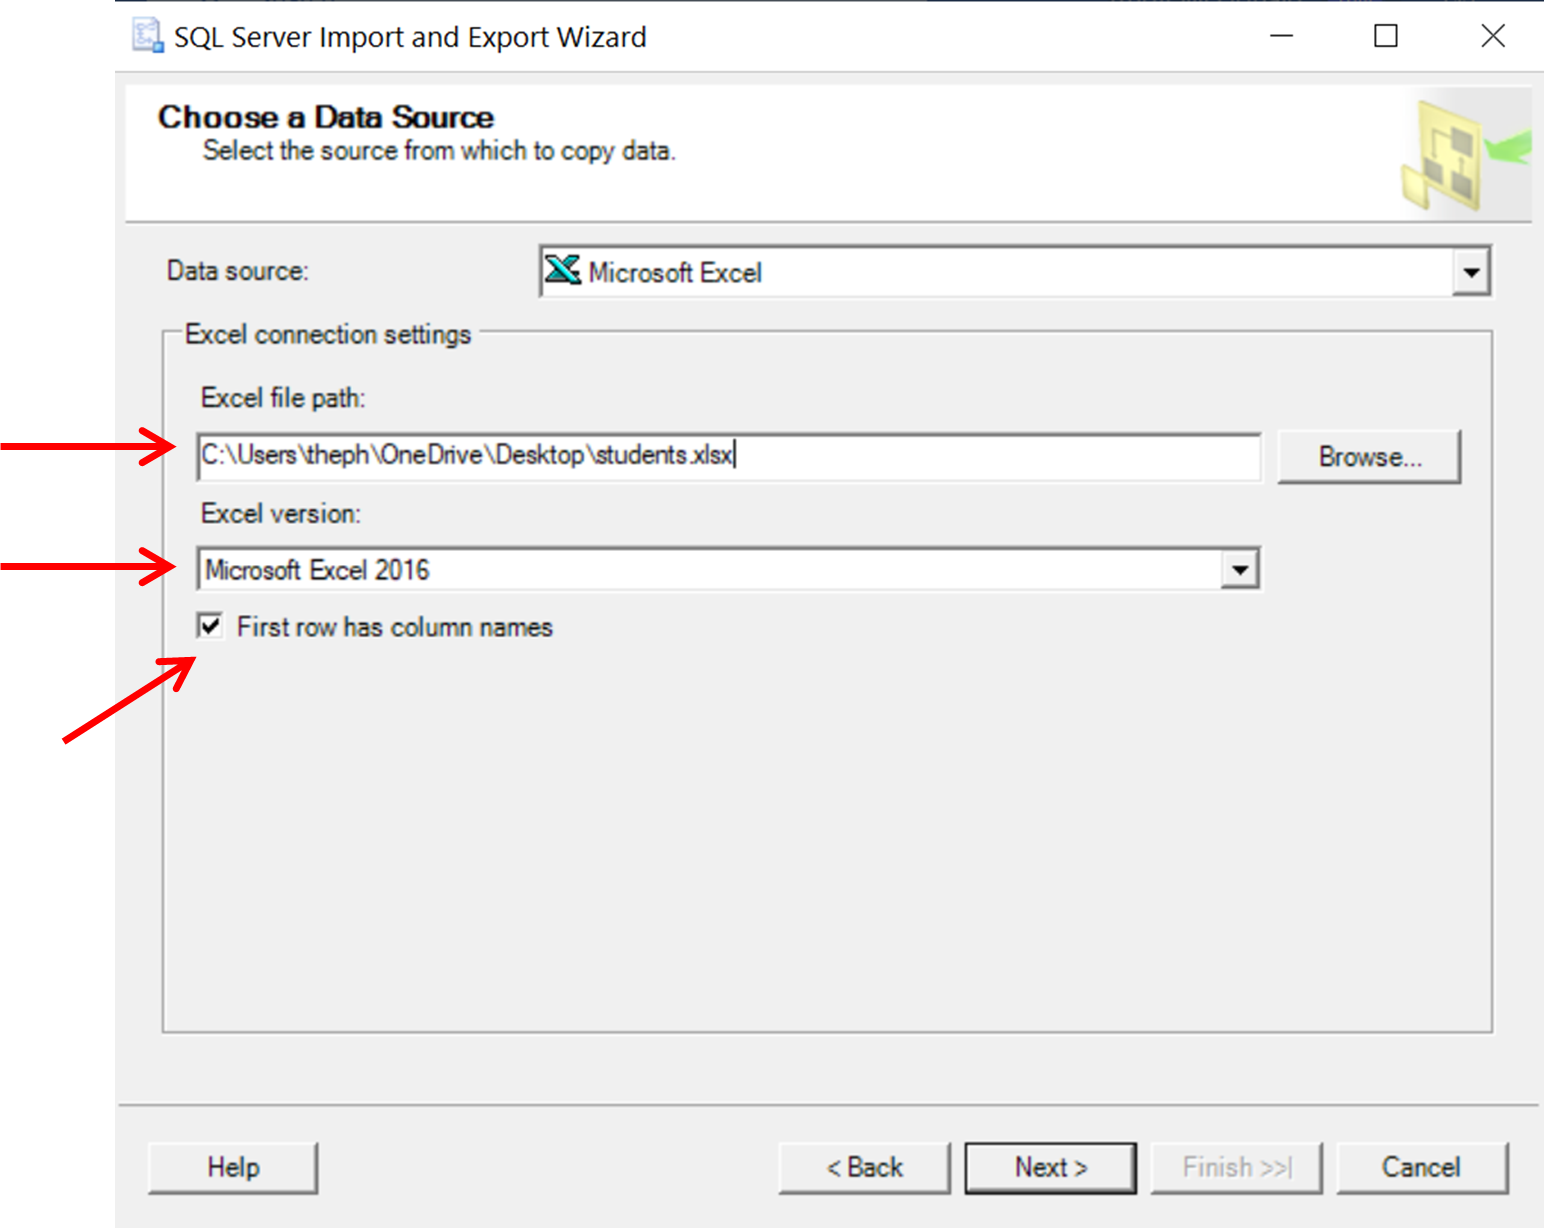
Note: when you select a data source type, the connection settings that you need to provide will change. For example, if your data source is a flat file (eg a csv file), you need to specify the file location and some details of the file format.
Step (3): Pick the destination for the data
On the Choose a Destination page, we now need to specify the destination for the data. For our example, the destination is a SQL Server table, so from the destination drop down menu we need to select SQL Server Native Client (you could also select Microsoft OLE DB Driver for SQL Server).
When you select the SQL Server option, the Authentication and Database options are displayed. In this example we’re going to select ‘Windows Authentication’ and we’re going to copy the data into a table in a new database by clicking ‘New’ in the database section. If we want to copy the data to a table in an existing database, we can select from the Database drop down menu instead of creating a new database.
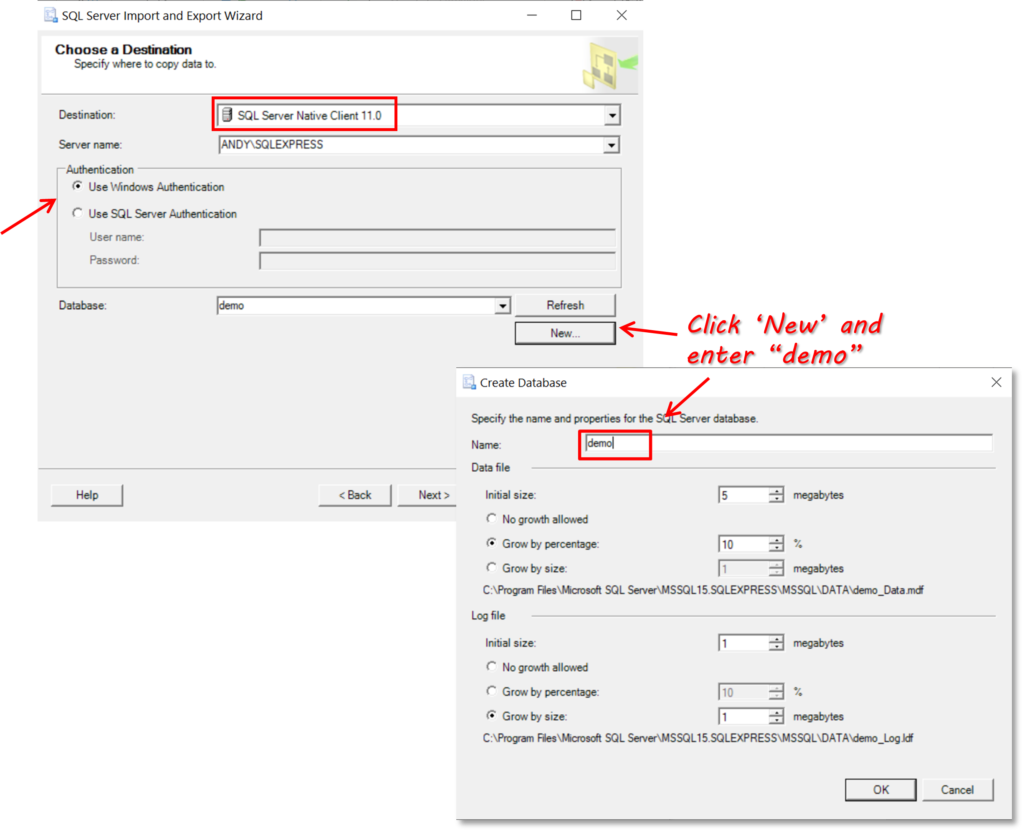
Click ‘Next’
Step (4): Specify what you want to copy
The Excel workbook that we are using for this example contains two sheets. We are only interested in the Students sheet for now, so we need to specify that only this will be copied.
First, on the Select Table Copy or Query page, we need to confirm the default option of ‘Copy data from one or more tables or views’. This just means that we are copying all the data and not a subset of data. This configuration option is more relevant when you are copying from a SQL database, and you want to write a specific SELECT statement, for example, to filter the data being copied.
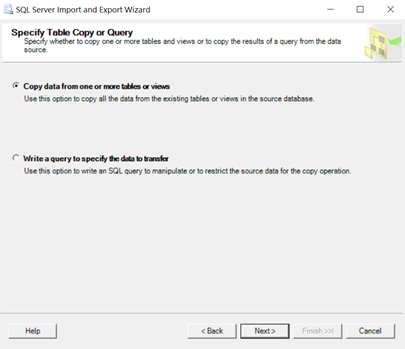
Click ‘Next’
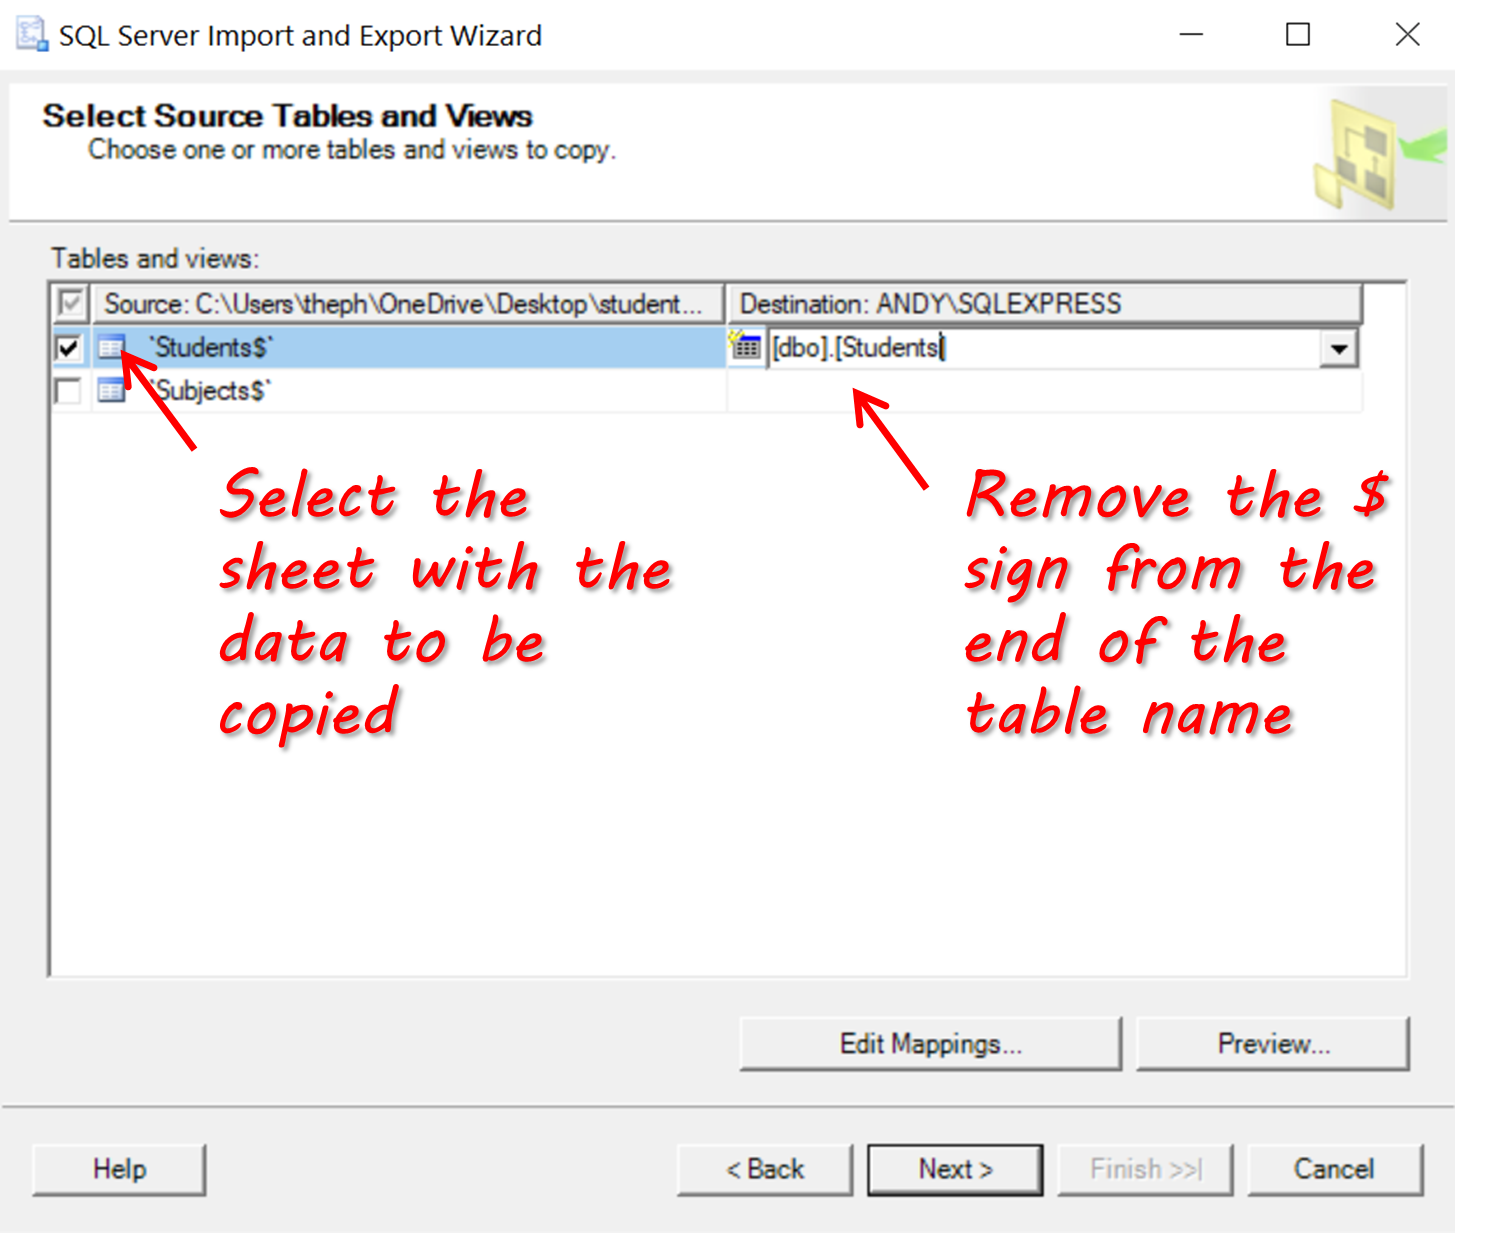
On the Select Source Tables and Views page, we can do the following to further define how the copy is performed:
- choose the specific sheet(s) within the workbook that we want to copy
- (optional) re-name the table that will be created in SQL Server
- (optional) edit the column mappings
First, we need to tick the first sheet in the list, as that has the student data that we want to copy. Note that we can copy as many spreadsheets as we like during this operation. We’re also going to rename the table that will be created in SQL Server. The default is for the table to be given the same name as the sheet name with a dollar sign appended to it; we’re going to remove the dollar sign.
Next we’re going to edit the column mappings by clicking the ‘Edit Mappings…’ button.
Step (5): Configure the copy operation
First we’re going to change the column names in the destination table so that they use lowercase and underscores. Secondly, we’re going to change the data type for the ‘date_of_birth’ column from datetime to date.
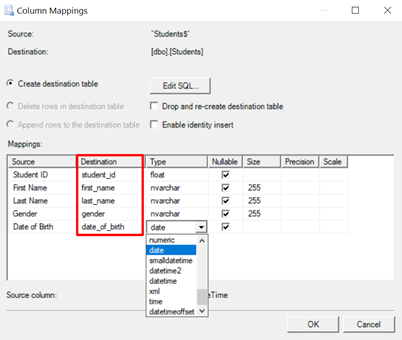
Once done, click ‘Ok’ to close the dialog and then ‘Next’.
If any of the mappings that we specified may not succeed in the copy process the SQL Server Import and Export Wizard shows the Review Data Type Mapping page. This page will indicate the conversions that the wizard needs to perform to make the source data compatible with the destination. In our example, there is a warning that the conversion from DateTime to Date for the ‘Date of Birth’ column may lead to data loss. We don’t need to worry about this warning as it is simply implying that the time portion of the Date of Birth won’t be copied to the new column in the table – this is actually what we are aiming for.
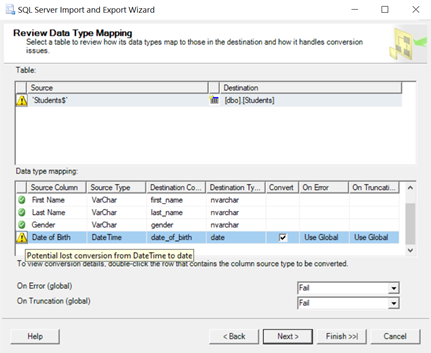
Click the ‘Next’ button.
Step (6): Copy the data
The wizard now offers you the chance to save the Wizard configuration as an SSIS package in addition to the default option of running the copy immediately.
Note: The SQL Import and Export Wizard uses SSIS under the hood; in other words, each time you run the wizard, you are creating an SSIS package. This is why you are given the option of saving it for future use.
We are just going to leave the default option ticked and then click the ‘Next’ button.

The wizard now displays a summary of the steps that we have configured.
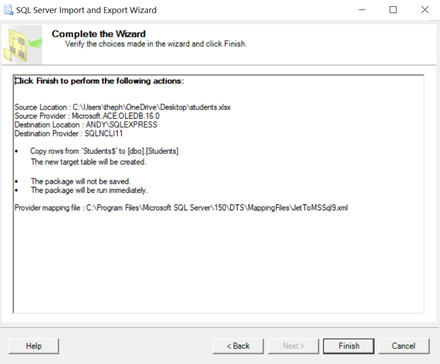
Click ‘Finish’, and the wizard will now show the final screen, which is the result of the execution. In our case, the execution was successful, and we can see that 1000 records were copied to the students table in the demo database in SQL Server.
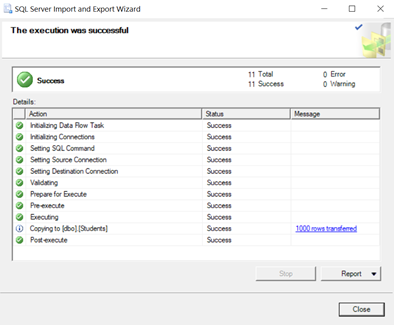
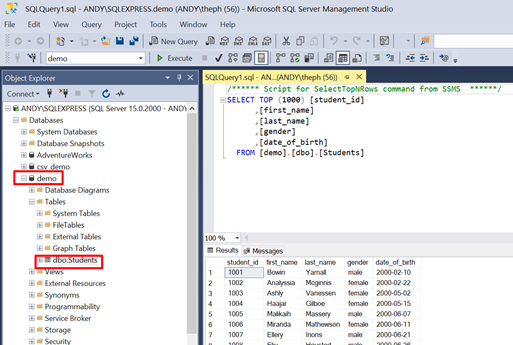
As a final check, we can open SQL Server Management Studio and check that the data has been copied successfully to the students table in the new demo database.
Summary
SQL Import and Export Wizard offers a comprehensive range of options to copy data from a source to a destination. In this example, we have shown how to use the wizard for a common use case: copying data from Excel to SQL Server.
If you are looking for a simple alternative to SQL Import and Export Wizard to import and export data from Excel to SQL Server, try SQL Spreads.
*This article was originally published on July 20, 2021 and was updated on May 6, 2022 to include additional information about the versions of the standalone utility.

Andy McDonald
Andy has worked 20+ years in the Engineering, Financial, and IT sectors with data analysis and presentation using tools such as SQL Server, Excel, Power Query and Power BI.
Writes for SQL Spreads about Excel and SQL Server and how to tie those two together.
Search code, repositories, users, issues, pull requests…
Provide feedback
Saved searches
Use saved searches to filter your results more quickly
Sign up
The SSIS Tools
As with any Microsoft product, SQL Server ships with a myriad of wizards and tools to make your life easier and reduce your time to market. In this chapter, you will learn about some of the tools of the trade that are available to you and how to create your first basic package. These wizards make transporting data and deploying your packages much easier and can save you hours of work in the long run, but they’re only a starting point in most cases. In the first part of this chapter, you’ll look at the Import and Export Wizard, which enables you to create a package for importing or exporting data quickly with minimal transformations. As a matter of fact, you may run this tool in your day-to-day work without even knowing that SSIS is the back end for the wizard. The latter part of this chapter explores other, more powerful, tools that are available to you, such as SQL Server Data Tools (SSDT). By the time this chapter is complete, you will have created your first SSIS package.
Learn how to use SSIS, from beginner basics to advanced techniques, with online video tutorials taught by industry experts. Enroll for Free SSIS Training Demo!
Import And Export Wizard
The Import and Export Wizard is the easiest method to move data from sources like Oracle, DB2, SQL Server, Excel, and text files to nearly any destination, and it is available across all versions of SQL Server — even those that don’t include SSIS. This wizard uses SSIS as a framework and can optionally save a package as its output prior to executing. The package it produces may not be the most elegant, but it can eliminate a lot of tedious package development work and it provides the building blocks that are necessary for building the remainder of the package. Oftentimes as an SSIS developer, you’ll want to relegate the grunt work and heavy lifting to the wizard when you want to just move data for a onetime load, and then do the more complex coding yourself.
As with any of the SSIS tools, there are numerous ways to open the tool. To open the Import and Export Wizard, right-click the database you want to import data from or export data to in SQL Server Management Studio and select Tasks ⇒ Import Data (or Export Data based on what task you’re performing). You can also open the wizard by right-clicking the SSIS Packages folder in SSDT and selecting SSIS Import and Export Wizard. Another common way to open it is from the Start menu under SQL Server 2014, where it’s called Import and Export Data. The last way to open the wizard is by typing dtswizard.exe at the command line or Run prompt. Regardless of whether you need to import or export data, the first few screens in the wizard look very similar.
When the wizard appears, you’ll see the typical Microsoft wizard welcome screen. Click Next to begin specifying the source connection. If you had opened the wizard from Management Studio by selecting Export Data, this screen is pre-populated. In this screen, you specify where your data is coming from in the Source dropdown box. Once you select the source, the rest of the options on the dialog may vary based on the type of connection. The default source is .Net Framework Data Provider for Odbc. Out of the box, you have ODBC and OLE DB sources that connect to SQL Server, Oracle, and Access. You can also use text files, Excel files, and XML files. Traditionally, the SQL Native Client is the provider used in SSIS because it gives additional functionality during design time. Change the data source to use the SQL Server Native Client 11.0 provider.
For SQL Server, you must enter the server name, as well as the user name and password you’d like to use. If you’re going to connect with your Windows account, simply select Use Windows Authentication. Windows Authentication will pass your Windows local or domain credentials into the data source. Lastly, choose a database to which you want to connect. For most of the examples in this tutorial, you’ll use the AdventureWorksDW database or a variation of that DW database, shown in below diagram. This database can be downloaded at WWW.WROX.COM.
.png&w=16&q=75)
NOTE: Additional sources such as Sybase and DB2 are also available if you install the vendor’s OLE DB providers. You can download the OLE DB provider for DB2 free if you’re using Enterprise Edition by going to the SQL Server Feature Pack on the Microsoft website. (As of this writing, the SQL Server 2014 Feature Pack has not be released. However, the SQL 2012 Feature Pack will work for 2014 as well.)
Frequently Asked SSIS Interview Questions & Answers
NOTE: In 2011, Microsoft released information regarding the appropriate provider types to use for new development. It was recommended that any new development should be done with ODBC providers rather than OLE DB. This rule should only be followed for homegrown applications for now. SSIS developers should continue using OLE DB because ODBC does not have full feature parity yet to complete some ordinary tasks.

After you click Next, you are taken to the next screen in the wizard, where you specify the destination for your data. The properties for this screen are identical to those for the previous screen with the exception of the database. Change the Destination provider to SQL Server Native Client 11.0, then select TempDB from the Database dropdown. This will create and load the tables into a temporary space, which will disappear once you restart your instance of SQL Server. Click Next again to be taken to the Specify Table Copy or Query screen (see below diagram). Here, if you select “Copy data from one or more tables or views,” you can simply check the tables you want. If you select “Write a query to specify the data to transfer,” you can write an ad hoc query (after clicking Next) that defines where to select the data from, or what stored procedure to use to retrieve your data.
.png&w=16&q=75)
For the purpose of this example, select “Copy data from one or more tables or views” and click Next. This takes you to the Select Source Tables and Views screen, where you can check the tables or views that you want to transfer to the destination (see below diagram). For this tutorial, check a couple of tables such as FactResellerSales and FactInternetSales in the AdventureWorksDW database.
.png&w=16&q=75)
If you wish, you can click the Edit buttons to access the Column Mappings dialog for each table (see below diagram). Here you can change the mapping between each source and destination column. For example, if you want the ProductKey column to go to the ProductKey2 column on the destination, simply select the Destination cell for the ProductKey column and point it to the new column, or select to ignore the column altogether.
.png&w=16&q=75)
Note that because you’re moving the data to a new database that doesn’t already contain the FactInternetSales table, the “Create destination table” option is one of the few options enabled by default. This will create the table on the destination before populating it with data from the source. If the table already existed, the data will append existing records but you could specify that all rows in the destination table should be deleted before populating it.
Finally, you can check the “Enable identity insert” option if the table into which you are moving data has an identity column. If the table does have an identity column, the wizard automatically enables this option. If you don’t have the option enabled and you try to move data into an identity column, the wizard will fail to execute.
For the purpose of this example, don’t change any of the settings in this screen. Click OK to apply the settings from the Column Mappings dialog and then click Next to proceed.
If no errors are found, you are taken to the Save and Run Package screen (below diagram). Here you can specify whether you want the package to execute only once, or whether you’d like to save the package for later use. As shown earlier, it isn’t necessary to execute the package here. You can uncheck Run Immediately and just save the package for later modification and execution. For this example, check the options for Run Immediately, Save SSIS Package, and File System. This collection of options will execute the package and save it as a .dtsx file to your computer. You learn more about where to save your SSIS packages later in this chapter. Note that if you save the package to SQL Server or to the file system, you’re saving the package with the Package Deployment Model. We’ll discuss more about the package deployment model in Chapter 22.
.png&w=16&q=75)
In this screen, you’re also asked how you wish to protect the sensitive data in your package. SSIS packages are essentially large XML files behind the scenes, and encryption of sensitive data, such as passwords, is critical to ensuring that no one sees that information by opening the XML manually. Again, you learn more about this later in this chapter, so for now just change the Package Protection Level property to “Encrypt sensitive data with password” to protect your sensitive data with a password, and give the dialog a password (as shown in the above diagram).
Explore SSIS Sample Resumes! Download & Edit, Get Noticed by Top Employers!Download Now!
You are then taken to the Save SSIS Package screen, where you can type the name of the package and the location to which you want to save it (see below diagram).
.png&w=16&q=75)
Click Next and confirm what tasks you wish the wizard to perform. The package will then execute when you click Finish, and you’ll see the page shown in the below diagram. Any errors are displayed in the Message column. You can also see how many rows were copied over in this column, and you can double-click an entry that failed to see why, in the event that there are errors during execution.
.png&w=16&q=75)
After the wizard executes, the package can be found in the location that you have specified, but the default is the My Documents directory. You can open the package that executed in SSDT by creating a project in SSDT and copying and pasting the package into the project or by right-clicking on Packages and selecting Add Existing Package.
List of Related Microsoft Certification Courses:
About Author
Yamuna Karumuri is a content writer at Mindmajix.com. Her passion lies in writing articles on IT platforms including Machine learning, PowerShell, DevOps, Data Science, Artificial Intelligence, Selenium, MSBI, and so on. You can connect with her via LinkedIn.
read more
Exporting SQL Server Data with SQL Server Management Studio Import and Export Wizard
![]()
Did you know that SQL Server Management Studio has an excellent tool to help you export the data contained in your tables to other useful formats? Here’s a guide on how to use the SQL Server Import and Export Wizard.
First, connect to your Winhost database using SQL Server Management Studio. For this tutorial, I am using the sample AdventureWorks database provided by Microsoft. Once you have logged into your database, right click on it and select Tasks -> Export Data…
This will launch the SQL Server Import and Export Wizard.
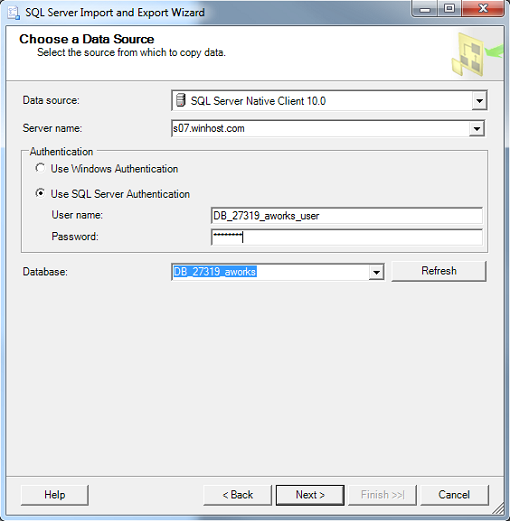
Click on Next to continue. Now, you will need to choose a Data Source. You can leave the Data source as SQL Server Native Client 10.0. Enter the Server name. Check SQL Server Authentication and enter the User Name and Password for your database. For the Database dropdown menu, select the name of your database.
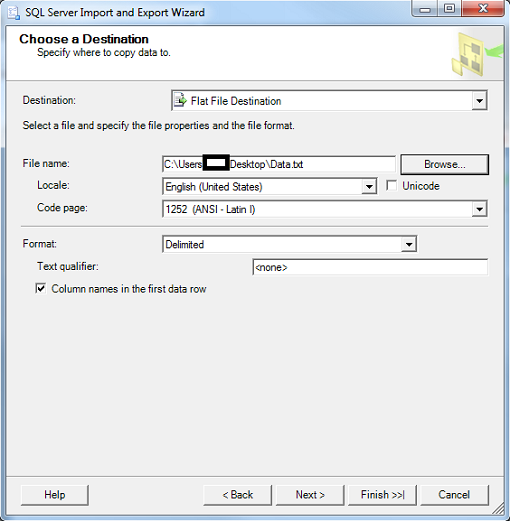
Click on Next to continue. In the Choose a Destination window, you can select a variety of formats to export to including Microsoft Access, Microsoft Excel, and another Microsoft SQL Server database. For this tutorial, I will be showing you how to export your data to a flat file (i.e. .txt and .csv).
 In the Destination dropdown menu, select Flat File Destination. For the File name, click on the Browse button, select Desktop and give the file a name. You can choose either .txt or .csv format by clicking on the dropdown menu next to the file name.
You can leave the Locale as English (United States) and Code page as 1252 (ANSI – Latin I). The Format will be Delimited and check Column names in the first data row. You can set a Text qualifier if you’d like, but I’m not going to.
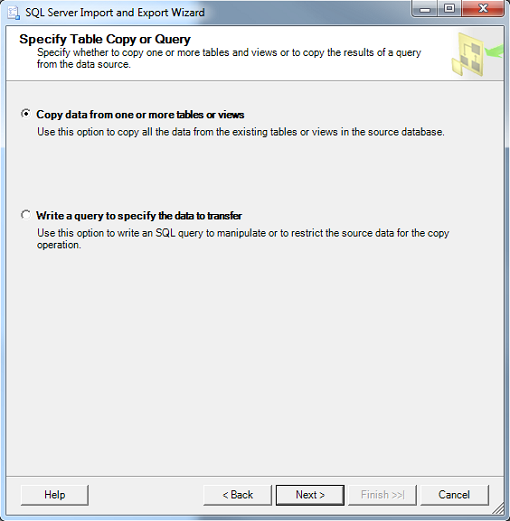
Click on Next to continue. In the Specify Table Copy or Query window, check Copy data from one or more tables or views. If you check the other option, you can write your own SQL query (SELECT statement) to extract the data you want from two or more tables.
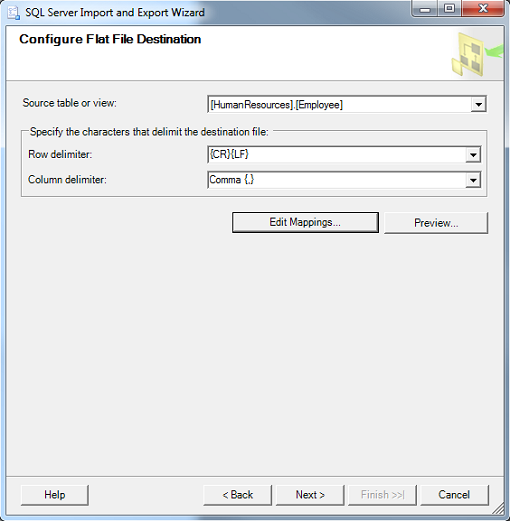
Click on Next to continue. In the Configure Flat File Destination window, I will be drawing data from the Employees table. In Source table or view, select [HumanResources].[Employee]. You can leave the Row delimiter as {CR}{LF} and the Column delimiter as Comma {,}
You may also want to spend some time looking at Edit Mappings. For a flat file, you can choose not to include certain columns to be exported by selecting the Destination column name and choosing <ignore> as shown below.
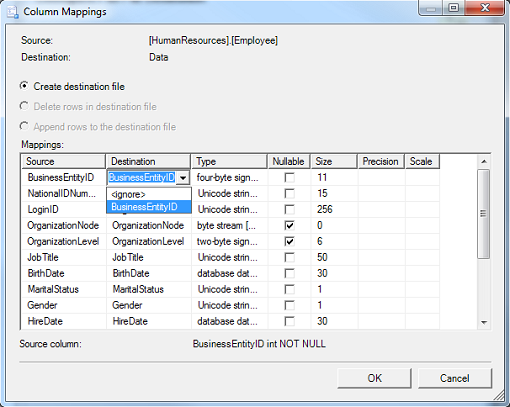
This tool is actually more powerful when you are exporting to an existing file that already has column names in place as you can map a column name from the Source file to a different column name in the Destination file.
For example, you have an Excel file with a column named BEID. You can map BusinessEntityID to BEID. The data will be populated in the BEID field in Excel. Click on Next to continue. This will bring up the Run Package page.
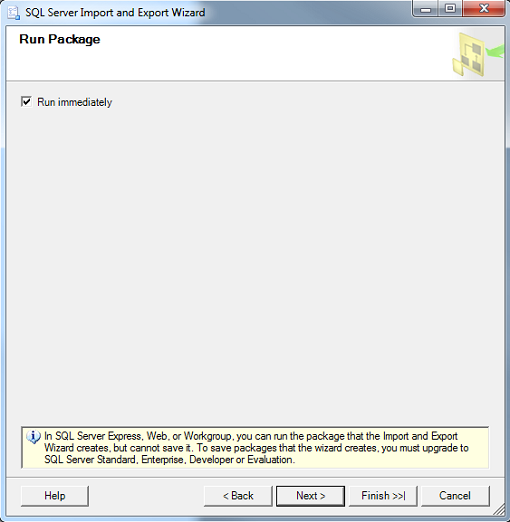
Click on Next to continue. The Wizard is complete and you can click on Finish.
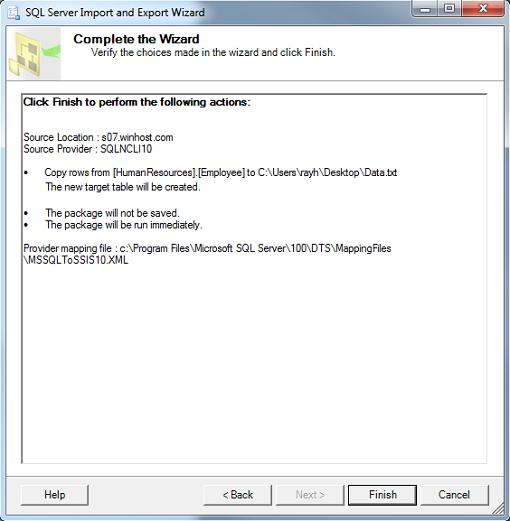
The Wizard will now run through a series of checks prior to exporting the data. If everything goes smoothly, you should get the screen below.
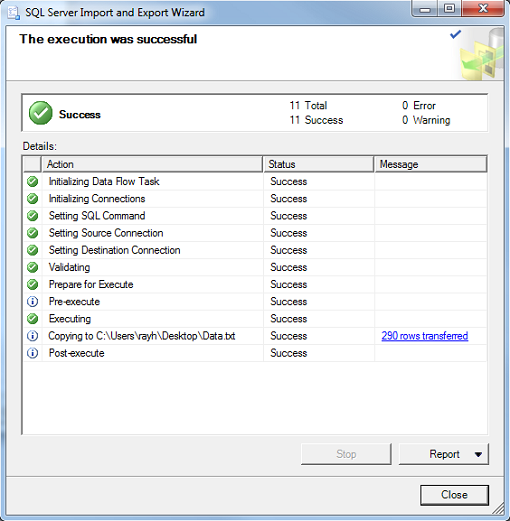
If you run into any errors, there will be a link in red which you can click and review the problem the wizard is having. You can use the Back button to correct the problem and go through the steps again until you are able to successfully export the data.
В СУБД Microsoft SQL Server 2008 существует отличный функционал по импорту и экспорту данных, причем в разные форматы и разные базы данных. Его можно также использовать для простого переноса данных из одной базы в другую или с одного сервера на другой. Сегодня мы рассмотрим примеры использования данного средства, и, как мне кажется, это очень удобно.
Мы с Вами уже не раз затрагивали тему импорта и экспорта данных в MS SQL Server 2008, например, в статьях:
- Access – Импорт данных в базу Microsoft SQL Server 2008
- Выгрузка данных в текстовый файл из MS SQL Server 2008 клиентом Access 2003
- Выгрузка данных из Access в шаблон Word и Excel
Но так или иначе, это было связанно с клиентским приложением, т.е. Access, другими словами, мы это делали для пользователей, чтобы они могли выгружать или загружать данные в базу. А теперь пришло время поговорить о том, чем может, и, наверное, должен пользоваться системный администратор или программист для подобного рода задач.
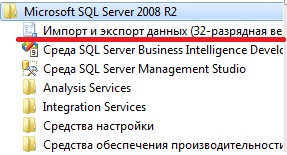
Примечание! Далее подразумевается, что у Вас уже установлена СУБД Microsoft SQL Server 2008 и средство импорта и экспорта данных, так как оно идет в комплекте, и на примере Windows 7 Вы можете наблюдать в меню «Пуск-> Все программы-> Microsoft SQL Server 2008 R2-> Импорт и экспорт данных (32-разрядная версия)». У меня это выглядит следующим образом:
И для того чтобы рассмотреть функционал по импорту и экспорту данных, давайте разберем два примера, первый по импорту данных, а второй по экспорту данных.
Содержание
- Импорт данных из Excel документа в MSSql 2008
- Создаем тестовые данные в документе Excel
- Шаг 1
- Шаг 2
- Шаг 3
- Шаг 4
- Шаг 5
- Шаг 6
- Шаг 7
- Шаг 8
- Экспорт данных из Microsoft SQL Server 2008 в файл Excel
- Шаг 1
- Шаг 2
- Шаг 3
- Шаг 4
- Шаг 5
- Шаг 6
- Шаг 7
Импорт данных из Excel документа в MSSql 2008
Создаем тестовые данные в документе Excel
Мы будем использовать старый, но проверенный Excel 2003 и формат файла у нас будет xls.
Данные будут вот такие, файл я назвал test_file.xls:
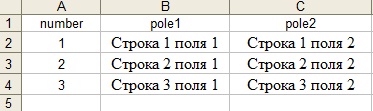
Сразу скажу, что в данном примере мы будем импортировать данные в новую таблицу, поэтому на название полей мы не обращаем внимания. Но если бы мы импортировали уже в существующую таблицу, то нам в процессе импорта пришлось бы задавать соответствие этих полей или изначально в файле создать столько полей с тем же названием и в той же последовательности, как и в таблице. А если этого не сделать, то те поля, которые отсутствуют в таблице в базе, будут со значением null. Как задать соответствие этих полей и как импортировать данные в уже существующую таблицу я покажу в процессе импорта.
Примечание! Сервер располагается локально, база данных называется test.
Шаг 1
Итак, приступим, у нас есть файл, теперь запускаем средство импорта, и у нас открывается следующее окно:
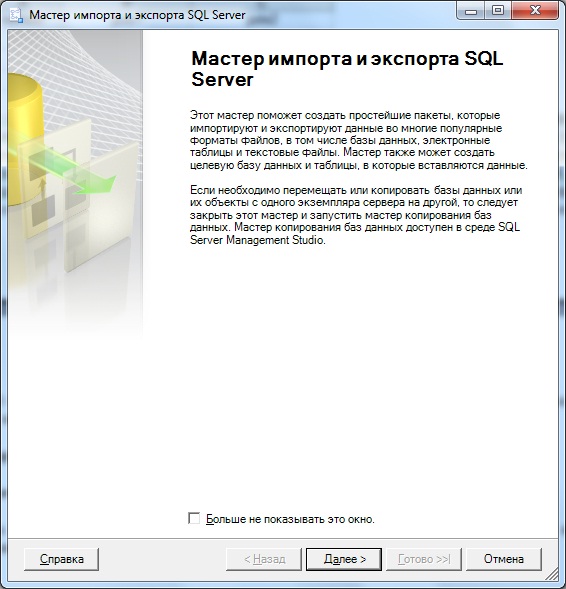
Шаг 2
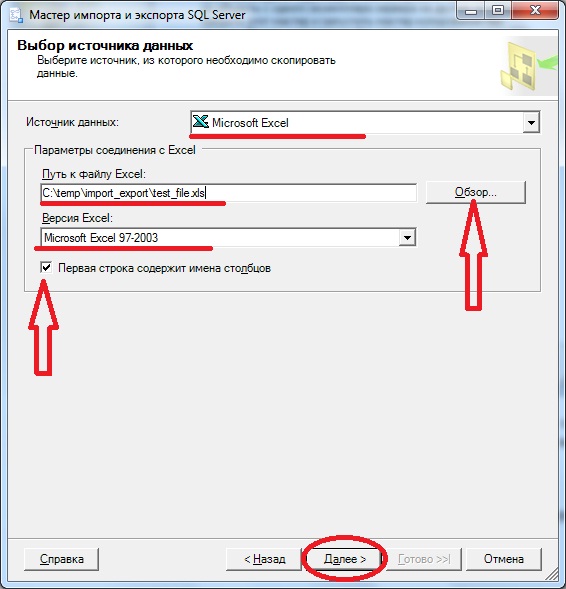
Нажимаем далее, где нам предлагают выбрать источник данных, в нашем случае это Excel, мы выбираем файл, версию excel и ставим галочку, что первая строка — это заголовок:
Шаг 3
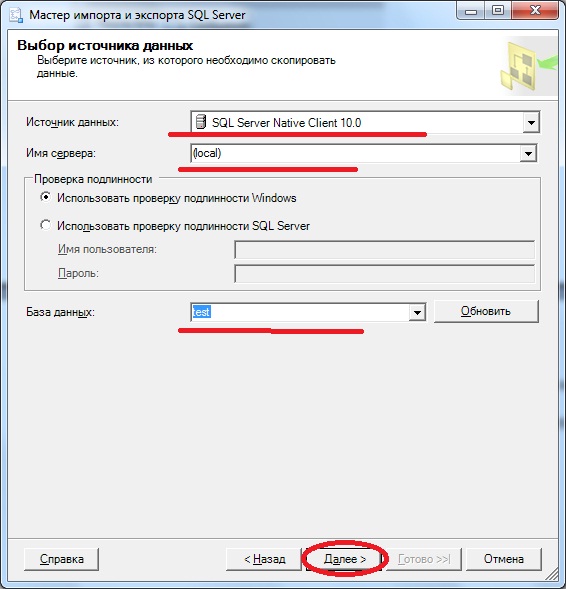
Жмем далее, нам предлагают выбрать назначение, куда копировать эти данные, мы выбираем SQL Server, указываем имя сервера, т.е. его адрес, в нашем случае, как я уже сказал, он расположен локально. Также не забудьте про проверку подлинности, выбирайте тот метод, который у Вас настроен на сервере, и, конечно же, про базу данных, в которую копировать:
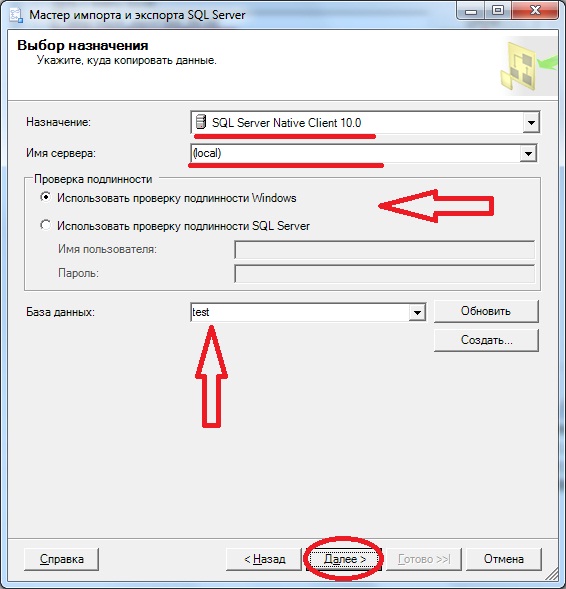
Шаг 4
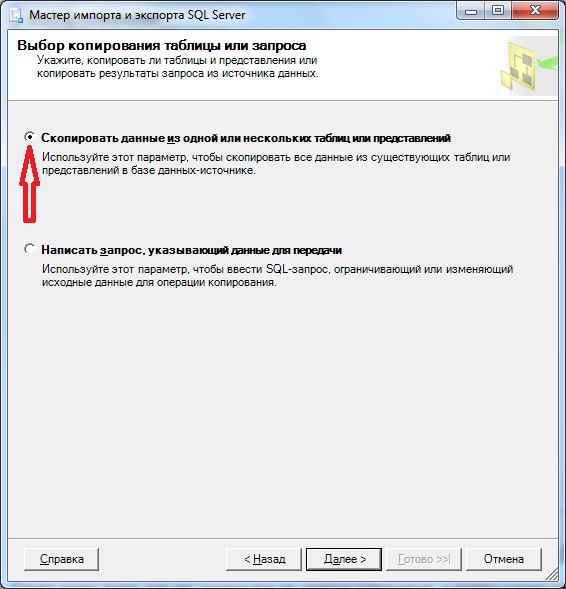
Снова жмем далее, где мы укажем все ли данные копировать, в нашем случае мы говорим что все:
Шаг 5
Жмем далее, и попадаем на окно выбора листа с данными и задания названия таблицы в нашей базе, я выбрал лист 1 и назвал таблицу test_table:
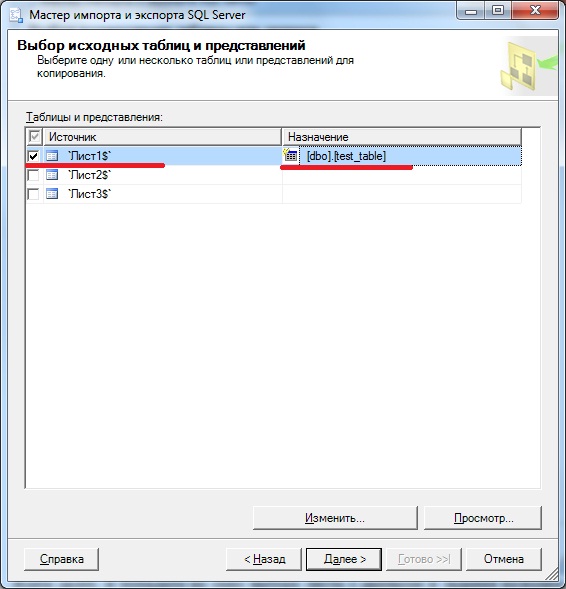
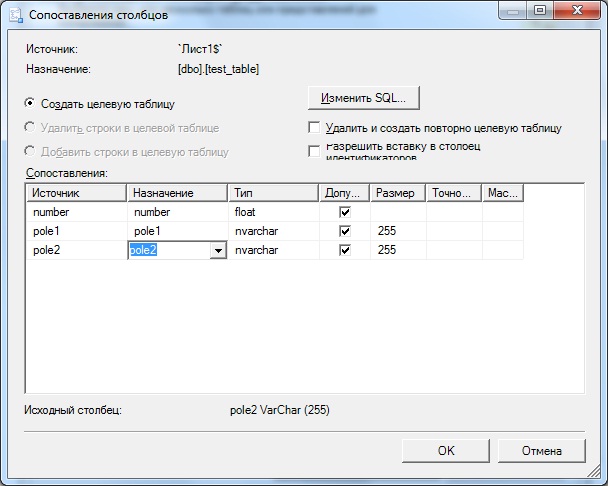
И, кстати, вот на этом этапе можно задать соответствие полей. В случае если Вы импортируете данные в существующую таблицу, для соответствия полей Вам необходимо выбрать таблицу из выпадающего списка и нажать изменить, где Вы также можете задать такие параметры как назначение, тип данных и другие, для примера вот это окно:
Шаг 6
Это было небольшое отступление, а в нашем примере мы жмем далее, и попадаем в окно, в котором можно сохранить все наше действия в пакет, но мы этого делать не будем, а сразу же нажмем готово:
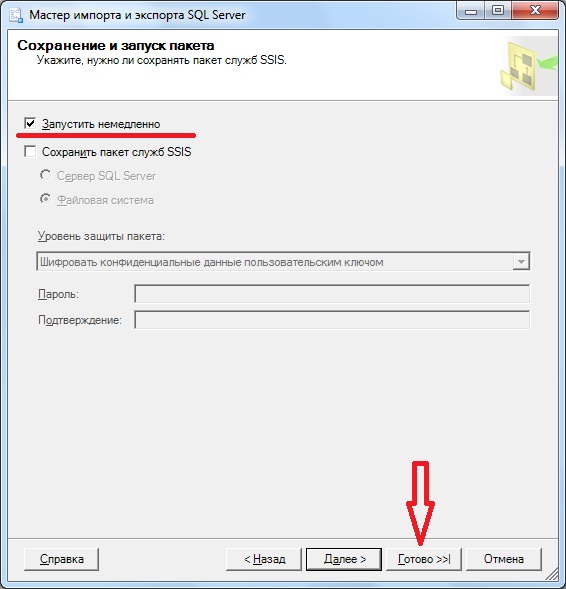
Шаг 7
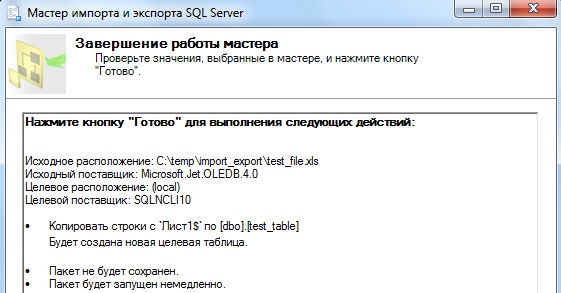
После появится окно, где мы все проверяем и жмем готово:
Шаг 8
И в заключение у нас появится еще одно окно, так сказать результат наших действий, жмем закрыть:
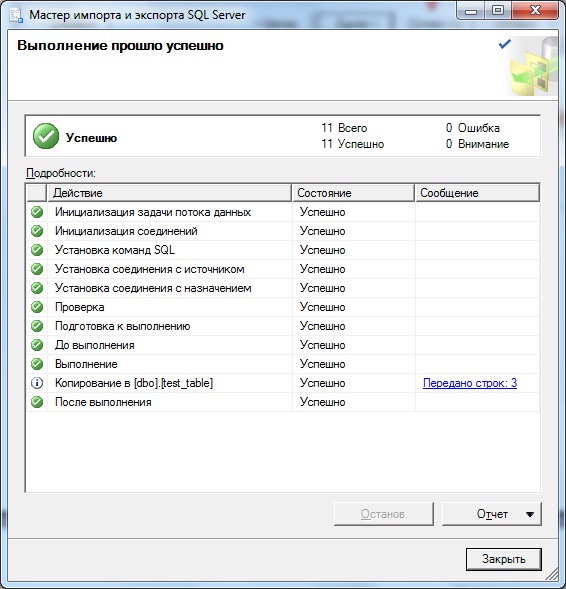
Как видно, передано 3 строки, т.е. импортировано — это означает, что все наши данные, которые были в файле, импортировались.
И для того, чтобы проверить какие данные у нас импортировались, выполним в Management Studio простой запрос select.
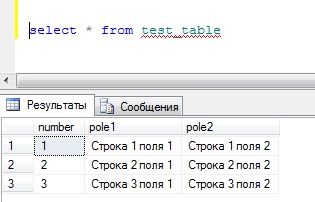
И как видите все хорошо!
А теперь давайте рассмотрим пример экспорта данных из нашей только что созданной таблицы в Excel документ.
Шаг 1
Для этого делаем практически то же самое, открываем средство экспорта, но уже здесь в качестве источника указываем нашу базу:
Шаг 2
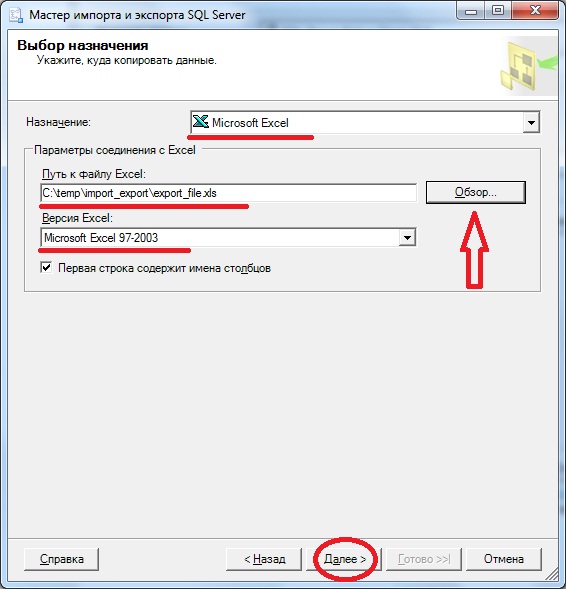
Жмем далее, где нам предлагают указать назначение экспорта, мы соответственно выбираем Excel, и задаем путь и название выгружаемого файла:
Шаг 3
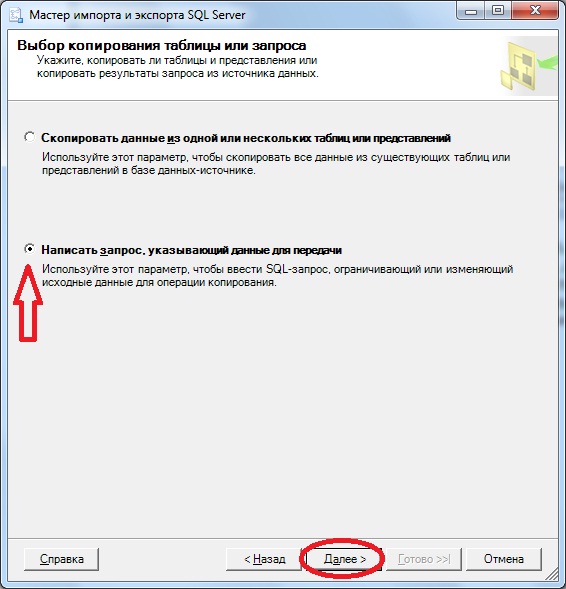
После того как Вы нажмете далее, Вы попадете в окно выбора данных, т.е. какие именно данные мы будем выгружать, и здесь давайте укажем — выгружать данные на основе запроса. Так как, когда мы импортировали данные, мы выбрали все, а теперь для примера выберем не все, а на основе запроса, можно также выбрать все и указать таблицу или представление VIEWS, в котором уже будут отфильтрованные данные, но мы напишем SQL запрос:
Шаг 4
И в следующем окне вставляем свой запрос, например, я написал вот такой:
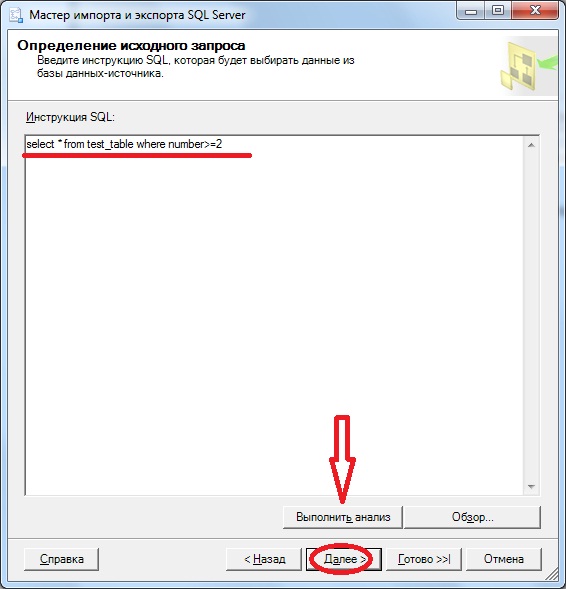
Также в этом окне Вы можете выполнить анализ своего запроса, на предмет наличия ошибок или выбрать файл, который содержит текст запроса, и, если все хорошо, жмем далее.
Шаг 5
На следующем окне сразу же можем нажимать далее, если конечно Вы не хотите задать свои названия полей в выгружаемом файле.
Шаг 6
Затем на следующем окне все проверяем и жмем готово.
Шаг 7
Далее, как и в импорте, жмем последний раз готово. И все, после этого у Вас в той папке, которую Вы указали, появится документ Excel с Вашими данными.
После рассмотрения этих примеров, я думаю стало понятно, как можно осуществлять импорт и экспорт данных в MS SQL Server 2008. Использовать можно не только Excel, но и другие источники данных, ну я думаю, дальше Вы разберетесь сами, так как это не так сложно, но если у Вас все равно возникают вопросы, можете задавать их в комментариях.
Заметка! Если Вас интересует SQL и T-SQL, рекомендую посмотреть мои видеокурсы по T-SQL, с помощью которых Вы «с нуля» научитесь работать с SQL и программировать с использованием языка T-SQL в Microsoft SQL Server.
Пока!