
-
инструкция Gaggia Syncrony digital
-
инструкция Gaggia Syncrony logic
-
инструкция Gaggia Titanium
-
инструкция Jura Impressa x90, x95
-
инструкция Jura Impressa E80, E85
-
инструкция Jura Impressa F90
-
инструкция Jura Impressa xs90
-
инструкция Jura Impressa J9 one touch
-
инструкция Jura Impressa C5
-
инструкция Jura Impressa F70
-
инструкция Saeco Aulika
-
инструкция Saeco Xsmall
-
инструкция Saeco Royal Professional
-
инструкция Saeco Minuto
-
инструкция Saeco Odea Giro Plus
-
инструкция Saeco Talea Ring
-
инструкция Saeco Vienna Digital
-
инструкция Spidem Trevi Automatica
-
инструкция Spidem Villa
-
инструкция La Cimbali m32 dosatron
Каталог
-
ПРОДАЖА КОФЕМАШИН
-
АРЕНДА КОФЕМАШИН
-
СРЕДСТВА (ХИМИЯ) ДЛЯ ЧИСТКИ КОФЕМАШИНЫ И КОФЕМОЛКИ
-
КОФЕ В ЗЕРНАХ И МОЛОТЫЙ
-
КОФЕ В КАПСУЛАХ и ЧАЛДАХ
-
СИРОПЫ, МОРСЫ, ТОППИНГИ ДЛЯ БАРА
-
ДРИП КОФЕ
-
КРУПНОЛИСТОВОЙ ЧАЙ
-
ФИЛЬТР-ПАКЕТЫ ДЛЯ ЧАЯ
-
ЧАЙ ПАКЕТИРОВАННЫЙ
-
ОДНОРАЗОВАЯ ПОСУДА
-
МОЛОКО ДЛЯ КАПУЧИНО
-
САХАР ПОРЦИОННЫЙ
-
ШОКОЛАД, СУХИЕ ОСНОВЫ И МАРШМЕЛЛОУ
-
БАРНЫЕ АКСЕССУАРЫ
-
ПОДАРКИ!
-
РАСПРОДАЖА
- Главная
- Сервис
- инструкция Gaggia Syncrony digital
Кофемашина GAGGIA Syncrony Compact Digital — инструкция пользователя по применению, эксплуатации и установке на русском языке. Мы надеемся, она поможет вам решить возникшие у вас вопросы при эксплуатации техники.
Вы можете скачать инструкцию к GAGGIA Syncrony Compact Digital по ссылке ниже, если не хотите ждать загрузки. Если остались вопросы, задайте их в комментариях после инструкции.
«Загружаем инструкцию», означает, что нужно подождать пока файл загрузится и можно будет его читать онлайн. Некоторые инструкции очень большие и время их появления зависит от вашей скорости интернета.
Полезные видео
Характеристики
Остались вопросы?
Не нашли свой ответ в руководстве или возникли другие проблемы? Задайте свой вопрос в форме ниже с подробным описанием вашей ситуации, чтобы другие люди и специалисты смогли дать на него ответ. Если вы знаете как решить проблему другого человека, пожалуйста, подскажите ему
![:)]()
Часто задаваемые вопросы

Как посмотреть инструкцию к GAGGIA Syncrony Compact Digital?
Необходимо подождать полной загрузки инструкции в сером окне на данной странице или скачать кликнув по специальной кнопке.
Руководство на русском языке?
Все наши руководства представлены на русском языке или схематично, поэтому вы без труда сможете разобраться с вашей моделью
Как можно распечатать инструкцию?
Скачайте ее по специальной кнопке над формой чтения на ваше устройства и отправьте на печать.
Форум о кофемашинах — ремонт, обслуживание, использование кофемашин, выбор кофе и кофемашины

Пожалуйста, войдите или зарегистрируйтесь.
- Документация
- Кофе и кофемашины
- Карта сервисов
- Магазин запчастей
- Инструкции
- Ремонт
-
Начало
-
Помощь
-
Поиск
-
Вход
-
Регистрация
- Форум о кофемашинах — ремонт, обслуживание, использование кофемашин, выбор кофе и кофемашины
рейтинг кофемашин » Gaggia
| Обзор кофемашины | |
Характеристики и функцииНастройкиТехническое обслуживание и уходОсновные компонентыТехнические условияДругоеДизайн и ценаОписание |
|

| Руководство пользователя, инструкция схемы для Кофемашина Gaggia Syncrony Digital | |||
| Имя файла | Тип файла | Размер файла | |
|
|
Инструкция для кофемашины Gaggia Syncrony Digital (англ.) |
|
6362.5 KB |
|
|
Схема гидросистемы кофемашин Gaggia |
|
1583.5 KB |
|
|
Схема кофемашины Gaggia Sincrony Digital |
|
2212.0 KB |


| Вопросы для голосования | Пользователи | Специалисты | |
| Качество приготовления кофе |
|
|
Для оценки этой машины, пожалуйста, авторизуйтесь. Впервые на сайте? Зарегистрируйтесь сейчас, бесплатно! |
| Внешний вид, дизайн |
|
|
|
| Сервисное обслуживание и уход |
|
|
|
| Надежность и ремонтопригодность кофемашины |
|
|
|
| Рекомендуете купить? |
|
|
|
| Цена кофемашины |
|
|
Читайте наши статьи

Эксплуатация кофемашины в зимний период
Что происходит с кофемашиной при длительном нахождении в помещении с низкой температурой? Перевозили кофемашину в багажнике — что теперь от неё ожидать?

Скидка на ремонт кофемашины
Получите 20% скидку на ремонт или обслуживание вашей кофемашины, а также при заказе кофе «Coffee-Everyday» у нас.

Уход за кофемашиной: рекомендации и советы
Как увеличить срок экслуатации вашей кофемашины или кофеварки? Как влияет качество воды на долговечность системы? Как правильно определить момент обсуживания?
![]()
-
во всех категориях
- Телефоны, Планшеты
- Ноутбуки, Компьютеры
- Фото и оптика
- Аудио, видео
- Бытовая техника
- Авто, Мото
- Детские товары
- Строительство, ремонт
- Спорт, туризм, рыбалка
- Красота и здоровье
- Дача, дом
- Животные, птицы, рыбы
- Оборудование
- Продукты, напитки
Смотрите видео обзор и распаковку от известных блогеров и обзорщиков. Узнаете ответы на вопросы: что в коробке, как работает, какие есть нюансы и многое другое. Некоторые видео, хорошо подготовлены и грамотно сняты. Посмотреть, что говорят владельцы товара всегда увлекательно.
- Цены, купить
- Характеристики
- Отзывы
- Видео
- Вопросы
Добавить своё видео
![]()
Обзор: Кофемашина Gaggia Syncrony Logic (обзор)
![]()
Обзор: Кофемашина Gaggia Syncrony Logic RS
![]()
Обзор: Gaggia Syncrony Logic
![]()
Обзор: Кофемашина Gaggia Syncrony Logic RS
![]()
Обзор: Кофемашины Gaggia Syncrony Logic
![]()
Обзор: Gaggia Syncrony Digital Bean to Cup Coffee machine from MrBean2Cup
![]()
Обзор: Gaggia Syncrony Logic RS Super-Automatic Espresso Machine
![]()
Обзор: Чистка от накипи кофемашины Gaggia Syncrony Digital
![]()
Обзор:
Добавить своё видео
-
Страница 1
ISTRUZIONI PER L ’USO OPERA TING INSTRUCTIONS GEBRAUCHSANWEISUNG MODE D’EMPL OI INSTRUCCIONES DE USO GEBRUIKSAANWIJZING INSTRUCÇOES E MODO DE EMPREGO SY NCR ON Y L OGIC[…]
-
Страница 2
Congratulazioni! Ci congratuliamo con voi per l’acquisto di questa macchina per caffè espresso, di qualità superiore, e vi ringraziamo per la fiducia accordataci. Prima di mettere in funzione la macchina, vi consigliamo di leggere attentame nte le istru zioni per l’ uso che vi spiegano come uti lizzarla, p ulirla e man tenerla in pe rfetta e[…]
-
Страница 3
3[…]
-
Страница 4
4 […]
-
Страница 5
5[…]
-
Страница 6
6 P RE C AU ZI ON I I M PO RT ANTI Dur ant e l’util iz z o d i e le t tr od ome st ic i, è c ons iglia bile pre ndere alcun e pr eca uzion i pe r limi tare il ris chio di incendi , scos se elet triche e / o incidenti . 1 Leg ger e a tte ntame nte tu tte le is tru zioni ed in for — maz ion i ripo rta te in ques to manu ale e in qual sia si alt ro[…]
-
Страница 7
7 GENERALITÀ — DA TI TECNICI 1 GENERALITÀ La macchin a da caffè è indicata per la preparazi one di caffè espresso impiegando sia caf fè in grani sia caffè macin ato ed è dota ta di un dispo sitivo per l’eroga zione del vapore e dell’acqua calda. Il corpo della macchina d al l ’ e le g a nt e d e si g n è s t a t o p ro g e tt a t o p[…]
-
Страница 8
8 misure in millimetri NORME DI SICUREZZA[…]
-
Страница 9
9 3 NORME DI SICUREZZA Mai mettere a contatto dell’acqua le parti sotto c or r en t e: p e ri c ol o d i c or t oc i rc u i to ! I l v ap o re surriscaldato e l’acqua calda possono provocare scottature! Mai dirigere il getto di vapore o del- l’acqua calda verso parti del corpo, toccare con precauzione il beccuccio vapore / acqua calda: perico[…]
-
Страница 10
10 NORME DI SICUREZZA — INST ALLAZIONE centro di assistenza autorizzato. Nel caso di interventi non eseguiti a regola d’arte, si declina ogni responsabilità per eventuali danni. Antincendio In caso di inc endio uti lizza re e stint ori ad ani dride carbonica (CO 2 ). Non utilizzare acqua o estintori a polvere. Legenda componenti macchina Conteni[…]
-
Страница 11
11 INS T ALLAZ ION E — MACIN ACAF FE’ — REG OLA ZION E D OSE CA FFE ‘ I m m e t t e r e n e l s e r b a t o i o ( 9 ) s e m p r e e soltanto acqua fresca non gassata. Acqua calda nonché altri liquidi possono danneggiare il ser bat oio e/o la macch ina . Non met ter e in funz ion e la macch ina senza acqua: accertars i che ve ne sia a suf[…]
-
Страница 12
12 EROGAZIONE CAFFE’ contenitore caffè, in senso antiorario si aumenta la dose di caffè macinato; ruotando il pomello in senso orario si diminuisce la dose di caffè macinato. La re gola zion e de lla dos e de ve ess ere effe ttua ta prima di premere il pulsante di erogazione caffè. Ques to sistema permet te di otten ere un’erog azion e o[…]
-
Страница 13
13 EROGAZIONE ACQUA CALDA — EROGAZIONE V APORE • Do po av er com piu to il ci clo di pr ein fus ion e, il ca ff è c om in ce rà a fu or iu s ci re d al b e cc uc ci o e ro ga to re (1 4) . • L ’erogazione del caffè si fermerà automaticamente quando viene raggiunto il livello impostato con il pomello (22); è comunque possibile interromper[…]
-
Страница 14
14 P U L IZ I A E MA NU TE NZ IO NE — D EC AL CI FI CA ZI ON E • Non utilizzare oggetti acuminati o prodotti chimici aggressivi (solventi) per la pulizia. Si consiglia di pulir e quoti dianam ente il serbat oio dell’acqua: — Estrarre il filtro (C) posto all’interno del serbatoio e pulirlo con acqua corrente potabile. — Riposizionare il filt[…]
-
Страница 15
15 INFORMAZIONI CARA TTERE GIURIDICO — SMAL TIMENTO • L as c i a r e r i s ca l d a r e l a m a c ch i n a e v u o t a r e i l ri m an e nt e c o nt e nu t o d e l s e rb a to i o d e ll ’ ac q ua ruotando il pomello vapore (17) in senso antiorario; per fermare l’erogazione ruotare il pomello (17) in senso orario. Qu a lo ra s i u ti li z zi […]
-
Страница 16
16 SPIE P ANNELLO COMANDI 14 SPIE P ANNELLO COMANDI Segnalazioni Cause Rimedi Luce verde (29) Macchina accesa Luce verde (24) fissa Ma cch in a i n te mpe ra tur a pro nt a: — per l’erogazione del caffè; — per l’erogazione dell’acqua calda. Luce verde (24) lampeggiante Macchina in fase di riscaldamento per l’ erog azi one caff è e d ac q[…]
-
Страница 17
17 PROBLEMI — CAUSE — RIMEDI Problemi Cause Rimedi La macchina non si accende La macchina non è collegata alla rete elettrica Co ll ega re l a ma cc hi na a ll a r et e elettrica Lo spor tel lo d i s ervi zio è a pert o Chiudere lo sportello Il caffè non è abbastanza caldo Le tazzine sono fredde Scaldare le tazzine N o n f u o r i e s c e a c q[…]
-
Страница 18
18 IMPORT A NT SAFEGUARDS Whe n usin g e lectri cal ap pl ia nces, bas ic safety pre cau tio ns sho ul d alwa ys be foll owed to red uce the ris k of fir e, ele ctric sho ck, a nd/ or i nju ry to person s, in clud ing the fol lowi ng: 1 Read all instructions and information in this instruction book and any other literature included in this carton r[…]
-
Страница 19
19 GENERAL INFORMA TION — TECHNICAL SPECIFICA TIONS 1 GENERAL INFORMA TION This coffee machine is ideal for preparing espresso coffe e using either coffee beans or ground coffee, and is equipped with a device for dispensing steam and hot water . The elegantly styled machine is designed for nor mal hom e u se o nly , a nd i s no t su itab le for con[…]
-
Страница 20
20 sizes in millimeter SAFETY RULES[…]
-
Страница 21
21 3 SAFETY RULES Never place electrical parts in contact with water: danger of short-circuit! The superheated steam and hot wa ter ma y ca use sc aldi ng! Ne ver aim the steam or hot water flow towards parts of your body , use caution when touching the steam / hot water nozzle: danger of scalding! Intended use The coffee machine is designed for h[…]
-
Страница 22
22 INST ALLA TION Key to machine components Coffee bean container Coffee bean container lid Grinder adjustment knob Dose adjustment knob Ground coffee dispenser lid Cup shelf Power switch (ON/OFF) Water container lid Water container Dregs box Power cable Water tray + grill Water tray level float Height-adjustable coffee dispenser Steam/hot water t[…]
-
Страница 23
23 INS T ALLA TION — COFF EE GR INDE R — DO SE ADJUS TME NT • T ake off the lid (2) and fill the container with coffee beans (1). Fit the lid of the coffee container (1) back into place. Ground or freeze-dried coffee or any other objects will damage the machine. • Replace the lid (2) on the coffee container (1). • Insert the plug (1 1) into […]
-
Страница 24
24 DISPENSING COFFEE — DISPENSING HOT W A TER 7 DISPENSING COFFEE Not e: If the mac hine fai ls to dis pens e coffee , ma ke su re th e w ate r c ont ain er c ont ain s w at e r; y o u m a y c h e ck t h e w a te r l ev e l i n t he container on the left-hand side of the machine. Before dispensing coffee, make sure that th e g r ee n t e mp e ra t […]
-
Страница 25
25 DISPENSING STEAM — CLEANING AND MAINTENANCE • Before dispensing hot water , make sure that the green temperature ready light (24) remains lit. Wh e n t he m ac hi n e i s r e ad y t o d is p en s e c of fe e, proceed as follows: • Place and cup and/or a receptacle beneath the hot water/steam tube (15). • T urn the knob (17) counter-clockwi[…]
-
Страница 26
26 DESCALING — LEGAL NOTICE • The co ffee disp enser ( 14) may be rem oved fo r cle ani ng. Rins e the dispe nsi ng chan nel s tho roughl y with hot water . 10.1 Dispensing unit • The dispensing unit (18) must be cleaned every time you fill the ground coffee container or , in any case, at least once a week. • T urn off the machine by setting[…]
-
Страница 27
27 DISPOSAL do not constitute part of any prior or pre-existing agreement or legal contract, nor do they change the provisions thereof. • All manufacturer obligations are derived from the cor res pon din g sale cont rac t, whi ch also inc lud es the complete and sole rules governing the warranty . • The contractual warranty terms are not limite[…]
-
Страница 28
28 CONTROL P ANEL PILOT LIGHTS 14 CONTROL P ANEL PILOT LIGHTS W arning Causes Remedies Green light (29) Machine on Green light (24) remains lit Ma chi ne at t em per at ure , rea dy : — to dispense coffee — to dispense hot water Green light (24) flashing Mac hin e heat ing to dispe nse coff ee and hot wa ter Green light (26) remains lit Mach ine d[…]
-
Страница 29
29 PROBLEMS — CAUSES — REMEDIES Problems Causes Remedies The machine does not turn on The machine i s not plugged into the electrical mains Plug the machine into the electrical mains The ser vic e do or is o pen Close the door The coffee is not hot enough The cups are cold Heat the cups No hot water or steam flows out The steam tube hole is clogge[…]
-
Страница 30
30 I M PO RT ANT Lors de l’ utili sation d’ appa reils électriq ues, il est im portant de prendre les pré cautions suiv antes, af in d’ évite r les décharges élec triques, les court s circuits et les accident s corporels. 1 Lire toutes les instructions et les indications données dans cette brochure, ainsi que toute autre information que[…]
-
Страница 31
31 GÉNÉRALITÉS — CARACTÉRISTIQUES TECHNIQUES 1 GÉNÉRALITÉS Cette machine à café est en mesure de préparer des caf és expre sso à par tir de mélan ges soit en grain s, soit moulus et est équipée d’un dispositif de distribution de la vapeur et de l’eau chaude. Avec un habillage machine au design élégant, cet appareil a été con?[…]
-
Страница 32
32 mesures en millimètres NORMES DE SÉCURITÉ[…]
-
Страница 33
33 3 NORMES DE SÉCURITÉ Ne jamais mettre les pièces sous tension au con- tact de l’eau: danger de courtcircuit! La vapeur et l’eau atteignent une température élevée: danger de brûlures! Ne jamais diriger le jet de vapeur ou d’ea u chaude vers des parti es du corp s, touch er le bec vapeur / eau chaude avec précaution: danger de brûlu[…]
-
Страница 34
34 NORMES DE SÉCURITÉ — INST ALLA TION Les réparati ons doivent être eff ectué es exclu siveme nt par un Centre d’Assistance Agréé. Dans le cas d’interventions non effectuées dans la règle de l’art, le Fabricant décline toute responsabilité en cas de dommages. Normes en cas d’incendie En cas d’incendi e, utiliser des extincteur[…]
-
Страница 35
35 MOU LIN À CAFÉ — RÉ GLAG E D E L A DOS E D E C AFÉ reposer le couvercle (8). P o u r r e m p l i r l e r é s e r v o i r ( 9 ) , u t i l i s e r exc lusi vem ent de l’eau froi de non pétil lant e. De l’ ea u c ha ude e t t ou t a ut re l iqu id e p eu ven t ab î me r l e r é se rv oi r e t/ o u l a m ac h in e. N e p as mettre la mac[…]
-
Страница 36
36 DISTRIBUTION DE CAFÉ le se ns cont raire des a iguille s d’un e montr e; pour diminuer la dose de café moulu, tourner le bouton dans le sens des aiguilles d’une montre. Le r églag e de l a dos e doi t êtr e effect ué av ant d e presser le bouton de distribution du café. Ce système permet d’obtenir une distribut ion optimale avec tou[…]
-
Страница 37
37 DISTRIBUTION D’EAU CHAUDE — DISTRIBUTION DE V APEUR distribution de café à tout moment, en pressant le bouton (23). • Ensuite, la machine retourne automatiquement au fonctionnement normal (voir par . 7.1). 8 DISTRIBUTION D’EAU CHAUDE Att enti on! au déb ut, de pe tits jet s d ’eau chaude peuvent s’échapper du bec: danger de b rû l[…]
-
Страница 38
38 N E T T OY A GE E T M AI NT EN A NC E — D ÉT A R TR AG E Il est recommandé de nettoyer chaque jour le réservoir d’eau: — Extraire le filtre (C) situé à l’intérieur du réservoir et le nettoyer avec de l’eau courante portable. — Re poser le filt re ( C) da ns s on lo geme nt et le faire tourner doucement en exerçant une légère pr[…]
-
Страница 39
39 INFORMA TIONS DE NA TURE JURIDIQUE — MISE À LA DÉCHARGE pour arrêter la distribution, tourner le robinet (17) dans le sens des aiguilles d’une montre. Si v ous u til is ez un p rod ui t di ff ére nt du produit préconisé, il est recommandé de respecter les instructions du fabricant, reportées sur l’emballage du produit détartrant. 12[…]
-
Страница 40
40 TÉMOINS DU P ANNEAU DE COMMANDE 14 TÉMOINS DU P ANNEAU DE COMMANDE Signalisations Causes Remèdes T emoin vert (29) Machine alimentée T emoin vert (24) mode continu T e mp ér atu re at te in te: — pour la distribution de café; — pour la distribution d’eau chaude Te m o i n v e r t ( 2 4 ) m o d e c l i — gnotant La machine est en train de[…]
-
Страница 41
41 SYMPTÔME — CAUSES — REMÈDE Problèmes Causes possibles Remèdes La machine ne s’allume pas La machine n’est pas rel iée à la ligne d’alimentation électrique Relier la machine à la ligne La port e d e se rvi ce e st ouve rte Fermer la porte Le café n’est pas assez chaud Les tasses sont froides Chauffer les tasses L’e a u c h a ud[…]
-
Страница 42
42 WI CH TI GE V ORS IC HTSM ASS NAH ME N B ei de r V erw e nd u n g vo n E l ek tr og er ät e n em pfi eh lt es s i c h , si ch a n ei n i ge V ors ic h tsm a ß na h me n zu ha lt en , um di e Gefa hr vo n B ra nd , ele ktri sch en S ch lä ge n un d U nfä l le n ei nzu sc h rä nk en . 1 Alle in diesem oder jedem anderen in der Verpackung enth[…]
-
Страница 43
43 ALLGEMEINES — TECHNISCHE DA TEN 1 ALLGEMEINES Dies e Kaffe emasc hine ist für die Zub ereit ung v on E sp r es s o ka ff e e k o n zi p i er t , w ob e i s ow o hl g a nz e Kaffeebohnen als auc h vorgemahlener Kaffee ver — wendet werden kann; sie verfügt über eine Dampf- und Heißwasserdüse. Die Maschine mit elegantem Design ist ausschließl[…]
-
Страница 44
44 Maße in Milimeter SICHERHEITSVORSCHRIFTEN[…]
-
Страница 45
45 3 SICHERHEITSVORSCHRIFTEN Die unter Span nung steh ende n Bau teil e dür fen nie mi t W as ser in Ko nta kt ko mme n: Kur zsc hlu ssg efa hr! He i ße r D a mp f u n d h e iß es Wa ss e r k ön n en z u V erbren nungen führ en! Nie den Damp fstra hl auf Körperteil e richten. Die Dampf-/Heiß wasserdüse imm er v ors icht ig anfa sse n: V erb[…]
-
Страница 46
46 SICHERHEITSVORSCHRIFTEN — INST ALLA TION Netzkabel aus der Steckdose ziehen. Niemals eine defekte Espresso-maschine in Betrieb nehmen. Nur die autorisierten Servicestellen dürfen Arbeiten und Reparaturen vornehmen. Die Rep araturen m üssen auss chließlich von auto- risierten Servicestellen ausgeführt werden. Sollten Eingriffe von nicht autor[…]
-
Страница 47
47 INS T ALLA TION — KAFF EEMÜH LE 4.3 Erste Inbetriebnahme • Den Wassertank (9) durch Anheben heraus- nehmen und den Deckel (8) abnehmen. M it f ri sch em Was se r au ss pü len u nd f üll en . Es empfiehlt sich, den T ank nicht allzu sehr zu füllen. Den T ank wieder in seinen Sitz einsetzen und den Deckel (8) aufsetzen. De n W as se rta nk […]
-
Страница 48
48 EINSTELLUNG DER KAFFEEPUL VERPORTION — KAFFEEZUBEREITUNG Die Mahls tufe muss nac hgestellt werd en, falls der Kaffee nicht optimal zubereitet wird: zu schnelle Zubereitung = zu grobe Mahlstufe > Den Drehgriff auf die niedrigeren Zahlen einstellen; tröp felnd e ode r gan z aus bleib ende Zube reitu ng = zu feine Mahlstufe > Den Drehgriff a[…]
-
Страница 49
49 HEISSW ASSERFUNKTION — DAMPFFUNKTION • Mit dem mitgelieferten Messlöffel (21) die richtige Menge Kaffeepulver in den Einfüllschacht füllen. Jeweils nur einen Messlöffel Kaffeepulver einf üllen . Für zwei T as sen m üssen zwei s e p a r a t e Z y k l e n h i n t e r e i n a n d e r a u s g e f ü h r t werden. • Den Wählschalter Kaffe[…]
-
Страница 50
50 R E I NI G UN G UN D W AR TU NG — E NT KA LK EN Na ch d ies em Vorg an g d ie D amp fd üse m it ei ne m feuchten Lappen reinigen. 9.1 Ü b e r g a n g v o n D a m p f a u f K a f f e e — zubereitung • Für di e K affe ezu bere itu ng mu ss di e T a ste (2 7) gedrückt werden. • Beim Übergang von der Dampffunktion auf Kaffee- zubereitung bl[…]
-
Страница 51
51 RECHTLICHE INFORMA TIONEN — ENTSORGUNG unschädliches und ungiftiges Entkalkungsmittel für Kaffeemaschinen verwenden. Acht ung! Auf kei nen Fall zum Ent kalke n Essig verwenden. • Das Entkalkungsmittel laut Packungsbeilage mit Wass er v erd ün nen un d de n Wass er tan k d am it füllen. • Di e M a sc h in e m i t d e m H a up t sc h al t […]
-
Страница 52
52 KONTROLLLEUCHTEN BEDIENFELD 14 KONTROLLLEUCHTEN BEDIENFELD Leuchten Ursachen Behebung Grüne Leuchte (29) Maschine eingeschaltet Grüne Leuchte (24) leuchtet konstant Maschine auf Betriebstemperatur: — für Kaffeezubereitung; — für Heißwasser Grüne Leuchte (24) blinkt Maschine heizt für Kaffee- zubereitung und Heißwasser auf Grüne Leuchte […]
-
Страница 53
53 PROBLEME — URSACHEN — BEHEBUNG Probleme Ursachen Behebung Die Maschine schaltet nicht ein D i e M a s ch i n e i s t n i c h t a n d a s Stromnetz angeschlossen Die M aschine an da s Strom netz anschließen Die Ser vic etür is t of fen Servicetür schließen Der Kaffee ist nicht heiß genug Die T assen sind kalt T asse vorwärmen Es trit t kein[…]
-
Страница 54
54 P RE C AU CI ON ES I M PO RT ANTE S Durante el uso de elec trodomé sticos, s e aconseja tomar algu nas precauciones para evit ar el riesgo de sacudida s eléc tricas o in cendios. 1 Lee r a ten tam ent e to das la s i nst ruc cio nes e i nfo r- mac ion es des cri tas en est e manua l y en cual quier otr o foll eto qu e veng a dentr o del emba l[…]
-
Страница 55
55 INFORMACIONES DE CARÁCTER GENERAL — DA TOS TÉCNICOS 1 INFORMACIONES DE CARÁCTER GENERAL Esta máquina de café es indicada para la preparación de café expreso tanto con café en granos como con café molido y está provista de un dispositivo para el suministro del vapor y del agua caliente. La máquina, con cuerpo de elegante diseño, ha si[…]
-
Страница 56
56 medidas en milímetros NORMAS DE SEGURIDAD[…]
-
Страница 57
57 3 NORMAS DE SEGURIDAD No poner nunca en con tacto con el agua las partes por las que pasa la corriente: ¡peligro de corto- circuito! ¡ El vapor calentado y el agua caliente pueden provocar quemaduras! No dirigir nunca el chorro de vapor o de agua a las partes del cuerpo, to ca r co n p re ca uc ió n e l p it ón d el v apo r/ ag ua caliente: […]
-
Страница 58
58 NORMAS DE SEGURIDAD — INST ALACIÓN Reparaciones/Mantenimiento En caso de aver ía, def ect o o sosp ech a de des per fect o desp ués de una caíd a, d escon ecta r ens egui da el enchufe de la toma de corriente. No poner nunca en funcionamiento una máquina que presenta una avería o un desperfecto. Únicamente los Centros de Asistencia Aut or[…]
-
Страница 59
59 INS T ALACI ÓN — MO LINIL LO D E C AFÉ Si al en cend er la má qui na s e e nci ende de mo do int ermi ten te e l le d r ojo (3 0), si gnifi ca q ue una de l a s p a r t e s a n t e r i o r m e n t e i n d i c a d a s n o h a s i d o correctamente colocada. No ta i mp or tan te . Es i mp or tan te le er c ua nt o se i nd ic a e n el C ap ít […]
-
Страница 60
60 REGULACIÓN DOSIS CAFÉ — SUMINISTRO DE CAFÉ Us ar me zc la s de c af é e n g ran os p ar a m áq ui nas ex p re so . E ví t es e e l u so d e g ra do s e x tr em os de mo lie nda (po r ej. 1 – 16); en tale s cas os util iz ar me zcl as dif eren tes de café . Con sérv ese el café en luga r fre sco, en un c ont ened or herm éti came nte […]
-
Страница 61
61 SUMINISTRO DE AGUA CALIENTE — SUMINISTRO V APOR • Para obtener la cantidad adecuada de café molido a in tr odu ci r , s e d eb erá u ti liz ar s ólo e l cu bi let e de m ed ic ió n ( 21 ) qu e s e en tr eg a j un to c on l a máquina. Int rod uci r só lo el café corr espo ndi ent e a un cubi lete de medic ión por vez; para prepa rar dos[…]
-
Страница 62
62 L I M PI E ZA Y M AN TE NI MI EN T O — DE S CA LC IF I CA CI ÓN • Este mismo sistema puede utilizarse para calentar otras bebidas. Una vez ejec utada esta oper ación lim piar el tubo vapor con un paño húmedo. 9.1 Pas o d e p osic ión v apor a pos ici ón café • Para sumi nistra r caf é se deb e pre siona r el bo- tón (27). • Du r a[…]
-
Страница 63
63 DESCALCIFICACIÓN — INFORMACIONES DE CARÁCTER LEGAL — DESGUACE Si se desea efectuar personalmente esta operación, se puede utilizar un producto desca lcificad or para máqui nas de café de tip o no tóxico ni nocivo, normalmente disponible en comercio. ¡Atención! En ningún caso utilizar vinagre como descalcificador . • Me zc l ar e l d[…]
-
Страница 64
64 TESTIGO P ANEL DE CONTROL 14 TESTIGO P ANEL DE CONTROL Señalacion Causas Remedio Luz verde (29) Máquina encendida Luz verde (24) fija Má qui na en t em per at ura “ lis ta ”: — para el suministro del café; — para el suministro del agua caliente Luz verde (24) intermitente Máquina en fase de calentamiento para el suministro de café y a[…]
-
Страница 65
65 PROBLEMAS — CAUSAS — REMEDIO Problemas Causas Remedio La máquina no se enciende La máquina no está conectada a la red eléctrica C o n e c t a r l a m á q u i n a a l a r e d eléctrica L a p o r te z u el a d e s e r vi c i o e st á abierta Cerrar la portezuela El c afé no es tá su fici ent eme nte caliente Las tazas están frías Calen[…]
-
Страница 66
66 P RE C A U Ç Õ E S I M P O RT A NT ES Quando se usam elect rdomésticos é aconselhável tomar algu mas precauções para limitar o risco de incêndios, choques eléc tricos e / ou acidentes. 1 Ler atentamente todas a instruções e informações apresentadas neste manual e em qualquer outro folheto contido nas embalagens, antes de preparar ou[…]
-
Страница 67
67 GENERALIDADES — DADOS TÉCNICOS 1 GENERALIDADES A máq uina de café é in dicad a par a a p repar ação de ca fé e xpre sso, ut iliz ando ta nto ca fé e m gr ãos como ca fé em pó, e poss ui um disp ositivo pa ra o fornecimento de vapor e de água quente. O corpo da máquina , com design elegante, foi projetado para uso doméstico e não ?[…]
-
Страница 68
68 medidas en milímetros NORMAS DE SEGURANÇA[…]
-
Страница 69
69 3 NORMAS DE SEGURANÇA Nunc a coloca r as parte s lig adas à corrent e elétri ca em contato com a água: perigo de curto-circuito! O vapor superaquecido e a água quente podem provocar queimaduras! Nunca posicionar o jato de vapor ou de água quente em direção às partes do corpo , toc ar com cui dado o bico de vapo r/ água quente: perigo d[…]
-
Страница 70
70 NORMAS DE SEGURANÇA — INST ALAÇÃO As reparaçõ es devem ser execu tadas unicam ente por um centro de assistência autorizado. No caso de intervenções não efetuados de acordo com as regras declina-se qualquer responsabilidade por eventuais danos. Anti-incêndio Em cas o de inc ên di o ut il iz ar ext int or es de gá s ca rb ôn ico (CO 2[…]
-
Страница 71
71 INST ALAÇÃO — MOEDOR DE CAFÉ — REGULAGEM DA DOSE DE CAFÉ Colocar no re servatório (9) sempr e e so- mente água fria sem gás. A água quente, as sim co mo ou tro s l íqu ido s, po de d ani fic ar o re ser va tór io e/o u a máq ui na . Não col oc ar a má qu in a par a fun cio nar se m água : cert ific ar- se de que a sua qua ntid ade[…]
-
Страница 72
72 FORNECIMENTO DE CAFÉ correspondendo à referência (B). Rodando o botão (4), situado dentro do recipiente de café, em sentido a nt i -h o rá r i o a u me n t a- s e a d o se d e p ó d e c af é ; rod ando o b otão em sen tido hor ário dim inui -se a dose de pó de café. A regulagem da dose deve ser feita antes de pres- sionar o botão de[…]
-
Страница 73
73 FORNECIMENTO DE ÁGUA QUENTE — FORNECIMENTO DE V APOR • Esvaziar o pó de café dentro do dosador . • Fechar a tampa (5). • P ar a fo rne ce r o ca fé é pr e ci so pr es si on ar o bo tã o (23 ); em se gu ida , in ici a- se o cic lo d e f or nec im ent o. • Depois de ter passado pelo ciclo de pré-infusão, o café começará a sair p[…]
-
Страница 74
74 L I M PE Z A E M AN UT EN ÇÃ O — DE SC AL CI FI CA ÇÃ O soment e quando a máquina estiver fria e deslig ada da rede elétrica. • Não emergir a máquina na água e não colocar os componentes na máquina de lavar louças. • Não utiliz ar objetos pontud os ou produto s quím icos agressivos (solventes) para a limpeza. Aconse lha- se a l[…]
-
Страница 75
75 INFORMAÇÕES DE CARÁTER JURÍDICO — DESA TIV AÇÃO DA MÁQUINA • Esvaziar 2/3 do conteúdo do reservatório de água, girando o botão vapor (17) em sentido anti- horário; para interromper o fornecimento girar o botão (17) em sentido horário. • Deixar aquecer a máquina e esvaziar o conteúdo r e s ta n t e d o r e s e r v a t ór i o […]
-
Страница 76
76 LUZES DE SINALIZAÇÃO DO P AINEL DE COMANDOS 14 LUZES DE SINALIZAÇÃO DO P AINEL DE COMANDOS Sinalizações Causas Soluções Luz verde (29) Máquina ligada Luz verde (24) fixa Má qui na em t em per at ura p ron ta : — para o fornecimento do café; — para o fornecimento de água quente. Luz verde (24) intermitente Máquina em fase de aquecim[…]
-
Страница 77
77 PROBLEMAS — CAUSAS — SOLUÇÕES Problemas Causas Soluções A máquina não liga A máquina não está ligada à rede elétrica Ligar a máquina à rede elétrica A abe rtur a d e se rviç o e stá abe rta Fechar a abertura O café não está suficient emente quente As xícaras estão frias Aquecer as xícaras Não sai água quente ou vapor O f[…]
-
Страница 78
78 BEL ANGRI JKE V OO R Z O R GS M A A TRE GE LE N Bij het gebruik van elektrische huishoudelijke apparaten is het raadzaam enkele voorzorgsmaatregelen in acht te nemen, om brandg evaar, elektrisc he schokk en en/of dergelijk e ongelu kken zoveel mogelijk te voorkomen. 1 Aandachtig alle aanwijzingen en informatie in deze gebruiksaanwijzing en ander[…]
-
Страница 79
79 ALGEMEENALGEMEEN — TECHNISCHE GEGEVENS 1 ALGEMEEN He t k of fie zet ap par aa t is g esc hi kt v oor h et ze tt en v a n e s p r e s s o k o ff i e m e t h e t g e b r u i k v a n z o w e l koffiebonen als gemalen koffie en is uitgerust met een installatie voor afgifte van stoom en warm water . Het apparaat heeft een elegant design, is ontwor[…]
-
Страница 80
80 afstanden in mm VEILIGHEIDSVOORSCHRIFTEN[…]
-
Страница 81
81 3 VEILIGHEIDSVOORSCHRIFTEN Laat onderdelen die onder stroom staan nooit in aanraking komen met water: gevaar voor kortslui- ting! Oververhitte stroom en heet water kunnen bran dwon den v eroo rzake n! R icht noo it s trale n stoom of heet water op lichaa msdelen , wees voor- zichtig bij het aanraken van het mondstuk voor stoom/heet water: gevaar[…]
-
Страница 82
82 VEILIGHEIDSVOORSCHRIFTEN — INST ALLA TIE reparaties verrichten. Reparat ies mogen uitsluitend worden uitgev oerd door een erkend servicecentrum. In het geval van ingrep en die niet corr ect zijn uitg e- voerd, wordt elke aansprakelijkheid voor eventuele sch ade afg ewez en. Brandpreventie Gebruik brandblusapparaten met kooldioxyde (CO 2 ), in he[…]
-
Страница 83
83 INS T ALLA TIE — K OFIE MOLEN — AFSTE LLI NG K OFFIE DOSI S Doe uitsluitend vers water zonder koolzuur in het reservoir (9). Warm water of andere v l o e i s t o f f e n k u n n e n h e t r e s e r v o i r e n / o f h e t apparaat beschadigen. Schakel het apparaat niet in zonder water: controleer of er voldoende water in het reservoir zit. • V[…]
-
Страница 84
84 AFGIFTE V AN KOFFIE’ een optimale afgifte bij alle soorten koffie die in de handel verkrijgbaar zijn. 7 AFGIFTE V AN KOFFIE Opme rking : als het app araat gee n kof fie afgeeft, moet worden gecontroleerd of het waterreservoir water bevat; op de linkerkant van het apparaat kan het waterniveau in het reservoir worden gecontroleerd. V ó ó […]
-
Страница 85
85 W AFGIFTE HEET W A TER — AFGIFTE STOOM — REINIGING EN ONDERHOUD 8 AFGIFTE HEET W A TER Let op: aan het begin van de afgifte kunnen er spatten heet water naar buiten komen: brandwondengevaar . De heetwaterpijp kan zeer heet worden: kom er niet met de handen aan. • Cont roleer vóór afgifte van heet water of het groe ne lampje van de temperatuu[…]
-
Страница 86
86 R E I NI G IN G EN ON DE RH O UD — O N TK AL KI N G zachtje s op te drukken en tegelijker tijd een beetje te draaien. — Vul het reservoir met vers drinkwater . Bij gebruik de doseerder voor gemalen koffie dagelijks reinigen: — Pak he t b ij gel ev er de kw ast je , r ei ni g d e dos ee rde r . • Gebruik een zachte doek met weinig water om het[…]
-
Страница 87
87 INFORMA TIE V AN JURIDISCHE AARD — VERWERKING ALS AFV AL 12 I NF O R M A T I E VAN J U R ID I S C HE AARD • Deze instructies bevatten de informatie die nodig is voor een correct gebru ik, voor de bedie ning en voor een zorgvuldig onderhoud van het apparaat. • De ze k en ni s, e n h et i n a ch t n em en v an d ez e ins truct ie s vorm en een[…]
-
Страница 88
88 LAMPJES BEDIENINGSP ANEEL 14 LAMPJES BEDIENINGSP ANEEL Signaleringen Oorzaken Oplossingen Groen lampje (29) Machine aan Groen lampje (24) bra ndt con- tinu Ma chi ne op “ te mpe ra tuu r ber ei kt ”: — voor afgifte van koffie; — voor afgifte van heet water . Groen lampje (24) knippert M ac h in e w ar m t o p v oo r a f g if t e koffie en […]
-
Страница 89
89 PROBLEMEN — OORZAKEN — OPLOSSINGEN Problemen Oorzaken Oplossingen Het apparaat gaat niet aan Het apparaat is niet op het elektri- citeitsnet aangesloten S lu i t h e t a p pa r aa t a an o p h e t elektriciteitsnet Het deu rtj e is op en Sluit het deurtje De koffie is niet warm genoeg De kopjes zijn koud V erwarm de kopjes Er komt geen water of[…]
-
Страница 90
90 COD. 1.6.589.1 1.00 REV . 02 DEL 25/10/04[…]
The Gaggia Syncrony Logic RS is a super-automatic espresso machine which features a rapid boiler system.
| Gaggia Syncrony Logic RS |
|---|
|
|
| Manufacturer: Gaggia |
| Model Name: Syncrony Logic RS |
| Model Number: E74043 |
| Type: Super-Automatic |
|
|


Contents
- 1 Machine Set-Up/New Users
- 1.1 Bean Compatibility
- 1.2 First Time Use
- 1.2.1 Initial Setup/Priming
- 1.2.2 Beans/Grinder Set-Up
- 1.2.3 Drink Adjustment
- 1.3 Puck Consistency
- 1.4 Bypass Doser
- 1.5 Brew Unit/Pump Noises
- 2 Cleaning & Maintenance
- 2.1 Machine Maintenance
- 2.1.1 Descaling
- 2.1.2 Brew Unit
- 2.1.3 Steam Wand Cleaning
- 2.1.4 Spout Cleaning
- 2.1.5 Recommended Cleaning Products
- 2.1 Machine Maintenance
- 3 Troubleshooting
- 3.1 No Crema or Bad Tasting Shots
- 3.2 Difficulty Frothing
- 3.2.1 Auto-Frother Issues
- 3.2.2 Pannarello Issues
- 3.3 Flow Issues
- 3.3.1 Poor Flow or No Flow
- 3.3.2 No Flow From Steam Wand
- 3.3.3 Reduced Or No Flow During Brewing
- 3.3.4 Have Flow But Getting No Flow Error
- 3.4 Machine Is Leaking
- 3.4.1 From The Bottom
- 3.4.2 From The Back
- 3.4.3 From The Wand
- 3.5 Machine Not Heating Or Powering On
- 3.5.1 No Power
- 3.5.2 No Or Little Steam
- 3.5.3 Cold Shots
- 3.6 Alarm Light On
- 3.7 Alarm Light Flashing
- 3.8 Brew Unit Stuck
- 3.9 Too Much Steam/Milk Boiling
- 4 Diagrams & Manuals
- 5 Specifications
Machine Set-Up/New Users
There are some key differences in how Super-Automatic machines work in comparison to semi-automatic/manual units to be aware of before the first use. Having a working knowledge of the machine before using it will help ensure a satisfying experience, increase the longevity of the unit, and prevent possible issues/damage that can result from misuse. This information in this section will cover machine set up and basic use. To start, the video below provides five useful tips to help you understand your super-automatic machine:
Bean Compatibility
Before going into the set up of the machine it’s best to review this topic because of its importance. The most important thing to understand about Super-Automatic machines is that they do not accept oily, caramelized, or flavored beans. The video below discusses what beans are compatible, and what beans are not:
First Time Use
The machine manual provides a thorough walk-through of the set-up of the unit, but there’s so much information it can be mystifying. In this section we will walk you through the most important points of the machine setup.
Initial Setup/Priming
When the machine is first unpacked there are several things to consider before even powering the unit on. When first unpacking the unit you may notice water or grounds in the machine. This is normal as all machines are manufacturer tested before leaving the factory.
- First, make sure all of the components are fully inserted into the machine.
- Plug the machine directly into an outlet. Because this is a high power unit it should not be plugged into surge protectors, extension cords, or timers.
- Fill the water tank and firmly reinsert it.
- Power the unit on. The machine should now go through an initial start-up/priming cycle. If the machine does not complete the priming cycle successfully make sure the tank is firmly inserted. If the machine continues not to prime then the machine may need to be force primed. Contact Technical Support for more information if this happens — force priming is normal and expected as the machines are drained to prevent leaking/freezing damage during shipping of the product.
- Once the machine has completed the automatic priming you will want to manually prime the unit to ensure the system is properly filled with water. To do this activate the machine’s hot water function and pull 3-4 oz. of liquid through. The machine should now be fully primed, proceed to the next section.
Beans/Grinder Set-Up
After the machine has been successfully primed it is important to set the grinder for initial use. The grinder fineness setting should only be adjusted while the grinder is running if it is being adjusted in the finer direction. The finer direction is indicated by lower numbers.
- For initial use the grinder should be set to the coarsest grind setting, which will be the largest number on the grinder knob. Once the dial is set you can add the beans in; make sure to only add dry beans as prescribed in the Bean Compatibility section.
- Set the aroma to the maximum setting using the aroma adjustment knob. This increases how much the grinder grinds each time. This will help the grinder mechanism fill with beans/grounds faster for the next step. The dial ranges from minus to plus. Plus will be the maximum aroma.
- Next choose one of the brewing options. The first few shots of the machine may come out watery/weak — this is to be expected since the beans need to feed into the grinder, and the bypass chamber needs to fill. Depending on the machine/type of bean used it can take up to 5-10 attempts.
- Once shots are pouring through consistently then settings can be adjusted. Adjustments are covered in the next section.
Drink Adjustment
The machine is now ready to brew for drinks, but the startup settings may not match the drink you are trying to brew. For the demonstration purposes this section will walk through brewing a single shot espresso from the machine.
- Set the aroma knob all the way to the plus position. This full aroma setting is typically best for espresso extraction, but can be lowered if the coffee is too strong.
- Adjust the fineness dial down to the 4 to 8 range, which is a very fine espresso grind. This adjustment must be done while the grinder is running. In order to do this press one of the brewing functions to activate the grinder. When you hear the grinder activate the knob can be turned. Turn the knob gradually to prevent jamming. Do not adjust the grinder below a 4. Especially on a new unit the burrs are not worn in, and anything less than a 4 risks the burrs coming into contact with each other. This can lead to clogging/damage.
- Most Super-Automatic machines come programmed to 1.5-2 oz. for the espresso option despite being single shot machines. For best results we suggest reprogramming the shot size to 1 oz. Shot sizes can be easily reprogrammed on this unit through the adjustment dial on the front of the machine. This will be around the second large dot — it may take a little trial and error adjusting this knob to get it just right.
- After an adjustment to the grind size it made it will typically take 3-4 shots for the machine to completely clear out the old grind size and reflect the adjustments made.
- The video below discusses how to adjust for other types of drinks. The general rule of thumb is that the more liquid volume passed through the grinds the coarser the grind should be set in order to get a balanced extraction.
Puck Consistency
A large misconception is that super-automatic machines should have a dry coffee puck after the machine is finished brewing. While this is true of other styles of espresso machine, this is not true of a super-automatic unit. Super-automatic machines utilize heat and pressure as part of the brewing process, which is key to espresso brewing. The machine achieves this through a device called a brew unit. The brew unit uses a similar but different brewing process to a semi-automatic or prosumer style machine. As a result the pucks will not always come out firm and dry. They may come out muddy or broken. This is perfectly normal; the machine will still produce a good extraction that contains crema and tastes good.
Bypass Doser
If you plan on using the bypass doser function on the machine to brew with pre-ground coffee there are a few things to consider for the best brewing experience:
- The bypass doser will only accept 8-9 grams of coffee at a time. The scoop that comes with the machine is merely for transferring coffee grinds, it is not a measurement tool. To prevent overfilling the bypass doser we suggest using a level scoop, and then taking a large pinch out of it. A little bit less than a full scoop is the perfect amount.
- Make sure to use the aroma button to activate the preground mode before beginning the brew, otherwise the machine will also grind coffee, which will result in too much coffee going into the brew unit and the machine will abort the brew.
- If the coffee is ground too coarsely the resulting shot is going to taste sour, weak or watery. Coarsely ground coffee also does not compact well, so the machine may dump the coffee if the grind is to coarse. Coffee ground for espresso should be slightly finer than table sugar or sand.
- Alternatively it is also possible to have coffee that is ground too fine. Extremely fine grinds can result in little or no flow from the machine, and very bitter shots. Coffee that is ground too finely can cause blockages in the system that can only be resolved through deep cleaning or a repair.
Do not add whole beans, or entire bags of preground coffee into this chamber. It can cause irreversible damage to the machine’s brewing assembly.
One useful trick the the bypass function allows for is that you can do a quick rinse of the brew circuit by simply running a bypass cycle and not adding any preground coffee. This will let plain water flow through the brew circuit which will remove old coffee flavors, oils, and grounds. You may want to do this if you’ve recently switched beans to remove some of the old flavors.
Brew Unit/Pump Noises
When Super-Automatic machines are in operation the brew unit will make a few different noises which are normal. The brew unit will make several loud clicking noises through the duration of the brewing cycle. These loud clicking noises are perfectly normal and will not harm the machine. The brew unit function is monitored by sensors to prevent it from being overloaded, so it cannot break itself apart.
The brew unit can also make squeaking noises during its operation. The squeaking could be from o-rings sealing on the brew unit, or the brew unit parts sliding along the tracks. If you are hearing more squeaking than normal it may be a sign that the brew unit needs to be cleaned and lubricated. Some squeaking is also normal on very new units as there are o-rings/seals that need some time to wear in.
When the pump of the machine activated for brewing, refilling, and hot water dispensing it is going to make a loud humming noise. The machine utilizes a vibration style pump. This style pump produces high pressures despite being compact. The pump achieves this through rapid vibration of internal parts, which produces a loud humming noise.
Cleaning & Maintenance
Proper machine maintenance is critical to proper machine functionality. Most machine failures are caused by a lack of cleaning and maintenance. This is vital, as many manufacturer warranties do not cover cleaning/maintenance related breakdowns. To avoid this, it is imperative to keep a regular maintenance schedule. Consult pp. 36-53 in your machine manual for fully detailed cleaning procedures, including descaling, carafe cleaning, and brew group cleaning, as well as the recommended products for machine maintenance. Listed below is a suggested maintenance rundown for most super-automatic espresso machines:
Machine Maintenance
Descaling
Descaling the machine should be done on a bimonthly basis using the product recommended by the manufacturer. Descaling is still required even if reverse osmosis, distilled, or zero water is being used. Refer to your machine manual for specific instructions for this unit.
Brew Unit
The brew unit of the machine should be removed on a weekly basis and rinsed off with cold water. Cold water must be used because hot water can wash away the lubricant that coats the moving parts of the brew unit. It is also important to use plain water; detergents and soaps should not be used. While the brew unit is removed, the brew unit chamber should be wiped down with a moist cloth to remove excess grounds and coffee residues.
Your machine features a brew unit cleaning cycle. This should be done on a monthly basis; refer to your manual for instructions on how to run one.
A complete disassembly, cleaning, and lubrication of the brew unit should be done every 500 cups or every 6 months, whichever comes first. A food safe silicone-based lubricant should be used, such as food grade Petrol-Gel.
Steam Wand Cleaning
Steam wands and nozzle attachments should be cleaned daily, after the machine is finished for the day. Milk residues quickly build up in steam wands and frothing nozzles, so it is important to keep these clean to prevent blockages from forming.
Spout Cleaning
The spout should be cleaned on a biweekly basis to prevent coffee residues from building up and to prevent wear on the spout assembly.
- The spout removes from inside the machine. Open the front door. The spout sits on tracks at the top and can simply me pulled up and off.
- Wash the spouts with warm water and dish soap to remove any excess coffee residues. Use toothpicks to gently clean the spout holes and free them of any coffee buildup.
- Place the spout assembly back into the machine. Make sure reinstall the spout with this side facing forward:

Syncrony Logic Spout Assembly
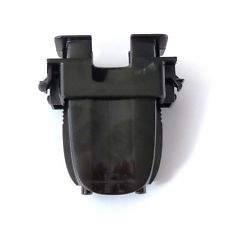
If coffee is not coming through the spout holes, or coffee is leaking around the sides of the spout then it is out of position. The spout can slide backwards and forwards along the track that it sits on. There is a tube that dispenses coffee from the brew unit. The spout needs to be positioned under this tube to properly direct the coffee through the spouts.
Recommended Cleaning Products
The best descaling product for this machine is Durgol Swiss Espresso Descaler. The suggested tablets for running brew unit cleaning cycles are the Gaggia Coffee Clean Tablets or Urnex Full Circle Espresso Machine Cleaning Tablets.
Troubleshooting
No Crema or Bad Tasting Shots
Typically, issues with crema or the flavor of the shot do not indicate a malfunction of the machine. Instead, this indicates that an adjustment needs to be made in the brewing process or that different beans need to be used.
The type of bean that is being used is particularly important for super-automatic machines, because the built in burr grinders only accept certain types of beans. Another consideration is the roast of the bean, which greatly influences how much crema can be produced, as well as the flavor of the shot. Super-automatic machines are not compatible with oily, caramelized, or flavored beans. Properly stored and recently roasted beans are best. You can find more information on why bean selection and storage is important for super-automatic machines by watching the video below.
5 Things New Super Automatic Espresso Machine Owners Should Know
Appropriately adjusting the grinder is also important. Poor shots can also be the result of incorrect grind settings.
- If the shot is too bitter:
- The grind is set too fine. Try adjusting the grind to a coarser setting, typically indicated by a large dot symbol or higher number.
- If applicable, the aroma setting is set too high. Lower the aroma setting so that less coffee is ground per shot.
- The beans being used are over-roasted, and a lighter roast is needed.
- If the shot is too sour or weak tasting:
- The grind is set too coarse. Try adjusting the grind to a finer setting, indicated by a lower number. Whenever moving the grind to a finer setting it is important to make minor adjustments, and to only adjust the grinder while in operation.
- If there is little crema:
- The beans are probably stale and fresher beans need to be used.
- The grind setting does not match the drink that is being made. Smaller drinks such as an espresso require finer grind size; larger drinks such as a longo require a coarser grind.
- Oily or dark roasted beans are being used. These beans are not compatible with the unit, and are not suitable for espresso brewing. The oils and chemicals that are needed to produce a rich crema have been roasted out of the bean. Switch to a drier/lighter roast.
- Keep the machine properly cleaned and maintained for good tasting shots. Your grinder may need to be cleaned or calibrated, or you may need to descale your machine to remove any unwanted residues or flavors.
Difficulty Frothing
Auto-Frother Issues
If you are having difficulty frothing then the cappuccinatore attachment or the steam wand it connects to may need to be cleaned.
- The cappuccinatore attachment should be cleaned on a daily basis. At the end of each day the cappuccinatore is used the following cleaning procedure should be done:
- Fill a container with fresh cold water and insert the intake tube from the cappuccinatore.
- Place a cup underneath the dispensing spout of the cappuccinatore.
- Activate the steam mode on the machine like you are using the cappuccinatore to froth milk.
- Water will be sucked through and dispensed. Keep drawing water through until the water is completely clear.
- If froth is still not being produced it may be time to do a more thorough cleaning of the cappuccinatore.
- Dissolve the Rinza into a solution using the instructions on the back of the bottle.
- Place a cup underneath the dispensing spout.
- Activate the steam mode on the machine like you are frothing milk.
- Run the full contents of the solution through the cappuccinatore.
- Repeat the process with plain water.
- Detach the cappuccinatore from the machine and submerge it fully in hot water to remove another other milk residues.
- Refer to your machine manual to see if there are further manual disassembly and cleaning instructions for the cappuccinatore.
- Use a pipe brush that has synthetic or plastic bristles to clean the wand that the cappuccinatore connects to. Do not use a pipe brush that has metal bristles as it can damage the wand.
Pannarello Issues
As with brewing, frothing is highly dependent on technique. If the machine is producing steam then an adjustment to technique may need to be made. Frothing is very sensitive to technique, so there is a steep learning curve. The video below shows proper frothing technique:

How to Froth with a Pannarello Wand
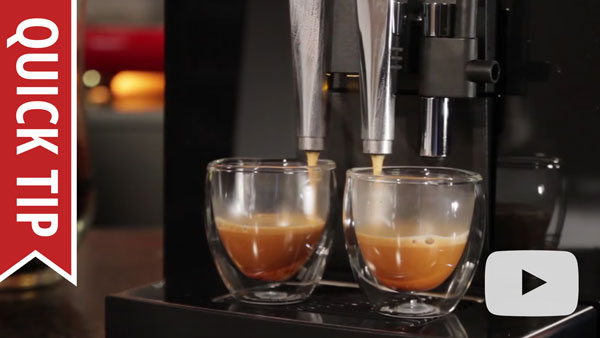
There are also common frothing mistakes which are made that will result in poor or no froth. The video below identifies these mistakes and shows how to correct them:

Quick Tip: Six Common Milk Frothing Mistakes
This machine also utilizes a special nozzle attachment called a pannarello. The pannarello nozzle needs to be regularly cleaned and properly attached to the machine in order to function. The video below reviews how to attach the pannarello properly. When disassembling the pannarello please make sure all of the separate pieces shown in the video are present. The pannarello should be taken apart frequently and the separate parts should be soaked in some hot water to help remove any built-up milk residues.

How to Attach a Pannarello Wand
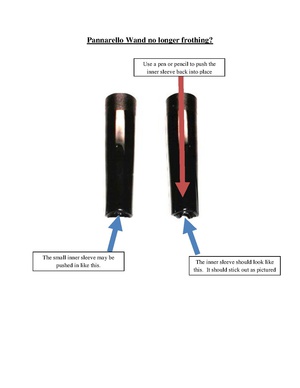
Inside the tube of the pannarello nozzle there should be a plastic insert which must be present in order for this nozzle attachment to work. If this insert is missing or improperly inserted the machine will not be able to create froth. Please check the position of this insert as shown in this troubleshooting document:
Alternatively you can try frothing on the machine without the pannarello attachment. The naked wand can also produce a tight microfoam, and is preferred by some users. The major disadvantage of frothing with the naked wand is that it reduces the length of the steam wand by several inches.
Flow Issues
The first place to start with any flow issue is cleaning the machine. Before going through these steps please make sure the machine is cleaned according to the Cleaning & Maintenance section of this article.
Poor Flow or No Flow
If you are not able to get water to flow through the machine at all or none of the functions flow well, then there is something blocking the flow of water through the machine. This error typically indicates the machine is not being cleaned on a regular basis. Review the cleaning & maintenance instructions for this machine, and make sure the cleanings are being done at the suggested interval with the recommended product.
- The water tank is not seating properly. Please remove the tank and reinsert it firmly. Make sure there are no beans or debris in the water tank chamber preventing the tank from seating flush with the machine.
- A foreign body, such as coffee grounds, has gotten drawn into the system from the water tank. This kind of debris can get lodged in valves/water circuits and cause flow issues.
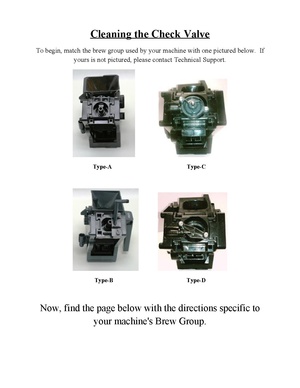
- Try cleaning the brew unit check valve using the instructions here:

- Try cleaning the brew unit check valve using the instructions here:
- The machine needs to be descaled. Descaling should be done every 2-3 months with either Gaggia Decalcifier or Durgol Descaler. Scale buildup inside the machine can be very damaging and cause serious flow issues.
No Flow From Steam Wand
Once the flow issue has been resolved the machine should be immediately descaled with the recommended product. Flow issues and blockages are typically due to lack of maintenance or excessive scale buildup.
- First remove any attachments on the wand and set the machine to hot water mode.
- Once the pump is activated turn the steam knob to the steaming position. The pump will start to vibrate and hot water should begin to flow through the wand.
- If hot water does flow through the wand stop the machine from dispensing hot water and switch the wand to steam mode to test for flow. There may have been a piece of debris in the steam wand blocking the flow of water.
- If water does not flow through the wand then there may be a more severe blockage. Proceed to the next step.
- Soak the wand in a mixture of descaler and hot water. Test flow using the hot water function again.
- Use a pipe cleaner to manually clean the inside of the wand. Only use a pipe cleaner with synthetic or plastic bristles; do not use one with metal bristles as it can damage the wand. Test the flow again.
- If it sounds like the steam circuit is pressurizing but there still isn’t anything coming through then the flow restrictor may be blocked or damaged and should be removed. This part is not necessary and the machine will function without it.
- First the steam wand will need to be removed to access the flow restrictor. Open the front door of the machine.
- At the top of the wand where it goes inside the machine is a plastic assembly with a slit in it. In this slit is a metal clip that holds the wand in, listed as part 33 on p. 9 of the diagram. Use needlenose pliers to remove this clip.
- The wand assembly will now be able to slide down and out of the machine. At the top of this assembly is the flow restrictor, listed as part 26 on p. 9 of the parts diagram. Two o-rings come out with the wand, make sure not to loose these.
- Once the restrictor is removed, push the o-rings and steam wand back into place and resecure them with the clip.
- If none of these cleanings have resolve the behavior then there is an internal blockage, or the steam thermostat has failed. The machine will require a repair.
Reduced Or No Flow During Brewing
- If there is no flow while brewing specifically, then something is blocked along the brew circuit. Begin by running a descale of the machine using the recommended product. Scale buildup is the most common cause of flow issues. Descaling will most likely resolve the issue.
- If the machine is set to a really fine grind, the grinds can block the flow. Set the grind to a coarser setting and see if flow is restored. Leave the grind on the coarse setting for the remainder of flow testing.
- There may be an issue with the brew unit.
- First remove the unit and rinse it off with cold water. Do not use any sort of detergent or soap to rinse it off or necessary lubricant will be removed.
- Wipe down the brew unit chamber with a damp cloth to remove any leftover grounds. A microfiber cloth is best, to prevent any cloth fibers from remaining behind.
- Clean the check-valve. Here are the instructions to follow.
- Reinsert the brew unit and test for flow.
- This machine allows beverage length to be reprogrammed. Make sure it isn’t set to the minimum brew length. If the machine is programmed to the minimum beverage length the machine may not dispense any coffee, or it may only dispense a few drops. Try reprogramming the machine to a longer length drink to see if it resolves the no flow issue.
- Check the brew unit to make sure it is lining up with the spout assembly and connecting with the spout assembly properly.
- If you are noticing a lot of brewed coffee or coffee sprayed inside the brew unit chamber then the brew unit o-ring may be damaged or out of place.
- Remove the brew unit and inspect the large red o-ring attached to the tamping assembly. Make sure it is clean, properly positioned, and not damaged.
- If the o-ring is broken or damaged it should be replaced. A brew unit o-ring can be purchased here.
- Your machine features an e-plus dial which may be blocked. Try brewing a shot and while the pump is activated turn the e-plus dial back and forth. This may clear up the blockage and restore flow.
- The dispensing spout may be blocked. Try very gently cleaning the dispensing spout holes with a toothpick to remove any blockages.
Have Flow But Getting No Flow Error
In some situations, you will be able to get flow through the machine for all functions, but the machine thinks there is no water flowing through. There is a device in the machine called a flow meter, and it tells the machine when water is flowing through or not. The device operates by having small fan-like blades spin when water passes through it. If those blades get stuck from excessive scale buildup or debris, then they will not spin. As a result, even though water is flowing through the machine, you will get a flow error.
If your machine uses a water filter, temporarily remove it from the water tank and add the recommended descaling product to the water tank. The descaler needs to work its way into the system to start dissolving the scale buildup in the flow meter. You may have to keep restarting the machine so that it can keep attempting to prime, which will draw the descaler/water solution into the system. If at any point you are able to clear the flow message then you will want to do an immediate descale of the machine. After you have descaled, run 4-5 tanks of plain water through the hot water function for the wand in order to ensure the system is completely free of debris.
Machine Is Leaking
From The Bottom
- Check the internal drip tray and make sure it is not overfilling. If the drip tray full indicator came on, and the trip tray was removed and reinserted but never emptied, it will reset the machine sensor and possibly result in the tray overflowing.
- If the machine only leaks while the water tank is attached, but is properly inserted, then the intake line may be broken or disconnected. This will require a repair.
- If leaking only occurs while the machine’s pump is activated then the drain area of the machine may be blocked. The drain area relieves excess water from the brewing process and should be cleaned regularly. Use these instructions to clean the drain area.
- If this does not resolve the leaking, then the leaking may be coming from an internal component and the machine should be repaired.
From The Back
- The leaking is coming from the water tank. If the water tank is not positioned properly it can cause water to continuously drain from the tank, even while the machine is turned off. This happens when the water tank is inserted far enough to open the release valve, but not far enough to seal with the intake line. This water can leak out from the water tank and end up on the bottom of the machine. This particular issue is usually indicated by lots of clear water leaking between the tank and the machine, and then leaking down the back side of the machine.
- Remove the water tank and make sure there isn’t anything, such as coffee beans, which could be blocking the tank from seating properly.
- Firmly reinsert the tank into the machine and press firmly on it to make sure it creates a good seal with the intake line.
- The grommet which seals the tank to the intake line is broken, dirty, or out of place. Remove the grommet, clean it off and inspect it for damage, and then reseat it into the machine. If reseating the grommet does not fix the leak then the grommet will need to be replaced. This document explains how to access the grommet and replace it.
From The Wand
If the steam wand is leaking while the machine is on and/or brewing, the steam valve is open inside the machine. It is likely that scale has built up inside the valve, and the buildup is holding the valve open. Try the following to resolve the leak:
- First begin by descaling the machine using the recommended descaling product.
- After descaling flush 4-5 tanks of plain water through the system using the hot water function for the steam wand. This will ensure any debris or scale buildup the descaling loosened is fully removed.
- If this does not work then the machine should be sent in for repair since the steam valve may need to be replaced.
Machine Not Heating Or Powering On
No Power
- Make sure the machine is plugged into an appropriate power source.
- Do not use the machine on a surge protector. This machine has a high power draw, more than a typical kitchen appliance such as a refrigerator or a microwave. Surge protectors are typically not rated to handle the amperage this machine requires.
- Make sure the power cord is firmly inserted into the power socket on the machine.
- Try using the machine on a different outlet, and make sure the machine is the only appliance plugged into that outlet.
- Try testing another appliance on the same outlet.
- Make sure the power switches are functioning properly and not broken. If the machine isn’t powering on try pressing and holding the power button in the on position to see if the machine turns on. If you are able to power the machine on this way then the power switch needs to be replaced.
- If the machine recently had a leak, had water spilled on it, or any other exposure to moisture then the machine may be shorting out. Try letting the machine sit unplugged for 48 hours to make sure there isn’t a short caused by moisture.
No Or Little Steam
- If you are getting no or little steam then there may just be a blockage in the steam circuit. Do the cleanings suggested in the section of this article which discusses steam wand blockages.
- Check the steam knob to make sure it is correctly positioned. If the knob spins in place and doesn’t reach a stopping point then the knob may be broken, or something is disconnected in the steam valve assembly.
- Make sure to give the machine sufficient time to heat up. Even a machine that uses a rapid steam boiler will still take thirty seconds to a minute to be fully heated.
- Make sure that you are purging the steam line before frothing. Purging is an important process for any machine that has a steam wand. Since the steam leaving the boiler hits the cold room temperature wand it is going to condense back into water. Wait until there is mostly steam coming out of the wand and then close the knob. You are now ready to steam with the machine now that the line has been purged.
- If the cleanings haven’t worked and there is still no steam then the machine may have a bad thermostat and it will require a repair.
Cold Shots
Make sure you are using a preheated cup. Ceramic cups will sap a lot of heat from the shot resulting in a colder shot. Preheating the cups using the machine’s hot water function is suggested, or you can brew into a paper, styrofoam, or other well insulated cup. If your machine utilizes a cup warming function you can use it to preheat the cups. Alternatively you can use the machine’s hot water function to fill the cup with hot water before pulling a shot to preheat it. If the shots are completely cold then the brew thermostat is broken and the machine will require a repair.
Alarm Light On
If the alarm light is on and not flashing the machine is asking for a minor maintenance item to be completed. Make sure the machine is powered on when doing these maintenance items. The various components trip sensors in the unit which tell the machine the maintenance has been done. If the machine is not powered on the sensors won’t reset and the alarm light will remain on.
- The water tank is empty.
- Remove the water tank and refill it.
- If the water tank chamber is dirty or has any debris in it, wipe it down.
- Firmly reinsert the water tank into the machine.
- The internal drip tray and grounds drawer are full.
- Remove the internal drip tray and grounds drawer.
- If the drip tray chamber is dirty or has any debris in it, wipe it down.
- Firmly reinsert the grounds drawer and drip tray into the unit.
- The machine is out of beans.
- Check the hopper. If is empty refill it.
- If the hopper is full, or you’ve already refilled it and the light is still not clearing then the grinder may be blocked and need cleaning. This typically happens if beans are being used that are not compatible with the machine. This machine does not accept oily, caramelized, or flavored beans. Use of these beans can cause permanent damage to the machine that is not covered under warranty. These beans can be identified easily. They will be shiny and feel slippery or sticky. Dry beans that are appropriate for the machine will look dull and feel rough.
- Do the cleaning and calibration instructions in this document:
- After reassembling the machine according to these instructions do not add beans in. First make sure the grinder adjustment knob is set to the coarsest setting, which is the largest dot.
- Add beans back into the machine. The beans must be dry, do not add oily beans back into the unit.
- If this clears the alarm light and shots are pulling successfully on this grind setting then you can move the grind back to the original setting. Only move the knob one dot at a time, brewing a shot in between each adjustment.
- Do the cleaning and calibration instructions in this document:
- If none of these steps have cleared the light then the machine may have a broken sensor and will need to be repaired.
Alarm Light Flashing
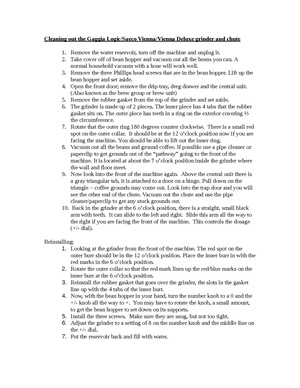
If the alarm light is flashing, this indicates that a component of the machine is missing or not inserted properly.
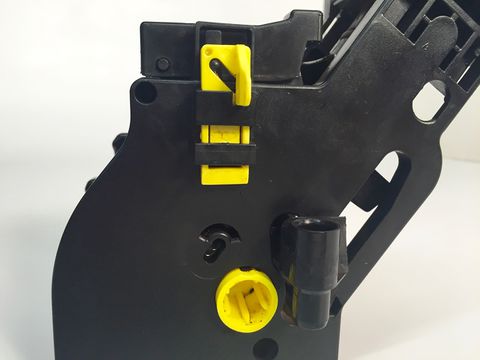
- The brew unit is not inserted properly.
- Remove the brew unit from the machine.
- Make sure the brew unit chamber is clean and clear of coffee grounds or other debris. Make sure the tracks for the brew unit are not blocked.
- Firmly reinsert the brew unit into the unit. It should click into place. To test if it is properly reinserted try removing it from the machine without hitting the push/press button. You should not be able to remove it. If you can go to the next step.
- There is a flap on the back of the brew unit, opposite the side that says push/press, that needs to be in a certain position.
- If the flap is down inside the square notch like the picture below then it needs to be pushed upwards. Please note that on certain units, especially newer Gaggia unites, a yellow plastic is used instead of black plastic to help make this part more easily identified.

Fin Positioned Incorrectly
- The flap should look like this when it is in the correct position.
- If the flap is down inside the square notch like the picture below then it needs to be pushed upwards. Please note that on certain units, especially newer Gaggia unites, a yellow plastic is used instead of black plastic to help make this part more easily identified.
- It’s possible that the gear for the brew unit is in the wrong position. This video discusses how to trick the machine into resetting the gear to the correct position:
- The grounds drawer or drip tray are not inserted. If they are inserted, then they are not pushed in all the way or something is blocking them from fitting all the way back in.
- Remove them and make sure there isn’t any coffee grounds or other debris that could prevent them from seating properly.
- Firmly reinsert them into the machine.
- The water tank is not inserted. If the water tank is in place remove it to make sure there isn’t any debris blocking it from sitting in all they way and then firmly reinsert it into the unit.
- The service door that covers the brew unit is open. Make sure it is firmly clicked shut.
- The steam/hot water knob is not turned to the correct position for the desired function.

Brew Unit Stuck
If the brew unit of your machine is stuck in place do not try to force it out of the machine. This will more than likely result in the brew unit breaking or other damage being done to the machine. Forced removal of the brew unit can cause the machine to fail in a way that will only be able to be repaired by professional technician. Follow the instructions in the video below to get the brew unit reset to the proper position.
How to Remove a Stuck Brew Unit
Too Much Steam/Milk Boiling
If you think your wand is producing too much steam, or your milk looks like it is boiling, then you may need to make an adjustment to your frothing technique. Boiling milk, or milk that is getting to hot before frothing is completed is an indication that incorrect frothing technique is being used. Review the section of this article that addresses frothing difficulties for more information.
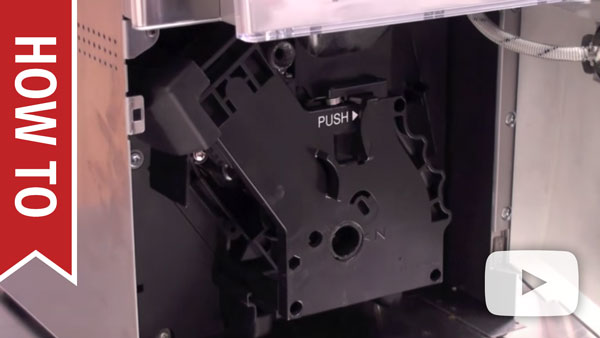
If you have tried adjusting your technique and the wand still appears to be producing too much steam, then a steam test should be completed.
If the machine is within the specified steam test range, then the machine is producing the correct amount of steam and an adjustment to frothing technique is necessary. Using a carafe that is chilled in a freezer before frothing is helpful for keeping the milk cooler for longer, allowing for more time to froth before the milk begins to scald.
Diagrams & Manuals
| Gaggia Syncrony Logic RS | |
|---|---|
| Syncrony Error Codes and Troubleshooting: | 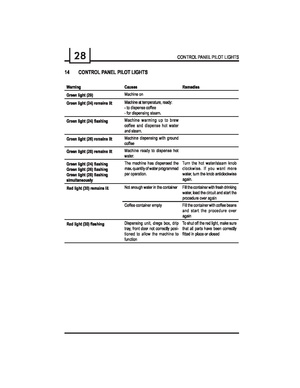
|
| Brew Unit Parts Diagram: | 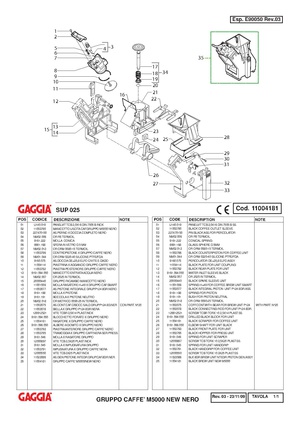
|
| Electrical Diagram: | 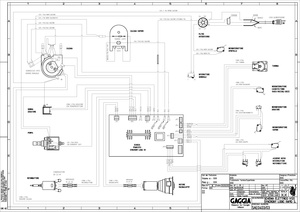
|
| Hydraulic Diagram: | Not Available |
| Machine Manual: | 
|
| Parts Diagram: | 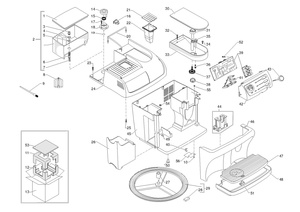
|
| Service Manual | Not Available |
| Startup Guide: | Not Available |
Specifications
| Basic Specs | |
|---|---|
| Width: | 15.35 in. |
| Height: | 15 in. |
| Depth: | 13 in. |
| Weight: | 20 lbs. |
| Housing | |
| Housing Material: | ABS Plastic |
| Bean Hopper Material: | Plastic |
| Drip Tray Material: | Plastic |
| Drip Tray Cover Material: | Plastic |
| Ground Coffee Container Material: | Plastic |
| Drain Line Adaptable: | No |
| Tall Legs: | No |
| Water Source | |
| Reservoir or Plumbed: | Reservoir |
| Reservoir Material: | Plastic |
| Reservoir Access: | Top |
| Reservoir Removable: | Yes |
| Water Filter: | No |
| Water Level Visible: | No |
| Controls | |
| Adjustable Coffee Strength: | Yes |
| Type of Controls: | Push Button/Dial |
| Display Type: | Indicator Lights |
| Programmable Brewing: | Yes |
| Temperature Control: | No |
| Adjustable Coffee Dosage: | Yes |
| Coffee Dosage Quantity: | 6-9 grams |
| Cup Volume Control: | Yes |
| Bypass Doser: | Yes |
| Pre-Infusion: | Yes |
| Descale Warning: | Yes |
| Pressure Gauges: | No |
| Brew Temp Display: | No |
| Cup Warmer | |
| Material: | Plastic |
| Type: | Passive |
| Brew Group | |
| Material: | Plastic |
| Type: | Automatic |
| Preheat: | No |
| Removable: | Yes |
| Self-Cleaning: | No |
| Boiler Data | |
| Number Of Boilers: | 2 |
| Brew And Steam Simultaneously: | No |
| Rapid Steam: | Yes |
| Brew Boiler Data | |
| Type: | Thermoblock |
| Volume: | Low |
| Material: | Stainless Steel Lined Aluminum |
| Element Location: | External |
| Pump Data | |
| Type: | Vibration |
| Max Pressure: | 15 Bar |
| Self-Priming: | Yes |
| Grinder Data | |
| Number Of Grind Settings: | 18 |
| Hopper Capacity: | 12 oz. |
| Burr Type: | Conical |
| Burr Material: | Stainless Steel |
| Freshness Lid: | Yes |
| Details | |
| Maintenance Alerts: | Yes |
| Country of Manufacture: | Italy |
| NSF Certified: | No |
| Recommended Application: | Home |
- Главная
- Кофеварки
- Gaggia
- Используемый кофемолотый / зерновой
- Количество групп1
- Объем резервуара для воды1.7 л
- Возможность приготовления капучиноесть, ручное приготовление
- Настройкиконтроль крепости кофе
- Максимальное давление15 бар
- Типэспрессо, автоматическое приготовление
- Мощность1250 Вт
- Манометрнет
- Одновременное приготовление двух чашекесть
- Показать все
Здесь вы можете изучить характеристики, видео обзоры, отзывы покупателей о Gaggia Syncrony Logic
Цена от 34900 ₽
(на апрель 2023)
Характеристики Gaggia Syncrony Logic
Основные характеристики*
| Используемый кофе | молотый / зерновой |
| Количество групп | 1 |
| Объем резервуара для воды | 1.7 л |
| Возможность приготовления капучино | есть, ручное приготовление |
| Настройки | контроль крепости кофе |
| Максимальное давление | 15 бар |
| Тип | эспрессо, автоматическое приготовление |
| Мощность | 1250 Вт |
| Манометр | нет |
Конструкция*
| Одновременное приготовление двух чашек | есть |
| Противокапельная система | нет |
| Дисплей | нет |
| Встроенная кофемолка | есть, емкость контейнера для зерен 350 г |
| Съемный лоток для сбора капель | есть |
Особенности*
| Размеры (Ш*В*Г) | 38x39x30 см |
| Материал корпуса | пластик |
| Индикатор уровня воды | есть |
| Индикация включения | есть |
| Вес | 8.7 кг |
* Точные параметры уточняйте на сайте продавца.
Отзывы пользователей о Gaggia Syncrony Logic