
2. Органы управления, приборная панель, оборудование салона
Приборы и органы управления
Общий вид
На схемах представлен общий вид расположения дисплеев и органов управления автомобиля рядом с местом водителя.
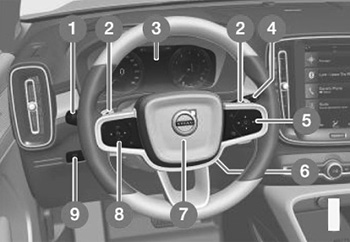
Рулевое колесо и приборная панель:
1. Габаритные огни, дневные ходовые огни, ближний свет, мигающие сигналы, противотуманные фары/освещение при прохождении поворотов (опция), задний противотуманный свет, обнуление счетчика пройденного пути. 2. Лепестки на рулевом колесе для переключения передач вручную в автоматической коробке передач (опция). 3. Дисплей водителя. 4. Очистители и омывание, датчик дождя (опция). 5. Правый набор кнопок на рулевом колесе. 6. Регулировка руля. 7. Звуковой сигнал. 8. Левый набор кнопок на рулевом колесе. 9. Подсветка дисплеев, разблокирование / открытие (опция) /закрытие (опция) двери багажника.
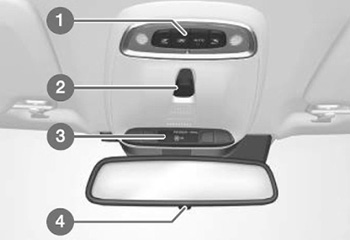
Потолочная консоль:
1. Передние лампы для чтения и освещение салона. 2. Панорамная крыша (опция). 3. Дисплей в потолочной консоли. 4. Установка вручную противоослепляющего положения на внутреннем зеркале заднего вида.
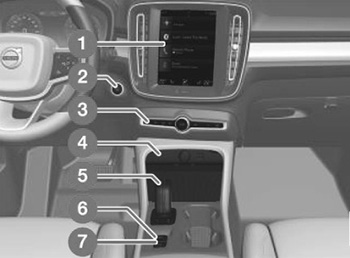
Центральная и тоннельная консоль:
1. Центральный дисплей. 2. Кнопка запуска. 3. Аварийные мигающие сигналы, удаление обледенения, мультимедиа, кнопка выбора режима вождения (опция). 4. Электрическое гнездо, разъем USB, беспроводное устройство для подзарядки телефона (опция). 5. Селектор передач. 6. Стояночный тормоз. 7. Автоматический тормоз во время остановки.
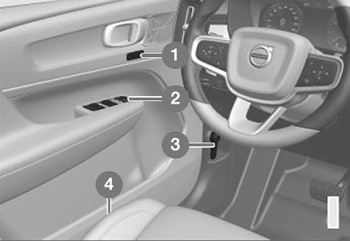
Дверь водителя:
1. Память для настроек передних сидений с электроприводом (опция), внешних зеркал заднего вида. 2. Центральный замок, стеклоподъемники, внешние зеркала заднего вида, электрическая блокировка для безопасности детей (опция). 3. Открытие капота. 4. Регулировка положения переднего сиденья.
Дисплей водителя
На дисплее водителя отображается информация, связанная с автомобилем и текущей поездкой.
В дисплей водителя входят указатели, индикаторы, а также контрольные и предупреждающие символы. Содержание информации на дисплее водителя зависит от уровня комплектации автомобиля, настроек и активированных функций.
Дисплей водителя активируется, как только открывается дверь, т.е. в положении зажигания 0. Если дисплей водителя не используется, он гаснет через некоторое время. Чтобы вновь активировать дисплей, выполните одно из следующих действий:
• Выжмите педаль тормоза.
• Активируйте положение зажигания I.
• Откройте одну из дверей.
Внимание:
— В случае неисправности дисплея водителя информация, связанная с тормозной системой, подушками безопасности или другими системами безопасности, может не показываться. В этом случае водитель не сможет контролировать состояние систем автомобиля и получить актуальные предупреждения и информацию.
— Автомобиль запрещается использовать, если дисплей водителя гаснет, не включается при активировании / запуске или информация на дисплее частично или полностью непригодна для чтения. Необходимо без промедления обратиться в мастерскую. Volvo рекомендует официальную станцию техобслуживания Volvo.
Примечание:
Изображение схематичное — некоторые детали могут отличаться в зависимости от модели автомобиля.
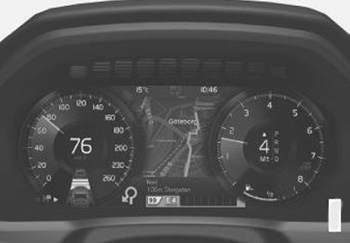
Расположение на дисплее водителя:
| Левая часть | Центр | Правая часть |
| Спидометр | Контрольные и предупреждающие символы | Тахометр/указатель ЕСО (А) |
| Счетчики пройденного пути | Указатель наружной температуры | Индикатор переключения передач |
| Одометр (В) | Часы | Режим вождения |
| Информация круиз-контроля и ограничителя скорости | Сообщения, в некоторых случаях дополненные графикой | Указатель топлива |
| Информация о дорожных знаках (опция) | Информация о дверях и ремнях безопасности | Состояние функции Start/Stop |
| – | Медиапроигрыватель | Пробег до пустого бака |
| – | Навигационная карта (опция) | Мгновенный расход топлива |
| – | Телефон | Меню приложений (активируется кнопками на рулевом колесе) |
| – | Управление голосом | – |
| – | Компас (А) | – |
(А) Зависит от выбранного режима вождения.
(В) Общий пробег.
Динамичный символ
Базовый вид динамичного символа: 
В центре дисплея водителя расположен динамичный символ, содержание которого зависит от типа сообщения. Янтарная и красная окантовка этого символа указывают степень серьезности контрольного или предупреждающего сообщения. С помощью анимации исходный символ может преобразоваться в более крупное изображение, чтобы графически показать, в чем заключается проблема, или пояснить детали.

Пример контрольного символа на дисплее.
Настройки для дисплея водителя
Настройки для представления информации на дисплее водителя можно выполнить в меню приложений на дисплее водителя и в меню настроек на центральном дисплее.
Настройки в меню приложений на дисплее водителя
В меню приложений вы можете выбрать информацию, которая выводится на дисплей водителя с:
• Бортовой компьютер.
• Медиапроигрыватель.
• Телефон.
• Навигационная система (опция / дополнительное оборудование).
Настройки на центральном дисплее
Выбор типа информации:
1. Нажмите Настройки на верхней панели центрального дисплея.
2. Нажмите My Car → Дисплеи → Настройки экрана водителя.
3. Выберите информацию, которая будет отображаться в фоновом режиме:
• Не показывать фоновую информацию
• Информация активного медиаисточника
• Показать навигацию, даже если маршрут не выбран.
Выбор темы оформления:
1. Нажмите Настройки на верхней панели центрального дисплея.
2. Нажмите My Car → Дисплеи → Темы оформления дисплея.
3. Выберите тему оформления для дисплея водителя:
• Glass;
• Minimalistic;
• Performance;
• Chrome Rings.
Выбор языка
1. Нажмите Настройки на верхней панели центрального дисплея.
2. Нажмите Система → Настройки языка и единиц измерения системы → Язык системы, чтобы выбрать язык. Изменение затрагивает язык, используемый на всех дисплеях.
Эти настройки являются персональными и сохраняются автоматически в активном профиле водителя.
Указатель топлива
Указатель топлива на дисплее водителя показывает уровень топлива в баке.

Бежевый участок указателя топлива показывает количество топлива в баке.
Символ бензоколонки янтарного цвета включается, когда уровень топлива низкий и приближается время для заправки. Бортовой компьютер показывает также расстояние до пустого бака.
Бортовой компьютер
Бортовой компьютер автомобиля во время поездки регистрирует и рассчитывает такие значения, как пройденное расстояние, расход топлива и средняя скорость. Экономичному вождению помогает информация о мгновенном и среднем расходе топлива. Информацию с бортового компьютера можно вывести на дисплей водителя.
Примечание:
Изображение схематичное — некоторые детали могут отличаться в зависимости от модели автомобиля.

В бортовой компьютер входят следующие указатели:
• Счетчики пройденного пути.
• Одометр.
• Мгновенный расход топлива.
• Пробег до пустого бака.
• Туризм — альтернативный спидометр.
Единицы измерения расстояния, скорости и т.п. можно изменить в системных настройках на центральном дисплее.
Счетчики пройденного пути
В автомобиле установлены два счетчика пройденного пути, ТМ и ТА.
ТМ можно обнулить вручную, а ТА обнуляется автоматически, если автомобиль не использовался более четырех часов.
Во время поездки регистрируется следующая информация:
• Отрезок пути.
• Время в пути.
• Средняя скорость.
• Средний расход топлива.
Значения рассчитываются, начиная с последнего обнуления счетчика пройденного пути.
Одометр
Одометр регистрирует общий пробег автомобиля. Это значение не обнуляется.
Мгновенный расход топлива
Этот счетчик показывает расход топлива на данный момент. Значение обновляется примерно один раз в секунду.
Пробег до пустого бака
Бортовой компьютер рассчитывает расстояние, которое можно пройти на оставшемся в баке топливе.
Для расчета используются значения среднего расхода топлива за последние пройденные 30 км пути и оставшегося количества топлива.
Когда счетчик показывает «—-», количество топлива недостаточно для расчета оставшегося расстояния. Необходимо как можно быстрее залить топливо.
Внимание:
Некоторые отклонения возможны при изменении манеры вождения.
Экономичный стиль вождения в общем случае увеличивает пробег автомобиля.
Туризм — альтернативный спидометр
Вспомогательный спидометр с цифровой индикацией облегчает езду в условиях, когда ограничения скорости на знаках указываются в единицах измерения, отличающихся от приборов автомобиля.
В этом случае единицы измерения для цифровой индикации скорости противоположны установленным в аналоговом спидометре. Если в аналоговом спидометре скорость измеряется в mph, спидометр с цифровой индикацией показывает скорость в km/h и наоборот.
Отображение данных о поездках на дисплее водителя
На дисплей водителя можно выводить значения, регистрируемые и рассчитываемые бортовым компьютером.
Эти значения сохраняются в приложении для бортового компьютера. В меню приложений вы можете выбрать информацию, которую следует показывать на дисплее водителя.

Для запуска и поиска в меню приложений (изображение схематичное — некоторые детали могут отличаться в зависимости от модели автомобиля) используйте правый набор кнопок на рулевом колеса:
1. Меню приложений. 2. Влево/вправо. 3. Вверх/вниз. 4. Подтвердить.
1. Нажмите (1), чтобы на дисплее водителя открыть меню приложений (меню приложений не открывается, если на дисплее водителя показывается неподтвержденное сообщение. Необходимо сначала подтвердить сообщение, а затем вы сможете открыть меню приложений).
2. С помощью (2) перейдите влево или вправо к приложению для бортового компьютера. Четыре верхних строки в меню -измеренные значения для счетчика пройденного пути ТМ. Следующие четыре строки в меню — измеренные значения для счетчика пройденного пути ТА Для перемещения по списку вверх/вниз используйте (3).
3. Перейдите дальше вниз к кнопкам выбора, чтобы выбрать информацию, которую следует вывести на дисплей водителя:
• Пробег до пустого бака.
• Одометр.
• Пробег для счетчика пройденного пути ТМ, ТА или не показывать данные о пройденном расстоянии.
• Мгновенный расход топлива, средний расход для ТМ или ТА или не показывать расход топлива.
• Туризм (альтернативный спидометр).
Установите или отмените маркировку для опции с помощью кнопки О (4). Изменение выполняется мгновенно.
Обнуление счетчика пройденного пути
Для обнуления счетчика пройденного пути используется левый подрулевой рычаг.
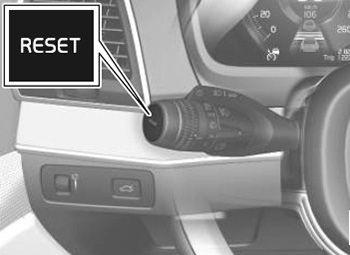
Для сброса всей информации в счетчике пройденного пути ТМ (т.е. пройденное расстояние, средний расход средняя скорость и время в пути) длительно нажмите на кнопку RESET на левом подрулевом рычаге.
При кратком нажатии кнопки RESET сбрасывается только пройденное расстояние.
Счетчик пройденного пути ТА обнуляется только автоматически после того, как автомобиль не использовался в течение не
менее четырех часов.
Отображение статистики поездок на центральном дисплее
Статистические данные о поездках показываются в графическом виде на центральном дисплее и позволяют добиться более экономичного вождения.

На панели приложений выберите приложение Действия водителя, чтобы открыть статистические данные о поездках.
Каждый столбик на диаграмме соответствует отрезку пути длиной 1, 10 или 100 км или миль. Дополнительные столбики появляются с правой стороны синхронно с движением автомобиля. Крайний правый столбик показывает значение для текущего отрезка пути.
Данные по среднему расходу топлива и общему времени в пути рассчитываются, начиная с последнего обнуления статистических данных о поездках.
Примечание:
Изображение схематичное — некоторые детали могут отличаться в зависимости от модели автомобиля.
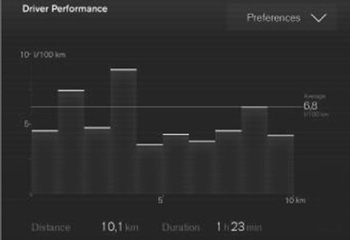
Статистические данные о поездках по данным бортового компьютера.
Настройки статистических данных о поездках
Обнуление или изменение настроек статистических данных о поездках.
1. На панели приложений выберите приложение Действия водителя, чтобы открыть статистические данные о поездках. 
2. Нажмите Предпочтения, чтобы:
• Изменить масштаб графики. Выберите разрешение столбца — 1, 10 или 100 км/миль.
• Обнулить данные после каждой поездки. Выполняется, если автомобиль не двигался в течение 4-х часов.
• Обнулить данные текущей поездки.
Статические данные о поездках, расчетный средний расход топлива и общее время в пути обнуляются только одновременно.
Единицы измерения расстояния, скорости и т.п. можно изменить в системных настройках на центральном дисплее.
Время и дата
Часы отображаются на дисплее водителя и центральном дисплее.
Расположение часов
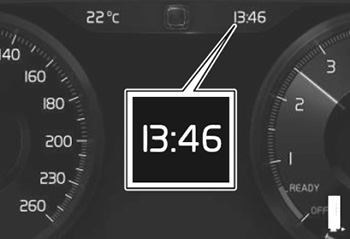
На центральном дисплее часы расположены в строке состояния вверху справа.
В некоторых ситуациях сообщения и информация могут закрывать индикацию часов на дисплее водителя.
Установка времени и даты
На верхней панели центрального дисплея выберите Настройки → Система → Дата и время, чтобы изменить формат времени и даты.
Для установки времени и даты нажмите на стрелки вверх / вниз на сенсорном экране.
Автоматическая установка времени в автомобилях с GPS
Если в автомобиле установлена навигационная система, вы можете выбрать Автом. установка времени. В этом случае часовой пояс устанавливается автоматически с учетом местоположения автомобиля. В некоторых типах навигационных систем для выбора правильного часового пояса необходимо выбрать текущее местоположение автомобиля (страну). Если вы не выбрали Автом. установка времени, время и дата устанавливаются с помощью стрелок вверх / вниз на сенсорном экране.
Летнее время
В некоторых странах с помощью Авто вы можете выбрать автоматическую установку летнего времени. Для других стран летнее время устанавливается с помощью Вкл или Выкл.
Указатель наружной температуры
Указатель наружной температуры представлен на дисплее водителя.
Датчик регистрирует температуру снаружи автомобиля.
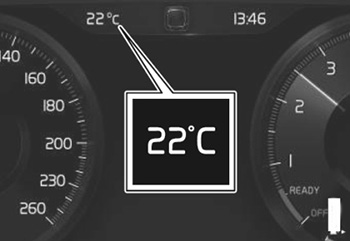
Когда автомобиль неподвижен, показания температуры могут быть несколько завышены.
При наружной температуре в пределах от -5 °С до +2 °С на дисплее водителя также появляется символ снежинки, предупреждающий о скользком дорожном покрытии. Символ снежинки временно появляется также и на проекционном дисплее (если он установлен в автомобиле).
Для выбора единиц измерения, например, для указателя температуры, откройте системные настройки на верхней панели центрального дисплея.

В магазине Клуба доступна PDF книга Volvo XC40.
Руководство по ремонту, инструкция по эксплуатации. Модели с 2018 года выпуска, оборудованные бензиновыми и дизельными двигателями B3154T9 / B3154T2 / B4204T4 / B4204T36 / D4204T16 / D4204T12 .
Язык: русский, Кол-во страниц: 466, Цветность: черно-белая
Цена только для зарегистрированных участников Клуба — 299 руб до 31.12.23
Не для распространения, только для личного пользования.
Подпишитесь на Volvo Journal — новости и события мира Volvo
Войдите или зарегистрируйтесь, чтобы писать комментарии, задавать вопросы и участвовать в обсуждении.
![]()
XC40
OWNER’S MANUAL


VÄLKOMMEN!
We hope your Volvo will give you many years of happy motoring. The vehicle is designed for the safety and comfort of you and your passengers. Volvo strives to design one of the world’s safest passenger vehicles. Your Volvo is also designed to meet applicable safety and environmental requirements.
To increase your enjoyment of your Volvo, we recommend that you read the instructions and maintenance information contained in this owner’s
manual. The owner’s manual is also available as a mobile app (Volvo Manual) and on Volvo Cars support page (support.volvocars.com).
We also encourage everyone to always use seat belts in this and other vehicles. You should also not drive if you are under the influence of alcohol or medicines or if your ability to drive is for some other reason impaired.

TABLE OF CONTENTS
OWNER’S INFORMATION
|
Owner’s information |
16 |
|
Owner’s Manual in the center display |
17 |
|
Navigate in the Owner’s Manual in |
18 |
|
the center display |
|
|
Owner’s manual in mobile devices |
20 |
|
Volvo Cars support site |
21 |
|
Using the Owner’s Manual |
21 |
|
The Owner’s Manual and the envi- |
24 |
|
ronment |
YOUR VOLVO
|
Contacting Volvo |
26 |
|
Volvo ID |
26 |
|
Creating and registering a Volvo ID |
26 |
|
Drive-E ‒ purer driving pleasure |
27 |
|
IntelliSafe — driver support |
28 |
|
Sensus — connection and entertainment |
30 |
|
Software Updates |
33 |
|
Data recording |
33 |
|
Terms & Conditions for Services |
35 |
|
Customer Privacy Policy |
35 |
|
Important information on accessories |
35 |
|
and extra equipment |
|
|
Accessory installation |
36 |
|
Connecting equipment to the vehi- |
37 |
|
cle’s data link connector |
|
|
Technician certification |
38 |
|
Viewing the Vehicle Identification |
38 |
|
Number (VIN) |
|
|
Volvo Structural Parts Statement |
39 |
|
Driver distraction |
39 |
SAFETY
|
Safety |
42 |
|
Safety during pregnancy |
43 |
|
Occupant safety |
43 |
|
Reporting safety defects |
44 |
|
Recall information |
45 |
|
Whiplash Protection System |
46 |
|
Seat belts |
47 |
|
Buckling and unbuckling seat belts |
48 |
|
Seat belt tensioners |
50 |
|
Resetting the electric seat belt ten- |
51 |
|
sioners* |
|
|
Door and seat belt reminders |
51 |
|
Airbags |
52 |
|
Driver/passenger-side airbags |
53 |
|
Occupant Classification System |
56 |
|
Side airbags |
59 |
|
Inflatable curtain |
60 |
|
Safety mode |
61 |
|
Starting and moving the vehicle |
62 |
|
when it is in safety mode |
|
|
Child safety |
63 |
|
Child restraints |
65 |
|
Infant seats |
67 |
|
Convertible seats |
69 |
|
Booster cushions |
71 |
2

|
Top tether anchors |
72 |
|
Lower child seat attachment points |
73 |
|
ISOFIX/LATCH lower anchors |
74 |
DISPLAYS AND VOICE CONTROL
|
Instruments and controls in left-hand |
78 |
|
drive vehicles |
|
|
Instrument panel |
80 |
|
Instrument panel settings |
82 |
|
Fuel gauge |
83 |
|
Trip computer |
83 |
|
Displaying trip data in the instrument |
84 |
|
panel |
|
|
Resetting the trip odometer |
85 |
|
Displaying trip statistics in the center |
86 |
|
display |
|
|
Trip statistics settings |
86 |
|
Date and time |
87 |
|
Ambient temperature sensor |
88 |
|
Indicator symbols in the instrument panel |
88 |
|
Warning symbols in the instrument panel |
91 |
|
Instrument panel licenses |
92 |
|
App menu in instrument panel |
96 |
|
Handling the App menu in the instru- |
96 |
|
ment panel |
|
|
Messages in the instrument panel |
97 |
|
Handling messages in the instru- |
99 |
|
ment panel |
|
|
Handling messages saved from the |
100 |
|
instrument panel |
|
|
Center display overview |
102 |
|
Handling the center display |
105 |
|
Activating and deactivating the cen- |
108 |
|
ter display |
|
|
Navigating in the center display’s views |
108 |
|
Handling tiles in the center display |
112 |
|
Function view in the center display |
115 |
|
Moving apps and buttons in the cen- |
117 |
|
ter display |
|
|
Symbols in the center display status bar |
117 |
|
Using the center display keyboard |
119 |
|
Changing keyboard language in the |
122 |
|
center display |
|
|
Entering characters, letters and |
122 |
|
words by hand in the center display |
|
|
Changing the appearance of the |
124 |
|
center display |
|
|
Turning off and adjusting the volume |
124 |
|
of the center display system sounds |
|
|
Changing system units of measurement |
125 |
|
Changing system language |
125 |
|
Changing settings in the center dis- |
125 |
|
play’s Top view |
|
|
Opening contextual setting in the |
126 |
|
center display |
|
|
Resetting user data when the vehicle |
127 |
|
changes owners |
|
|
Resetting center display settings |
127 |
|
Table of settings in the center display |
128 |
3

|
Driver profiles |
129 |
|
Selecting a driver profile |
130 |
|
Changing a driver profile’s name |
130 |
|
Protecting a driver profile |
131 |
|
Linking a remote key to a driver profile |
131 |
|
Resetting driver profile settings |
133 |
|
Messages in the center display |
133 |
|
Handling messages in the center display |
134 |
|
Handling messages saved from the |
134 |
|
center display |
|
|
Voice control |
135 |
|
Using voice commands |
136 |
|
Voice control for cellular phones |
137 |
|
Voice control for radio and media |
137 |
|
Voice control settings |
138 |
LIGHTING
|
Lighting panel and controls |
140 |
|
Adjusting light functions via the cen- |
141 |
|
ter display |
|
|
Parking lights |
142 |
|
Daytime running lights |
142 |
|
Low beams |
143 |
|
Using high beam |
144 |
|
Active high beam |
145 |
|
Using turn signals |
146 |
|
Active Bending Lights* |
146 |
|
Front fog lights/cornering illumination* |
147 |
|
Rear fog light |
148 |
|
Brake lights |
148 |
|
Emergency brake lights |
149 |
|
Hazard warning flashers |
149 |
|
Using home safe lighting |
149 |
|
Welcome Light |
150 |
|
Interior Lighting |
150 |
|
Adjusting interior lighting |
152 |
WINDOWS, GLASS AND MIRRORS
|
Windows, glass and mirrors |
154 |
|
Pinch protection for windows and |
154 |
|
sun curtains |
|
|
Reset procedure for pinch protection |
155 |
|
Power windows |
155 |
|
Operating the power windows |
156 |
|
Rearview/door mirrors |
157 |
|
Adjusting the rearview mirror dim- |
158 |
|
ming function |
|
|
Adjusting the door mirrors |
158 |
|
Panoramic roof* |
160 |
|
Operating the panoramic roof* |
161 |
|
Auto closing the panoramic roof* sun |
163 |
|
curtain |
|
|
Wiper blades and washer fluid |
164 |
|
Using the windshield wipers |
164 |
|
Using the rain sensor |
165 |
|
Using the rain sensor’s memory function |
166 |
|
Using the windshield and headlight |
167 |
|
washers |
|
|
Using the rear window wiper/washer |
168 |
|
Using automatic rear window wiping |
168 |
|
when backing up |
4

SEATS AND STEERING WHEEL
|
Manual front seats |
172 |
|
Power* front seats |
173 |
|
Adjusting the power* front seats |
173 |
|
Storing positions for seats and mirrors |
174 |
|
Using stored positions for seats and |
175 |
|
mirrors |
|
|
Adjusting* front seat cushion length |
176 |
|
Adjusting front seat lumbar support* |
176 |
|
Folding down the rear seat backrests |
177 |
|
Adjusting the rear seat head restraints |
179 |
|
Steering wheel controls and horn |
181 |
|
Adjusting the steering wheel |
181 |
CLIMATE CONTROL
|
Climate |
184 |
|
Climate zones |
184 |
|
Climate control sensors |
185 |
|
Perceived temperature |
185 |
|
Climate control system voice commands |
186 |
|
Air quality |
187 |
|
Clean Zone* |
187 |
|
Clean Zone Interior Package* |
188 |
|
Interior Air Quality System* |
188 |
|
Activating and deactivating the air |
189 |
|
quality sensor* |
|
|
Passenger compartment air filter |
189 |
|
Air distribution |
190 |
|
Adjusting air distribution |
191 |
|
Opening, closing and directing air vents |
191 |
|
Air distribution options |
193 |
|
Climate system controls |
196 |
|
Activating and deactivating power |
198 |
|
front seats* |
|
|
Activating and deactivating the |
198 |
|
heated front seat* |
|
|
Activating and deactivating the |
199 |
|
heated rear seats* |
|
|
Activating and deactivating front seat |
199 |
|
ventilation* |
|
Activating and deactivating the |
200 |
|
heated steering wheel* |
|
|
Activating and deactivating automatic |
200 |
|
steering wheel heating* |
|
|
Activating auto climate control |
201 |
|
Activating and deactivating recirculation |
201 |
|
Activating and deactivating the recir- |
202 |
|
culation timer setting |
|
|
Activating and deactivating max defroster |
202 |
|
Activating and deactivating the |
204 |
|
heated windshield* |
|
|
Activating and deactivating automatic |
205 |
|
windshield heating* |
|
|
Activating and deactivating the |
205 |
|
heated rear window and door mirrors |
|
|
Automatically activating and deacti- |
206 |
|
vating the heated rear window and |
|
|
door mirrors |
|
|
Setting the blower speed for the |
206 |
|
front seats |
|
|
Setting the temperature for the front |
207 |
|
seats |
|
|
Synchronize temperature |
208 |
|
Activating and deactivating air condi- |
208 |
|
tioning |
|
|
Parking climate* |
209 |
|
Preconditioning* |
210 |
|
Starting and stopping preconditioning* |
210 |
5

|
Preconditioning timer* |
211 |
|
Adding and editing timer settings for |
211 |
|
preconditioning* |
|
|
Activating and deactivating precondi- |
212 |
|
tioning timer* |
|
|
Deleting preconditioning timer settings* |
213 |
|
Climate comfort retaining function* |
213 |
|
Starting and switching off the cli- |
214 |
|
mate retaining function when parking* |
|
|
Parking climate symbols and messages* |
215 |
KEY, LOCKS AND ALARM
|
Lock indication |
218 |
|
Lock confirmation settings |
219 |
|
Remote key |
219 |
|
Locking and unlocking using the |
222 |
|
remote key |
|
|
Settings for remote and inside door |
223 |
|
unlock |
|
|
Unlocking the tailgate using the |
223 |
|
remote key |
|
|
Remote key range |
224 |
|
Replacing the remote key’s battery |
225 |
|
Ordering additional remote keys |
228 |
|
Detachable key blade |
229 |
|
Locking and unlocking with detacha- |
230 |
|
ble key blade |
|
|
Electronic immobilizer |
231 |
|
Start and lock system type designations |
232 |
|
Keyless and touch-sensitive surfaces* |
233 |
|
Keyless locking and unlocking* |
234 |
|
Keyless unlock settings* |
235 |
|
Keyless tailgate unlock* |
236 |
|
Antenna locations for the start and |
236 |
|
lock system |
|
|
Locking and unlocking from inside |
237 |
|
the vehicle |
|
|
Unlocking the tailgate from inside |
238 |
|
the |
|
Activating and deactivating child |
239 |
|
safety locks |
|
|
Automatic locking when driving |
240 |
|
Opening and closing the power tailgate* |
241 |
|
Setting a maximum height for the |
244 |
|
power tailgate* |
|
|
Foot movement tailgate operation* |
244 |
|
Private Locking |
245 |
|
Activating and deactivating private |
246 |
|
locking |
|
|
Alarm |
247 |
|
Arming and disarming the alarm |
248 |
6

DRIVER SUPPORT
|
Driver support systems |
252 |
|
Speed-dependent steering wheel |
252 |
|
resistance |
|
|
Stability system Roll Stability Control |
253 |
|
Electronic Stability Control |
253 |
|
Electronic Stability Control Sport mode |
255 |
|
Activating/deactivating Sport mode |
255 |
|
in Electronic Stability Control |
|
|
Electronic Stability Control Sport |
255 |
|
mode limitations |
|
|
Electronic Stability Control symbols |
256 |
|
and messages |
|
|
Speed limiter |
257 |
|
Activating and starting Speed Limiter |
258 |
|
Managing Speed Limiter speed |
258 |
|
Deactivating and putting Speed Lim- |
259 |
|
iter in standby mode |
|
|
Reactivating Speed Limiter from |
260 |
|
standby mode |
|
|
Turning off Cruise Control |
260 |
|
Cruise Control limitations |
261 |
|
Automatic Speed Limiter |
261 |
|
Activating/deactivating Automatic |
263 |
|
Speed Limiter |
|
|
Changing Automatic Speed Limiter |
264 |
|
tolerance |
|
|
Automatic Speed Limiter limitations |
265 |
|
Cruise control |
265 |
|
Activating and starting Cruise Control |
266 |
|
Managing Cruise Control speed |
267 |
|
Deactivating and putting Cruise Con- |
269 |
|
trol in standby mode |
|
|
Reactivating Cruise Control from |
269 |
|
standby mode |
|
|
Switching off Cruise Control |
270 |
|
Adaptive Cruise Control* |
271 |
|
Adaptive Cruise Control and collision |
273 |
|
warning |
|
|
Activating and starting Adaptive |
274 |
|
Cruise Control |
|
|
Managing Adaptive Cruise Control speed |
275 |
|
Setting Adaptive Cruise Control time |
276 |
|
intervals |
|
|
Deactivating/reactivating Adaptive |
278 |
|
Cruise Control |
|
|
Passing assistance with Adaptive |
280 |
|
Cruise Control |
|
|
Starting passing assistance with |
280 |
|
Adaptive Cruise Control |
|
|
Limitations of passing assistance |
281 |
|
with Adaptive Cruise Control |
|
|
Switching target vehicles with Adap- |
281 |
|
tive Cruise Control |
|
|
Automatic braking with Adaptive |
282 |
|
Cruise Control |
|
Adaptive Cruise Control limitations |
283 |
|
Switching between Cruise Control |
283 |
|
and Adaptive Cruise Control |
|
|
Symbols and messages for Adaptive |
285 |
|
Cruise Control |
|
|
Pilot Assist |
287 |
|
Pilot Assist and collision warning |
290 |
|
Activating and starting Pilot Assist |
291 |
|
Managing Pilot Assist speed |
292 |
|
Setting a time interval for Pilot Assist |
293 |
|
Deactivating/reactivating Pilot Assist |
294 |
|
Passing assistance with Pilot Assist |
296 |
|
Starting passing assistance with |
297 |
|
Pilot Assist |
|
|
Passing assistance with Pilot Assist |
297 |
|
limitations |
|
|
Switching target vehicles with Pilot Assist |
297 |
|
Auto-hold braking with Pilot Assist |
298 |
|
Pilot Assist limitations |
299 |
|
Pilot Assist* symbols and messages |
300 |
|
Radar sensor |
302 |
|
Radar sensor limitations |
303 |
|
Recommended maintenance for the |
306 |
|
radar sensor |
|
|
Radar sensor type approval |
306 |
|
Camera |
307 |
7

|
Camera limitations |
308 |
|
Recommended maintenance for the |
311 |
|
camera/radar sensor |
|
|
City Safety™ |
311 |
|
City Safety parameters and sub-functions |
312 |
|
Setting a warning distance for City Safety |
314 |
|
Detecting obstacles with City Safety |
315 |
|
City Safety in crossing traffic |
317 |
|
Limitations of City Safety in crossing |
318 |
|
traffic |
|
|
City Safety and delayed evasive |
319 |
|
maneuvers |
|
|
City Safety braking for oncoming |
320 |
|
vehicles* |
|
|
City Safety limitations |
321 |
|
City Safety messages |
323 |
|
Rear Collision Warning |
324 |
|
Rear Collision Warning limitations |
324 |
|
BLIS* |
325 |
|
Activating/deactivating BLIS |
326 |
|
BLIS limitations |
327 |
|
Recommended maintenance for BLIS |
328 |
|
BLIS messages |
329 |
|
Cross Traffic Alert* |
330 |
|
Activating/deactivating Cross Traffic |
331 |
|
Alert |
8
|
Cross Traffic Alert limitations |
331 |
|
Recommended maintenance for |
332 |
|
Cross Traffic Alert |
|
|
Cross Traffic Alert messages |
334 |
|
Road Sign Information* |
335 |
|
Activating/deactivating Road Sign |
336 |
|
Information |
|
|
Road Sign Information and sign displays |
337 |
|
Road Sign Information and Sensus |
337 |
|
Navigation |
|
|
Road Sign Information with Speed |
338 |
|
Warning and Settings |
|
|
Activating/deactivating Speed Warn- |
339 |
|
ing in Road Sign Information |
|
|
Road Sign Information with speed |
339 |
|
camera information |
|
|
Road Sign Information limitations |
340 |
|
Driver Alert Control |
341 |
|
Activating/deactivating Driver Alert |
342 |
|
Control |
|
|
Selecting guidance to a rest area if |
343 |
|
the Driver Alert Control warning has |
|
|
been given |
|
|
Driver Alert Control limitations |
343 |
|
Lane Keeping Aid |
343 |
|
Steering assistance with Lane Keep- |
345 |
|
ing Aid |
|
|
Activating/deactivating Lane Keeping Aid |
346 |
|
Selecting type of assistance for Lane |
346 |
|
Keeping Aid |
|
|
Lane Keeping Aid limitations |
346 |
|
Lane Keeping Aid symbols and mes- |
348 |
|
sages |
|
|
Lane Keeping Aid symbols in the |
350 |
|
instrument panel |
|
|
Steering assistance at risk of collision |
351 |
|
Activating/deactivating steering |
351 |
|
assistance during collision risks |
|
|
Run-Off Mitigation with steering |
352 |
|
assistance |
|
|
Run-Off Mitigation with steering |
352 |
|
assistance levels |
|
|
Activating/deactivating Run-Off Miti- |
353 |
|
gation with steering assistance |
|
|
Limitations of Run-Off Mitigation |
354 |
|
with steering assistance |
|
|
Steering assistance during collision |
354 |
|
risks from oncoming traffic |
|
|
Activating/deactivating Steering |
355 |
|
assistance during collision risks with |
|
|
oncoming vehicles |
|
|
Limitations of steering assistance |
356 |
|
during collision risks from oncoming |
|
|
traffic |
|
|
Symbols and messages for steering |
357 |
|
assistance during collision risks |
|
|
Park Assist* |
358 |
![]()
|
Park Assist front, rear and sides |
359 |
|
Activating/deactivating Park Assist |
360 |
|
Park Assist limitations |
361 |
|
Recommended maintenance for |
362 |
|
Park Assist |
|
|
Park Assist symbols and messages |
363 |
|
Park Assist Camera* |
364 |
|
Park Assist Camera views |
365 |
|
Park Assist Camera trajectory lines |
367 |
|
Sensor field from Park Assist for |
369 |
|
Park Assist Camera |
|
|
Starting the Park Assist Camera |
370 |
|
Park Assist Camera limitations |
371 |
|
Recommended maintenance of the |
372 |
|
Park Assist Camera |
|
|
Park Assist Camera symbols and |
373 |
|
messages |
|
|
Park Assist Pilot* |
374 |
|
Types of parking with Park Assist Pilot |
374 |
|
Parking with Park Assist Pilot |
376 |
|
Leaving a parking space with Park |
378 |
|
Assist Pilot |
|
|
Park Assist Pilot* limitations |
379 |
|
Recommended maintenance for |
381 |
|
Park Assist Pilot |
|
|
Park Assist Pilot* messages |
382 |
STARTING AND DRIVING
|
Starting the vehicle |
384 |
|
Switching off the vehicle |
386 |
|
Ignition modes |
386 |
|
Selecting ignition mode |
388 |
|
Brake functions |
388 |
|
Brakes |
389 |
|
Brake Assist System |
390 |
|
Braking on wet roads |
390 |
|
Braking on salted roads |
391 |
|
Maintenance of the brake system |
391 |
|
Parking brake |
391 |
|
Activating and deactivating the park- |
392 |
|
ing brake |
|
|
Settings for automatically activating |
393 |
|
the parking brake |
|
|
Parking on a hill |
394 |
|
Parking brake malfunction |
394 |
|
Auto-hold brakes |
395 |
|
Activating and deactivating Auto- |
396 |
|
hold at a standstill |
|
|
Hill Start Assist |
396 |
|
Braking assist after a collision |
397 |
|
Transmission |
397 |
|
Gear selector positions for automatic |
398 |
|
transmissions |
|
Using the steering wheel paddles* to |
400 |
|
shift |
|
|
Shiftlock |
401 |
|
The kickdown function |
401 |
|
All Wheel Drive (AWD)* |
402 |
|
Drive modes* |
402 |
|
Changing drive mode* |
404 |
|
ECO drive mode |
404 |
|
Activating and deactivating ECO |
406 |
|
drive mode using the function button |
|
|
Start/Stop function |
407 |
|
Driving with the Start/Stop function |
407 |
|
Temporarily deactivating the Start/ |
408 |
|
Stop function |
|
|
Conditions for the Start/Stop function |
408 |
|
Leveling control* and suspension |
410 |
|
Low Speed Control* |
412 |
|
Activating and deactivating Low |
412 |
|
Speed Control* using the function button |
|
|
Hill Descent Control* |
413 |
|
Activating and deactivating Hill |
414 |
|
Descent Control* using the function |
|
|
button |
|
|
Economical driving |
415 |
|
Preparing for a long trip |
416 |
|
Winter driving |
416 |
9

|
Driving through standing water |
417 |
|
Opening/closing the fuel filler door |
418 |
|
Refueling |
418 |
|
Fuel |
419 |
|
Octane rating |
420 |
|
Emission controls |
422 |
|
Overheating of engine and transmission |
422 |
|
Battery drain |
423 |
|
Jump starting using another battery |
424 |
|
Detachable towbar* |
425 |
|
Driving with a trailer |
426 |
|
Trailer Stability Assist* |
428 |
|
Checking trailer lights |
429 |
|
Towing using a towline |
430 |
|
Attaching and removing the towing eyelet |
431 |
|
Recovery |
432 |
|
HomeLink®* |
433 |
|
Programming HomeLink®* |
434 |
|
Using HomeLink®* |
435 |
|
Type approval for HomeLink®* |
436 |
|
Compass* |
436 |
|
Activating and deactivating the compass* |
437 |
|
Calibrating the compass* |
437 |
AUDIO, MEDIA AND INTERNET
|
Audio, media and Internet |
440 |
|
Sound settings |
440 |
|
Sound experience* |
441 |
|
Apps |
442 |
|
Download apps |
443 |
|
Updating apps |
443 |
|
Deleting apps |
444 |
|
Radio |
444 |
|
Starting the radio |
445 |
|
Changing waveband and radio station |
446 |
|
Searching for a radio station |
446 |
|
Storing radio favorites |
447 |
|
Radio settings |
448 |
|
RBDS |
448 |
|
HD Radio™ |
449 |
|
Activating and deactivating the HD |
450 |
|
Radio™ |
|
|
HD Radio™ sub-channels |
451 |
|
HD Radio™ limitations |
451 |
|
SiriusXM® Satellite radio* |
452 |
|
Using SiriusXM® Satellite radio* |
453 |
|
Settings for SiriusXM® Satellite radio* |
455 |
|
SiriusXM Travel Link®* |
456 |
|
SiriusXM Travel Link®* — Weather |
457 |
|
SiriusXM Travel Link®* — Notifications |
459 |
|
SiriusXM Travel Link®* — Fuel |
459 |
|
SiriusXM Travel Link®* — Sports |
461 |
|
Media player |
461 |
|
Playing media |
462 |
|
Controlling and changing media |
463 |
|
Media searches |
464 |
|
Gracenote® |
465 |
|
Video |
466 |
|
Playing video |
466 |
|
Playing DivX® |
466 |
|
Video settings |
467 |
|
Streaming media via Bluetooth® |
467 |
|
Connecting a device via Bluetooth® |
467 |
|
Playing media via the USB port |
468 |
|
Connecting a device via the USB port |
468 |
|
Technical specifications for USB devices |
469 |
|
Compatible file formats for media |
469 |
|
Apple® CarPlay®* |
470 |
|
Using Apple® CarPlay®* |
471 |
|
Settings for Apple® CarPlay®* |
472 |
|
Tips for using Apple® CarPlay®* |
473 |
|
Android Auto* |
474 |
10

|
Using Android Auto* |
474 |
|
Settings for Android Auto* |
475 |
|
Tips for using Android Auto* |
476 |
|
Phone |
476 |
|
Connecting a phone to the car via |
477 |
|
Bluetooth for the first time |
|
|
Connecting a phone to the car via |
479 |
|
Bluetooth automatically |
|
|
Connecting a phone to the car via |
479 |
|
Bluetooth manually |
|
|
Disconnecting a Bluetooth-con- |
480 |
|
nected phone |
|
|
Switch between phones connected |
480 |
|
via Bluetooth |
|
|
Disconnecting Bluetooth-connected |
480 |
|
devices |
|
|
Handling phone calls |
481 |
|
Handling text messages |
482 |
|
Text message settings |
483 |
|
Managing the phone book |
483 |
|
Phone settings |
484 |
|
Settings for Bluetooth devices |
484 |
|
Wireless phone charger* |
485 |
|
Using the wireless phone charger* |
485 |
|
Internet-connected vehicle* |
486 |
|
Connecting the vehicle to the Inter- |
487 |
|
net via a Bluetooth-connected phone |
|
Connecting the vehicle to the Inter- |
488 |
|
net via a phone (Wi-Fi) |
|
|
Connecting the vehicle to the Inter- |
488 |
|
net via vehicle modem (SIM card) |
|
|
Vehicle modem settings |
489 |
|
Sharing Internet from the vehicle via |
490 |
|
Wi-Fi hotspot (tethering) |
|
|
No or poor Internet connection |
491 |
|
Deleting Wi-Fi networks |
491 |
|
Wi-Fi technology and security |
492 |
|
Terms of use and data sharing |
492 |
|
Activating and deactivating data sharing |
492 |
|
Hard disk storage space |
493 |
|
License agreement for audio and media |
494 |
WHEELS AND TIRES
|
Tires |
506 |
|
Tire direction of rotation |
508 |
|
Tread wear indicator |
509 |
|
Tire terminology |
509 |
|
Tire sidewall designations |
510 |
|
Uniform Tire Quality Grading |
512 |
|
Checking tire pressure |
513 |
|
Adjusting tire pressure |
514 |
|
Recommended tire pressure |
515 |
|
Tire pressure monitoring system* |
515 |
|
Calibrating the tire pressure monitor- |
517 |
|
ing system* |
|
|
Viewing tire pressure status in the |
518 |
|
center display* |
|
|
Action when warned of low tire pressure |
519 |
|
When changing wheels |
520 |
|
Tool kit |
520 |
|
Jack* |
521 |
|
Wheel bolts |
522 |
|
Removing a wheel |
522 |
|
Installing a wheel |
524 |
|
Spare wheel |
526 |
|
Accessing the spare wheel |
527 |
|
Snow tires |
527 |
|
Snow chains |
528 |
11

|
Tire sealing system |
529 |
|
Using the tire sealing system |
530 |
|
Inflate tires with the compressor |
533 |
|
included in the tire sealing system |
|
|
Determining the vehicle’s permitted |
534 |
|
weight |
LOADING, STORAGE AND PASSENGER COMPARTMENT
|
Passenger compartment interior |
538 |
|
Tunnel console |
539 |
|
Electrical outlets |
539 |
|
Using the electrical outlets |
540 |
|
Using the glove compartment |
541 |
|
Sun visors |
542 |
|
Cargo compartment |
543 |
|
Loading recommendations |
543 |
|
Roof loads and load carriers |
544 |
|
Grocery bag holders |
545 |
|
Load anchoring eyelets |
545 |
|
Rear seat ski hatch* |
546 |
|
Folding up the cargo compartment floor |
546 |
|
Removing the folding cargo compart- |
546 |
|
ment floor* |
|
|
Installing and removing the cargo net* |
548 |
|
Removing and storing the parcel |
550 |
|
shelf in the vehicle |
MAINTENANCE AND SERVICE
|
Volvo’s service program |
552 |
|
Data transfer between vehicle and |
554 |
|
workshop over Wi-Fi |
|
|
Download Center |
555 |
|
Handling system updates via Down- |
555 |
|
load Center |
|
|
Vehicle status |
556 |
|
Scheduling service and repairs |
557 |
|
Sending vehicle information to the |
558 |
|
workshop |
|
|
Hoisting the vehicle |
560 |
|
Opening and closing the hood |
562 |
|
Climate control system service |
563 |
|
Engine compartment overview |
563 |
|
Engine oil |
564 |
|
Checking and filling engine oil |
565 |
|
Refilling coolant |
566 |
|
Replacing bulbs |
567 |
|
Location of exterior lights |
568 |
|
Replacing rear turn signal bulbs |
569 |
|
Replacing the brake light bulb |
570 |
|
Replacing the rear fog light bulb |
571 |
|
Bulb specifications |
572 |
|
Start battery |
573 |
|
Support battery |
576 |
12

|
Battery symbols |
577 |
|
Fuses and fuseboxes |
578 |
|
Replacing fuses |
579 |
|
Fuses in the engine compartment |
580 |
|
Fuses under the left front seat |
583 |
|
Cleaning the interior |
586 |
|
Cleaning the center display |
586 |
|
Cleaning fabric upholstery and ceil- |
587 |
|
ing liner |
|
|
Cleaning the seat belt |
588 |
|
Cleaning floor mats and inlay mats |
588 |
|
Cleaning leather upholstery |
589 |
|
Cleaning the leather steering wheel |
590 |
|
Cleaning interior plastic, metal and |
590 |
|
wood surfaces |
|
|
Cleaning the exterior |
591 |
|
Polishing and waxing |
591 |
|
Hand washing |
592 |
|
Automatic car washes |
593 |
|
High-pressure washing |
594 |
|
Cleaning the wiper blades |
595 |
|
Cleaning exterior plastic, rubber and |
595 |
|
trim components |
|
|
Cleaning rims |
596 |
|
Corrosion protection |
597 |
|
Paintwork |
597 |
|
Touching up minor paint damage |
598 |
|
Color codes |
599 |
|
Changing rear window wipers |
599 |
|
Replacing windshield wiper blades |
600 |
|
Windshield wipers in the service position |
601 |
|
Filling washer fluid |
602 |
SPECIFICATIONS
|
Type designations |
606 |
|
Dimensions |
609 |
|
Weights |
611 |
|
Towing capacity and tongue weight |
613 |
|
Engine specifications |
614 |
|
Engine oil specifications |
615 |
|
Coolant specifications |
616 |
|
Transmission fluid specifications |
616 |
|
Brake fluid specifications |
616 |
|
Fuel tank volume |
617 |
|
Air conditioning specifications |
617 |
|
Approved tire pressure |
618 |
13

14

OWNER’S INFORMATION
OWNER’S INFORMATION
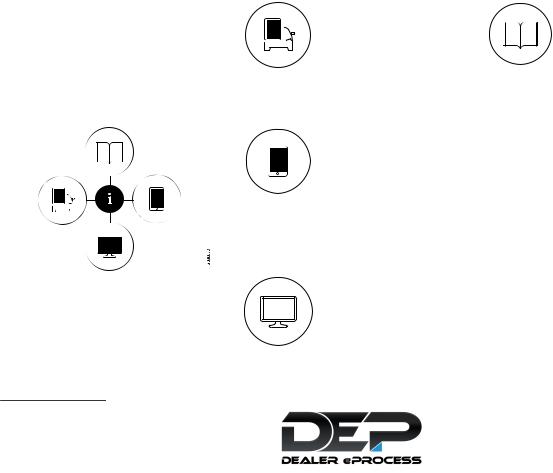
Owner’s information
Owner’s information is available in several different formats, both digital and printed. The Owner’s Manual is available on the vehicle’s center display, as a mobile app and on Volvo Cars’ support website. There is also a Quick Guide in the glove compartment, as well as a supplement to the Owner’s Manual containing information about e.g. fuses, specifications, etc. A printed Owner’s Manual can be ordered.
Vehicle’s center display1
In the center display, pull down Top view and tap Owner’s
manual. This gives you access
to visual navigation with exterior and interior images of the vehicle. The information is searchable and is divided into catego-
ries.
Mobile app
In App Store or Google Play, search for «Volvo Manual». Download the app to your smartphone or tablet and select your vehicle model. The app contains instructive videos and offers visual navigation, includ-
ing exterior and interior images of the vehicle. You can easily navigate between sections in the Owner’s Manual and the contents are searchable.
Volvo Cars support site
Go to support.volvocars.com and select your country. Owner’s Manuals are available here for viewing online and in
PDF format. The support site also contains instructive videos and additional information and
assistance concerning your vehicle and owning a Volvo. The website is available on most markets.
1 For markets without Owner’s Manuals in the center display, a complete printed
Printed information
The glove compartment contains a printed supplement to the Owner’s Manual1, which contains information on fuses and specifications as well as a summary of important and practical information.
There is also a printed Quick Guide with useful information about the most commonly used features and functions in your vehicle.
Other printed information may also be provided in the vehicle, depending on equipment level, market, etc.
A printed Owner’s Manual and accompanying supplement can also be ordered. Contact a Volvo retailer to order.
16
CAUTION
The driver is always responsible for operating the vehicle in a safe manner and adhering to all applicable laws and regulations. It is also important that the vehicle is operated, maintained and serviced according to Volvo’s recommendations provided in the owner’s information.
If the information in the center display differs from the printed information, the printed information always takes precedence.
NOTE
Changing languages in the center display could mean that certain owner’s information will not comply with national or local laws and regulations. Do not change to a language that you do not fully understand, as this could make it difficult to navigate back through the menu.
Related information
•Owner’s Manual in the center display (p. 17)
•Owner’s manual in mobile devices (p. 20)
•Volvo Cars support site (p. 21)
•Using the Owner’s Manual (p. 21)
2 Available in most markets.
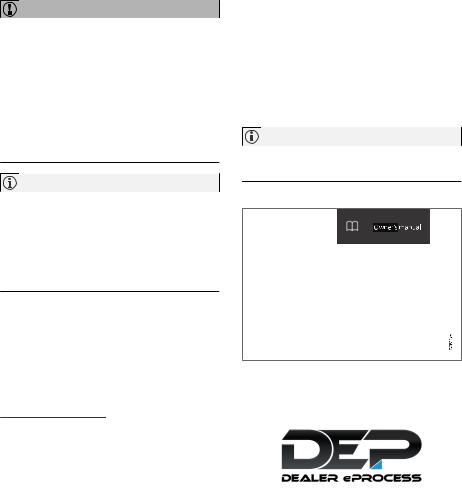
Owner’s Manual in the center display
A digital version of the Owner’s Manual is available in the vehicle’s center display2.
The digital Owner’s Manual can be accessed from Top view and in certain cases, the contextual Owner’s Manual can also be accessed from Top view.
NOTE
The digital Owner’s Manual is not available during driving.
OWNER’S MANUAL
OWNER’S INFORMATION
To open the Owner’s Manual, pull down Top view in the center display and tap Owner’s manual.
The information in the Owner’s Manual can be accessed directly via the Owner’s Manual start page or via its Top menu.
Top view with button for Owner’s Manual.
}}
17
|
OWNER’S INFORMATION |
||||||
|
|| Contextual Owner’s Manual |
Related information |
|||||
|
• Navigate in the Owner’s Manual in the center |
||||||
|
display (p. 18) |
||||||
|
• Navigating in the center display’s views |
||||||
|
(p. 108) |
||||||
|
• Download apps (p. 443) |
||||||
Navigate in the Owner’s Manual in the center display
The digital Owner’s Manual can be accessed from the center display’s Top view. The contents are searchable and it is easy to navigate among the various sections.
Top view with button for contextual Owner’s Manual.
The contextual Owner’s Manual is a shortcut to an article in the Owner’s Manual describing the active function displayed on the screen. When a contextual Owner’s Manual is available, it will be shown to the right of Owner’s manual in Top view.
Tap the contextual Owner’s Manual to open an article in the Owner’s Manual related to the information displayed on the screen. For example, tap Navigation Manual to open an article related to navigation.
Certain apps in the vehicle only. For third-party apps that have been downloaded, it is not possible to e.g. access app-specific articles.
The Owner’s Manual is accessed from Top view.
–To open the Owner’s Manual, pull down Top view in the center display and tap Owner’s manual.
There are a number of ways to find information in the Owner’s Manual. The options can be accessed from the Owner’s Manual start page and from the Top menu.
18
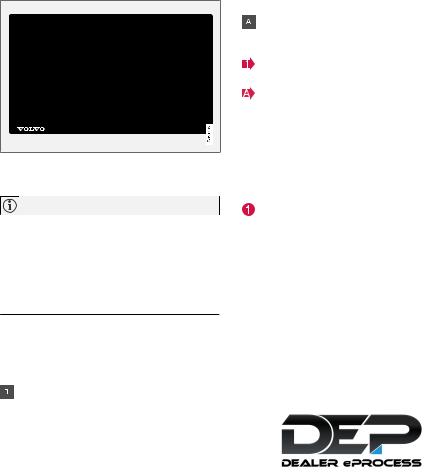
![]()
Opening the menu in the Top menu
–Tap  in the upper list in the Owner’s Manual.
>A menu will open, displaying different options for finding information:
Start page
Categories
Tap the symbol to return to the Owner’s Manual start page.
The articles in the Owner’s Manual are structured into main and sub-categories. The same article may appear in several relevant categories in order to help make them easier to find.
1.Tap Categories.
>The main categories are listed.
2.Tap a main category (  ).
).
>A list of sub-categories (  ) and articles (
  ) will appear.
3.Tap an article to open it.
To go back, tap the left arrow.
Quick Guide
Tap the symbol to go to a page with links to a selection of use-
ful articles about the vehicle’s
most commonly used features and functions. The articles can also be accessed via categories, but have been collected
here for quick access. Tap an article to read it in its entirety.
Exterior and interior hotspots
Exterior and interior overviews of the vehicle. Hotspots are
provided for certain functions, components, etc. Tap a hotspot to come to a relevant article.
1.Press Exterior or Interior.
>Exterior or interior images of the vehicle are shown with hotspots. The hotspots lead to articles about the corresponding function, component, etc. Swipe the screen horizontally to scroll between the images.
OWNER’S INFORMATION
2.Tap a hotspot.
>The title of a relevant article will be displayed.
3.Tap the title to open the article.
To go back, tap the left arrow.
Favorites
Tap the symbol to go to articles saved as favorites. Tap an article to read it in its entirety.
Saving or deleting favorite articles
Save an article as a favorite by tapping the  at the upper right when the article is open. When an article has been saved as a favorite, the star sym-
bol will be filled in:  .
.
To remove an article from the list of favorites, tap its star again.
Video
Tap the symbol to go to brief instructive videos for various functions in the vehicle.
}}
19
OWNER’S INFORMATION
||Information
Tap the symbol for information about the current version of the Owner’s Manual in your vehicle and other useful information.
Owner’s manual in mobile devices
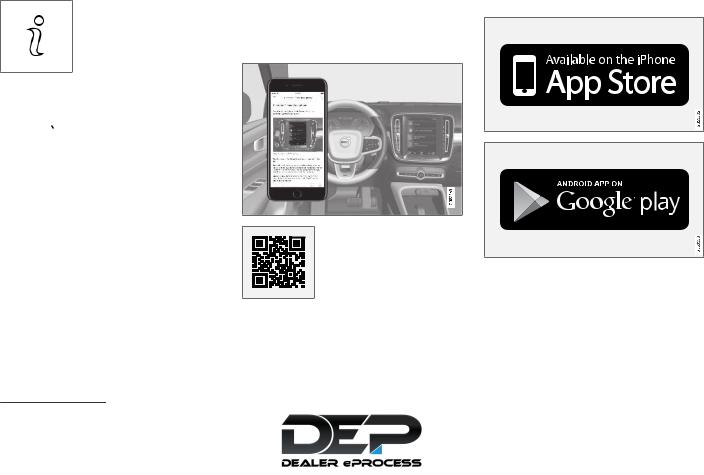
The Owner’s Manual is available as a mobile app3 and can be downloaded from the App Store and Google Play. The app is adapted for both smartphones and tablets.
can easily navigate between sections in the Owner’s Manual and the contents are searchable.
Using the search function in the Top menu
1.Tap  in the Owner’s Manual upper menu. A keyboard will appear at the bottom of the screen.
2.Enter a search word, e.g. «seat belt».
>Suggested articles and categories will be displayed as characters are entered.
3.Tap the article or category to read it.
Related information
•Owner’s Manual in the center display (p. 17)
•Using the center display keyboard (p. 119)
•Using the Owner’s Manual (p. 21)
3 Certain mobile devices.
The Owner’s Manual can be downloaded as a mobile app
from the App Store or Google
Play. This QR code will take
you directly to the app. You can also search for «Volvo manual» in the App Store or Google
Play.
The app contains videos and exterior/interior images of the vehicle. These images contain hotspots for various functions, components, etc., which lead directly to related information. You
The mobile app is available on both App Store and Google Play.
Related information
•Using the Owner’s Manual (p. 21)
20

Volvo Cars support site
Volvo Cars’ website and support site contain additional information about your vehicle.
Online support
Go to support.volvocars.com to visit the site. The support site is available in most markets.
The site contains support for e.g. Internet-based services and functions, Volvo On Call, the navigation system* and apps. Videos and step-by-step instructions explain various procedures, such as how to connect the vehicle to the Internet via a cellular phone.
Downloadable information
Maps
For vehicles equipped with Sensus Navigation maps can be downloaded from the support site.
Mobile apps
Beginning with model year 2014, the Owner’s Manual is available as an app for certain Volvo models. The Volvo On Call app can also be downloaded from the support site.
Owner’s manuals in PDF format
Owner’s Manuals are available for downloading in PDF format. Select the vehicle model and year to download the desired manual.
Contact
Contact information for customer support and your nearest Volvo retailer are available on the support site.
Related information
•Contacting Volvo (p. 26)
•Volvo ID (p. 26)
OWNER’S INFORMATION
Using the Owner’s Manual
Reading your Owner’s Manual is a good way to get to know your new Volvo, preferably before driving it for the first time.
Reading your Owner’s Manual is a good way to familiarize yourself with new features and functions, get advice on the best way to handle your vehicle in different situations, and to learn how to get the most out of everything your Volvo has to offer. Pay particular attention to the safety warnings provided in the Owner’s Manual.
The intention of this owner’s information is to explain all of the possible features, functions and options included in a Volvo vehicle. It is not intended as an indication or guarantee that all of these features, functions and options are included in every vehicle. Some terminology used may not exactly match terminology used in sales, marketing and advertising materials.
Volvo continuously works to develop and improve our products. Modifications can mean that information, descriptions and illustrations in the Owner’s Manual differ from the equipment in the vehicle. We reserve the right to make changes without prior notice.
Do not remove this manual from the vehicle. If a problem should occur, you will not have the necessary information on where and how to get professional assistance.
© Volvo Car Corporation
}}
* Option/accessory. 21
OWNER’S INFORMATION
||Option/accessory
In addition to standard equipment, the Owner’s Manual also describes options (factory-installed equipment) and certain accessories (extra retrofitted equipment).
All options and accessories are marked with an asterisk: *.
The equipment described in the Owner’s Manual is not available in all vehicles. Vehicles may be equipped differently depending on market requirements and national or local laws and regulations.
For more information on which equipment is standard and which is an option or accessory, please contact your Volvo retailer.
Footnotes
Certain parts of the Owner’s Manual contain information in the form of footnotes at the bottom of the page or at the end of a table. This information supplements the text that the footnote number refers to. If the footnote refers to text in a table, a letter is used instead of a number.
Messages
There are several displays in the vehicle that show messages and menu texts. The appearance of these texts differs from the normal texts provided. Example of messages and menu texts:
Phone, New message.
Decals
There are various types of decals affixed in the vehicle to communicate important information in a clear and concise manner. The importance of these decals is explained as follows, in descending order of importance.
Risk of injury
Black ISO symbols on a yellow warning field, white text/image on a black message field. Used to indicate potential danger. Ignoring a warning of this type could result in serious injury or death.
Risk of damage
White ISO symbols and white text/image on a black or blue warning field and message field. Used to indicate potential danger. Ignoring a warning of this type could result in damage.
Information
White ISO symbols and white text/image on a black message field.
NOTE
The decals shown in the Owner’s Manual do not claim to be exact reproductions of those found in the vehicle. The purpose is to show approximately how they look and about where they are located. The information that applies for your vehicle in particular is found on the decal on the vehicle.
Procedures
Procedures that must be carried out in a certain order are shown as numbered lists in the Owner’s Manual.
When a series of illustrations are provided along with the step-by-step instructions, the
numbers of the steps correspond with the numbers of the illustrations.
Lists using letters instead of numbers are used in cases where the order in which the instructions are carried out is not important.
Arrows with or without numbers are used to indicate the direction of movement.
Arrows with letters are used to indicate a movement in cases where the order in which the instructions are carried out is not important.
If there are no illustrations associated with step- by-step instructions, the steps are indicated by ordinary numbers.
Position lists
Red circles containing a number are used in general overview illustrations of components. The corresponding number is used in the position list’s description of that component.
Bullet lists
Bullets are used for items (components, functions, information, etc.) that can be listed in a random order.
For example:
•Coolant
•Engine oil
OWNER’S INFORMATION
Related information
Related information offers references to other parts of the manual containing information associated with the information you are currently reading.
Illustrations, images and video clips
Illustrations, images and video clips used in the Owner’s Manual are sometimes generic and are intended to provide an overview or an example of a certain function or feature. They may vary depending on equipment level and market and may differ from the appearance of your vehicle.
Continues on next page
}} This symbol is shown in the lower right-hand corner to indicate that the current topic continues on the next page.
Continuation from previous page
|| This symbol is shown in the upper left-hand corner to indicate that the current topic is a continuation from the previous page.
Related information
•Owner’s Manual in the center display (p. 17)
•Owner’s manual in mobile devices (p. 20)
•Volvo Cars support site (p. 21)
23
OWNER’S INFORMATION
The Owner’s Manual and the environment
The Owner’s Manual is printed on paper from responsibly managed forests.
The Forest Stewardship Council (FSC)® symbol certifies that the paper pulp in the printed Owner’s Manual comes from FSC®-certified forests or other responsibly managed sources.
Related information
•Drive-E ‒ purer driving pleasure (p. 27)
24

YOUR VOLVO
YOUR VOLVO
Contacting Volvo
Use the following contact information if you would like to get in touch with Volvo in the United States or Canada.
In the USA:
Volvo Car USA, LLC Customer Care Center 1 Volvo Drive,
P.O. Box 914
Rockleigh, New Jersey 07647 1-800-458-1552 www.volvocars.com/us
In Canada:
Volvo Car Canada Ltd.
Customer Care Centre
9130 Leslie Street, Suite 101 Richmond Hill, Ontario L4B 0B9 1-800-663-8255 www.volvocars.com/ca
Volvo ID
Volvo ID is a personal ID that gives you access to a range of services using a single username and password.
Examples of services:
•Volvo On Call-app — check your vehicle using your phone. You can check fuel level, find the nearest gas station and lock the vehicle remotely.
•Send to Car – send addresses from online map services directly to the vehicle.
•Book service and repairs – register your preferred workshop/retailer on volvocars.com to schedule service directly from the vehicle.
NOTE
If the username/password for a service (e.g. Volvo On Call) is changed, the change will also automatically be applied to other services.
A Volvo ID can be created from the vehicle or the Volvo On Call app.
When a Volvo ID is registered in the vehicle, additional services are available.
Related information
•Creating and registering a Volvo ID (p. 26)
•Scheduling service and repairs (p. 557)
Creating and registering a Volvo ID
A Volvo ID can be created in two ways. If your Volvo ID was created with the Volvo On Call app, the Volvo IDmust also be registered to the vehicle to enable access to the Volvo ID services.
Creating a Volvo ID with the Volvo ID app
1.Download the Volvo ID app from Download Center in the center display’s App view.
2.Start the app and register a personal email address.
3.Follow the instructions that will be sent automatically to this email address.
>A Volvo ID has now been created and is automatically registered to the vehicle. The Volvo ID services can now be used.
26

Creating a Volvo ID using the Volvo On Call app1
1.Download the latest version of the Volvo On Call app from a smartphone, via e.g. App Store, Windows Phone or Google Play.
2.On the app’s start page, create a Volvo ID and enter a personal email address.
3.Follow the instructions that will be sent automatically to this email address.
>A Volvo ID has now been created. See below for information on how the ID is registered to the vehicle.
Registering your Volvo ID to the vehicle
If your Volvo ID was created using the Volvo On Call app, follow these steps to register the ID to the vehicle:
1.If you have not already done so, download the Volvo ID app from Download Center in the center display’s App view.
NOTE
To download apps the vehicle must be connected to the internet.
2.Start the app and enter your Volvo ID/email address.
1 Vehicles with Volvo On Call.
3.Follow the instructions that will be automatically sent to the email address connected to your Volvo ID.
>Your Volvo ID has now been registered to the vehicle. The Volvo ID services can now be used.
Related information
•Volvo ID (p. 26)
•Download apps (p. 443)
•Handling system updates via Download Center (p. 555)
•Internet-connected vehicle* (p. 486)
YOUR VOLVO
Drive-E ‒ purer driving pleasure
Volvo is committed to the well-being of its customers. As a natural part of this commitment, we care about the environment in which we all live. Concern for the environment means an everyday involvement in reducing our environmental impact.
Volvo’s environmental activities are based on a holistic view, which means we consider the overall environmental impact of a product throughout its complete life cycle. In this context, design, production, product use, and recycling are all important considerations. In production, Volvo has partly or completely phased out several chemicals including CFCs, lead chromates, asbestos, and cadmium; and reduced the number of chemicals used in our plants 50% since 1991.
Volvo was the first in the world to introduce into production a three-way catalytic converter with a Lambda sond, now called the heated oxygen sensor, in 1976. The current version of this highly efficient system reduces emissions of harmful substances (CO, HC, NOx) from the exhaust pipe by approximately 95 — 99% and the search to eliminate the remaining emissions continues. Volvo is the only automobile manufacturer to offer CFC-free retrofit kits for the air conditioning system of all models as far back as the 1975 model 240. Advanced electronic engine controls and cleaner fuels are bringing us closer to our
}}
* Option/accessory. 27

YOUR VOLVO
||goal. In addition to continuous environmental refinement of conventional gasoline-powered internal combustion engines, Volvo is actively looking at advanced technology alternative-fuel vehicles.
When you drive a Volvo, you become our partner in the work to lessen the vehicle’s impact on the environment. To reduce your vehicle’s environmental impact, you can:
•Maintain proper air pressure in your tires. Tests have shown decreased fuel economy with improperly inflated tires.
•Follow the recommended maintenance schedule in your Warranty and Service Records Information booklet.
•Drive at a constant speed whenever possible.
•See a trained and qualified Volvo service technician as soon as possible for inspection if the check engine (malfunction indicator) light illuminates, or stays on after the vehicle has started.
•Properly dispose of any vehicle-related waste such as used motor oil, used batteries, brake pads, etc.
•When cleaning your vehicle, please use genuine Volvo car care products. All Volvo car care products are formulated to be environmentally friendly.
Related information
•Economical driving (p. 415)
•Starting and stopping preconditioning* (p. 210)
•The Owner’s Manual and the environment (p. 24)
•Air quality (p. 187)
2 Depending on market, this function can be either standard or optional.
IntelliSafe — driver support
IntelliSafe is Volvo Cars’ philosophy regarding vehicle safety. IntelliSafe consists of a number of systems, both standard and optional, that are designed to help make driving safer, prevent accidents and protect passengers and other road users.
Support
IntelliSafe includes driver support functions such as Adaptive cruise control* which helps the driver to maintain an even speed combined with a preselected time interval to the vehicle ahead.
Pilot Assist2 helps the driver keep the vehicle in the current traffic lane by providing steering assistance and maintaining an even speed and a set time interval to the vehicle ahead.
Park Assist Pilot* helps the driver pull into and out of parking spaces.
Other examples of systems that can help the driver are the Active main beam, Cross Traffic Alert (CTA)* and Blind Spot Information (BLIS)* systems.
Prevention
City Safety is a function intended to help prevent accidents. The function can help prevent or mitigate a collision with pedestrians, cyclists, large animals or other vehicles. Light, sound and pulsations in the brake pedal are provided to alert of a
![]()
possible collision and help the driver act in time to prevent it. If the driver does not react to the warning and the risk of collision is determined to be imminent, City Safety can automatically apply the brakes.
Lane assistance (LKA) is another example of a function that can help prevent accidents by helping the driver — on expressways and similar larger roads — to reduce the risk of the car accidentally leaving its own lane.
The function Steering aid during increased collision risk can help the driver reduce the risk of the car leaving its lane unintentionally and/or colliding with another vehicle or obstacle by actively steering the car back into its lane and/or swerving.
Protection
To help protect the driver and passengers, the vehicle is equipped with seat belt tensioners that pull the seat belts taut in collisions and other critical situations. The vehicle also has airbags, inflatable curtains and the Whiplash Protection System (WHIPS), which helps prevent whiplash injuries.
Related information
•Driver support systems (p. 252)
•Active high beam (p. 145)
•Safety (p. 42)
•Seat belts (p. 47)
YOUR VOLVO
•Airbags (p. 52)
•Whiplash Protection System (p. 46)
29

YOUR VOLVO
Sensus — connection and entertainment
Sensus makes it possible to surf the Internet, use apps, and turn your vehicle into a Wi-Fi hotspot.
This is Sensus
Sensus provides an intelligent interface and Internet connection to the digital world. An intuitive navigation structure offers access to relevant assistance, information and entertainment when it is needed, without distracting the driver.
Sensus includes all of the solutions in the vehicle related to entertainment, Internet connection and navigation*, and serves as the user interface between the driver and the vehicle. Sensus is what makes communication between you, the vehicle and the world around you possible.
Information when it’s needed, where it’s needed
The vehicle’s displays present the right information at the right time. Information is presented in
different displays depending on how it should be prioritized by the driver.

YOUR VOLVO
Different types of information are shown in different displays depending on how the information should be prioritized.
Instrument panel |
The instrument panel displays information |
Center display |
||||
|
such as speed, incoming phone calls or the track |
||||||
|
currently playing. It is controlled using the steer- |
||||||
|
ing wheel keypads. |
||||||
Instrument panel3.
|
3 The illustration is generic — details may vary according to vehicle model. |
}} |
31

YOUR VOLVO
||Many of the vehicle’s main functions are controlled from the center display, a touchscreen that reacts to taps and other gestures. This minimizes the number of physical buttons and controls needed in the vehicle. The screen can also be operated while wearing gloves.
The center display is used to control e.g. the climate and entertainment systems and to adjust the power seats*. The information presented in the center display can be handled by the driver or, in some situations, by a passenger.
Voice control system
The voice control system enables the driver to control certain
vehicle functions without taking their hands off the wheel. The
system can understand natural speech. Use voice commands to e.g. play a song, make a
phone call, increase the temperature in the passenger compartment or have a text message read aloud.
Related information
•Instrument panel (p. 80)
•Center display overview (p. 102)
•Voice control (p. 135)
•Internet-connected vehicle* (p. 486)
•Sharing Internet from the vehicle via Wi-Fi hotspot (tethering) (p. 490)

Software Updates
So that you as a Volvo customer shall have the best possible experience from your car, Volvo is continuously developing the systems in the cars and the services that you are offered.
You can update the software in your Volvo to the latest version when your car is serviced at an authorized Volvo dealer. The latest software update gives you access to new functions and improvements, as well as previous improvements included with previous software updates.
For more information about released updates and answers to frequently asked questions, please go to support.volvocars.com.
NOTE
Functionality after updating may vary depending on market, model, model year and options.
Related information
•Sensus — connection and entertainment (p. 30)
•Handling system updates via Download Center (p. 555)
Data recording
As part of Volvo’s commitment to safety and quality, certain information is recorded regarding vehicle operation, functionality and incidents.
US market only:
EDR
This vehicle is equipped with an event data recorder (EDR). The main purpose of an EDR is to record, in certain crash or near crash-like situations, such as an air bag deployment or hitting a road obstacle, data that will assist in understanding how a vehicle’s systems performed. The EDR is designed to record data related to vehicle dynamics and safety systems for a short period of time, typically 30 seconds or less. The EDR in this vehicle is designed to record such data as:
•How various systems in your vehicle were operating;
•Whether or not the driver and passenger safety belts were buckled/fastened;
•How far (if at all) the driver was depressing the accelerator and/or brake pedal; and,
•How fast the vehicle was traveling.
These data can help provide a better understanding of the circumstances in which crashes and injuries occur. NOTE: EDR data are recorded by your vehicle only if a non-trivial crash situation occurs; no data are recorded by the EDR under normal driving conditions and no
YOUR VOLVO
personal data (e.g., name, gender, age, and crash location) are recorded. However, other parties, such as law enforcement, could combine the EDR data with the type of personally identifying data routinely acquired during a crash investigation.
To read data recorded by an EDR, special equipment is required, and access to the vehicle or the EDR is needed. In addition to the vehicle manufacturer, other parties, such as law enforcement, that have the special equipment, can read the information if they have access to the vehicle or the EDR.
ASDR
This vehicle is equipped with an Active Safety Data Recorder (ASDR). This data recorder can record information related to the usage of the car, functional errors and active safety actuations (e.g. auto brake). The information saved is used by technicians for service and maintenance to diagnose and repair possible faults that has occurred in the vehicle and to fulfil certain legal requirements. The registered data can also, in congregated form, be used for researchand product development –purposes to continuously improve the safety and quality of Volvo Cars. For more information contact your local Volvo retailer.
}}
33

YOUR VOLVO
||Canadian market only:
This vehicle is equipped with an “Event Data Recorder” (EDR). The main purpose of the EDR is to register and record data in traffic accidents or accident-like situations, e.g. if an airbag deploys or if the vehicle hits an obstacle in the road. This data is recorded in order to help understand how the vehicle’s systems perform in these types of situations. The EDR is designed to record data related to vehicle dynamics and safety systems for a short period of time, usually 30 seconds or less.
The EDR in this vehicle is designed to record data in traffic accidents or accident-like situations such as:
•How the various systems in the vehicle performed;
•Whether the driver and passenger seat belts were tightened/buckled;
•The driver’s use of the accelerator/brake pedal;
•How fast the vehicle was moving.
This data can help provide a better understanding of the circumstances in which traffic accidents and injuries occur. The EDR records data only if a non-trivial accident situation occurs. EDR does not record any data during normal driving conditions. The system also never registers data on who is driving the vehicle or the geographical location of the accident or near-accident. How-
ever, other parties, such as law enforcement, could combine the EDR data with the type of personally identifiable information that is routinely acquired during an accident investigation. Special equipment and access to either the vehicle or the EDR is required to read this recorded data.
In addition to the EDR, the vehicle is equipped with a number of computers that continuously control and monitor the vehicle’s performance.
These computers may record data during normal driving conditions, particularly if they detect a fault relating to the vehicle’s operation and functionality or upon activation of the vehicle’s active driver support functions (e.g. City Safety or the auto-brake function).
Some of this recorded data is required by technicians performing service and maintenance in order to diagnose and rectify any faults that may have occurred in the vehicle. The recorded information is also needed to enable Volvo to fulfill legal and other regulatory requirements. Information registered in the vehicle is stored in its computers until the vehicle is serviced or repaired.
In addition to the above, the recorded information may be used in aggregated form for research and product development purposes in order to continuously improve the safety and quality of Volvo vehicles.
Volvo will not provide this information to any third parties without the vehicle owner’s consent. However, national legislation and regulations may
require Volvo to disclose this type of information to law enforcement or other authorities that can claim a legal right to the information. Special technical equipment, which Volvo and workshops that have entered agreements with Volvo have access to, is required to read and interpret the recorded data. Volvo is responsible for ensuring that information provided to Volvo in conjunction with service and maintenance is stored and handled securely and in compliance with applicable legal requirements. For more information, please contact a Volvo retailer.
Related information
•Contacting Volvo (p. 26)
•Volvo Structural Parts Statement (p. 39)
34

Terms & Conditions for Services
Volvo offers services to help make driving your Volvo as safe and comfortable as possible.
These services comprise everything from assistance in emergencies to navigation and various maintenance services.
Before using the services, it is important to read the Terms and Conditions for the services at support.volvocars.com.
Related information
•Customer Privacy Policy (p. 35)
Customer Privacy Policy
Volvo respects and safeguards the personal privacy of everyone who visits our websites.
This policy refers to the handling of customer data and personal information. The purpose is to give current, past and potential customers a general understanding of:
•The circumstances in which we collect and process your personal data.
•The types of personal data we collect.
•Why we collect your personal data.
•How we process your personal data.
The policy can be read in its entirety at support.volvocars.com.
Related information
•Terms of use and data sharing (p. 492)
•Terms & Conditions for Services (p. 35)
•Data recording (p. 33)
YOUR VOLVO
Important information on accessories and extra equipment
Incorrectly connected or installed accessories or extra equipment may have an adverse effect on the vehicle’s electronics.
We strongly recommend that Volvo owners use only genuine, Volvo-approved accessories, and that accessory installations be performed only by a trained and qualified Volvo service technician. Certain accessories only work when the associated software is installed in the vehicle’s computer system.
The equipment described in the Owner’s Manual is not available in all vehicles. Vehicles may be equipped differently depending on market requirements and national or local laws and regulations.
Optional or accessory equipment may not be available in all countries or markets. Please note that some vehicles may be equipped differently, depending on special legal requirements. For more information on which equipment is standard and which is an option or accessory, please contact your Volvo retailer.
}}
35

YOUR VOLVO
|| NOTE
NOTE
Do not export your Volvo to another country before investigating that country’s applicable safety and exhaust emission requirements. In some cases it may be difficult or impossible to comply with these requirements. Modifications to the emission control system(s) may render your Volvo not certifiable for legal operation in the U.S., Canada and other countries.
WARNING
CALIFORNIA proposition 65
Engine exhaust, some of its constituents, and certain vehicle components contain or emit chemicals known to the state of California to cause cancer, and birth defects or other reproductive harm. In addition, certain fluids contained in vehicles and certain products of component wear contain or emit chemicals known to the State of California to cause cancer, and birth defects or other reproductive harm.
WARNING
Certain components of this vehicle such as air bag modules, seat belt tensioners, adaptive steering columns, and button cell batteries may contain Perchlorate material. Special handling may apply for service or vehicle end of life disposal.
See www.dtsc.ca.gov/hazardouswaste/ perchlorate.
WARNING
The driver is always responsible for operating the vehicle in a safe manner and for complying with current statutes and regulations.
It is also essential to maintain and service the vehicle according to Volvo’s recommendations as stated in the owner’s information and the service and warranty booklet.
If the on-board information differs from the printed owner’s manual, the printed information always takes precedence.
Related information
•Accessory installation (p. 36)
•Connecting equipment to the vehicle’s data link connector (p. 37)
•Using the Owner’s Manual (p. 21)
Accessory installation
We strongly recommend that Volvo owners use only genuine, Volvo-approved accessories, and that accessory installations be performed only by a trained and qualified Volvo service technician. Certain accessories only work when the associated software is installed in the vehicle’s computer system.
•Genuine Volvo accessories are tested to ensure compatibility with the performance, safety, and emission systems in your vehicle. Additionally, a trained and qualified Volvo service technician knows where accessories may and may not be safely installed in your Volvo. In all cases, please consult a trained and qualified Volvo service technician before installing any accessory in or on your vehicle.
•Accessories that have not been approved by Volvo may or may not be specifically tested for compatibility with your vehicle.
•Any of your vehicle’s performance and safety systems could be adversely affected if you install accessories that Volvo has not tested, or if you allow accessories to be installed by someone unfamiliar with your vehicle.
•Damage caused by unapproved or improperly installed accessories may not be covered by your new vehicle warranty. See your Warranty and Service Records Information booklet for more warranty information. Volvo assumes no responsibility for death, injury, or expenses
36

that may result from the installation of nongenuine accessories.
Related information
•Important information on accessories and extra equipment (p. 35)
Connecting equipment to the vehicle’s data link connector
Incorrectly connected or installed software or diagnostic tools may have an adverse effect on the vehicle’s electronics.
We strongly recommend that Volvo owners use only genuine, Volvo-approved accessories, and that accessory installations be performed only by a trained and qualified Volvo service technician. Certain accessories only work when the associated software is installed in the vehicle’s computer system.
On-board Diagnostic (OBDII) socket under the dashboard on the driver’s side.
YOUR VOLVO
NOTE
Volvo Cars takes no responsibility for the consequences of connecting non-authorized equipment to the On-board Diagnostic (OBDII) socket. This socket should only be used by a trained and qualified Volvo service technician.
Type approval
USA
FCC ID: 2AGKKACUII-06
This device complies with part 15 of the FCC rules. Operation is subject to the following two conditions:
(1)This device may not cause harmful interference, and
(2)this device must accept any interference received, including interference that may cause undesired operation.
WARNING
Changes or modifications not expressly approved by the party responsible for compliance could void the user’s authority to operate the equipment.
}}
37

YOUR VOLVO
||Canada
IC: 20839-ACUII06
This device complies with Industry Canada license-exempt RSS standards. Operation is subject to the following two conditions:
(1)this device may not cause interference, and
(2)This device must accept any interference received, including interference that may cause undesired operation.
Related information
•Important information on accessories and extra equipment (p. 35)
Technician certification
In addition to Volvo factory training, Volvo supports certification by the National Institute for Automotive Service Excellence (A.S.E.).
Certified technicians have demonstrated a high degree of competence in specific areas. Besides passing exams, each technician must also have worked in the field for two or more years before a certificate is issued. These professional technicians are best able to analyze vehicle problems and perform the necessary maintenance procedures to keep your Volvo at peak operating condition.
Viewing the Vehicle Identification Number (VIN)
When contacting a Volvo retailer, about e.g. your Volvo On Call subscription, your Vehicle Identification Number (VIN4) may be needed.
1.Tap Settings in the Top view in the center display.
2.Proceed to System  System Information
 Vehicle Identification Number.
>The vehicle identification number will be displayed.
4 Vehicle Identification Number
38
![]()
Volvo Structural Parts Statement
Volvo is one of the leading companies for car safety.
Volvo engineers and manufactures vehicles designed to help protect vehicle occupants in the event of a collision.
Volvos are designed to absorb the impact of a collision. This energy absorption system including, but not limited to, structural components such as bumper reinforcement bars, bumper energy absorbers, frames, rails, fender aprons, A-pillars, B-pillars and body panels must work together to maintain cabin integrity and protect the vehicle occupants.
The supplemental restraint system including but not limited to air bags, side curtain air bags, and deployment sensors work together with the above components to provide proper timing for air bag deployment.
Due to the above, Volvo Car USA does not support the use of aftermarket, alternative or anything other than original Volvo parts for collision repair.
Volvo Car USA also recommends using Volvoapproved replacement glass. The use of aftermarket glass, particularly a windshield, can have an adverse effect on collision avoidance and advanced lighting systems.
In addition Volvo does not support the use or reuse of structural components from an existing
vehicle that has been previously damaged. Although these parts may appear equivalent, it is difficult to tell if the parts have been previously replaced with non-OE parts or if the part has been damaged as a result of a prior collision. The quality of these used parts may also have been affected due to environmental exposure.
Related information
•Data recording (p. 33)
YOUR VOLVO
Driver distraction
A driver has a responsibility to do everything possible to ensure his or her own safety and the safety of passengers in the vehicle and others sharing the roadway. Part of this responsibility is avoiding distractions, including performing activities that are not directly related to controlling the vehicle in the driving environment.
Your new Volvo is, or can be, equipped with fea- ture-rich entertainment and communication systems. These include hands-free cellular telephones, navigation systems, and multipurpose audio systems. You may also own other portable electronic devices for your own convenience. When used properly and safely, they enrich the driving experience. Improperly used, any of these could cause a distraction.
For all of these systems, we want to provide the following warning that reflects the strong Volvo concern for your safety. Never use these devices or any feature of your vehicle in a way that distracts you from the task of driving safely. Distraction can lead to a serious accident. In addition to this general warning, we offer the following guidance regarding specific new features that may be found in your vehicle:
}}
39

YOUR VOLVO
|| WARNING
•Never use a hand-held cellular telephone while driving. Some jurisdictions prohibit cellular telephone use by a driver while the vehicle is moving.
•If your vehicle is equipped with a navigation system, set and make changes to your travel itinerary only with the vehicle parked.
•Never program your audio system while the vehicle is moving. Program radio presets with the vehicle parked, and use your programmed presets to make radio use quicker and simpler.
•Never use portable computers or personal digital assistants while the vehicle is moving.
Related information
•Audio, media and Internet (p. 440)
40

SAFETY

SAFETY
Safety
The vehicle is equipped with a number of safety systems that work together to help protect the vehicle’s driver and passengers in the event of an accident.
The vehicle is equipped with a number of sensors that may react in the event of an accident and activate different safety systems, such as the airbag system and seat belt tensioners. Depending on the specific conditions of the accident, e.g. collisions at certain angles, overturning or swerving, the systems react differently to help provide the best protection.
There are also mechanical safety systems such as the Whiplash Protection System. The vehicle is also built so that a large part of the force of a collision is distributed to the vehicle’s members, pillars, floor, roof and other parts of the body.
After an accident, the vehicle’s safety mode may be activated if any important function in the vehicle has been damaged.
Warning symbol in the instrument panel
The warning symbol in the instrument panel illuminates when the vehicle’s electrical system is in ignition mode II.
The symbol will go out after approx. 6 seconds if no faults are detected in the vehicle’s safety systems.
WARNING
If the warning symbol remains illuminated or switches on while driving and the message
SRS airbag Service urgent Drive to workshop is displayed in the instrument panel, this indicates that something in the safety system is not functioning properly. Volvo recommends contacting an authorized Volvo workshop for repairs as soon as possible.
WARNING
Never attempt to alter or repair any of the vehicle’s safety systems yourself. Incorrectly performed repairs to any system could impair function and lead to serious injury. Volvo recommends contacting an authorized Volvo workshop.
If this dedicated warning symbol is not functioning, the general warning symbol will illuminate instead and the same message will be displayed in the instru-
ment panel.
Related information
•Safety during pregnancy (p. 43)
•Occupant safety (p. 43)
•Reporting safety defects (p. 44)
•Recall information (p. 45)
•Seat belts (p. 47)
•Airbags (p. 52)
•Whiplash Protection System (p. 46)
•Safety mode (p. 61)
•Child safety (p. 63)
42

Safety during pregnancy
It is important that seat belts are worn correctly during pregnancy and that pregnant drivers adjust their seating position accordingly.
Seat belt
The seat belt should fit closely against the shoulder, with the diagonal section between the breasts and to the side of the stomach.
The lap section of the seat belt should lie flat over the thighs and as far as possible under the stomach. Never let it ride upward. Remove unnecessary slack and make sure the seat belt fits as close as possible to the body. Make sure there are no twists in the seat belt.
Seating position
As pregnancy progresses, pregnant drivers should adjust the seat and steering wheel to a position that allows them to retain full control of
the vehicle (which means they should be able to easily reach the steering wheel and foot pedals). Try to maintain as much distance as possible between the stomach and the steering wheel.
Related information
•Safety (p. 42)
•Seat belts (p. 47)
•Manual front seats (p. 172)
•Power* front seats (p. 173)
SAFETY
Occupant safety
Safety is Volvo’s cornerstone.
Volvo’s concern for safety
Our concern for safety dates back to 1927 when the first Volvo rolled off the production line. Three-point seat belts (a Volvo invention), safety cages, and energy-absorbing impact zones were designed into Volvo vehicles long before it was fashionable or required by government regulation.
We will not compromise our commitment to safety. We continue to seek out new safety features and to refine those already in our vehicles. You can help. We would appreciate hearing your suggestions about improving automobile safety. We also want to know if you ever have a safety concern with your vehicle. Call us in the U.S. at: 1-800-458-1552 or in Canada at: 1-800-663-8255.
}}
* Option/accessory. 43

SAFETY
||Occupant safety reminders
How safely you drive doesn’t depend on how old you are but rather on:
•How well you see.
•Your ability to concentrate.
•How quickly you make decisions under stress to avoid an accident.
The following suggestions are intended to help you cope with the ever changing traffic environment.
•Never drink and drive.
•If you are taking any medication, consult your physician about its potential effects on your driving abilities.
•Take a driver-retraining course.
•Have your eyes checked regularly.
•Keep your windshield and headlights clean.
•Replace wiper blades when they start to leave streaks.
•Take into account the traffic, road, and weather conditions, particularly with regard to stopping distance.
•Never send text messages while driving.
•Refrain from using or minimize the use of a cell phone while driving.
Related information
•Safety (p. 42)
•Reporting safety defects (p. 44)
•Recall information (p. 45)
Reporting safety defects
The following information will help you report any perceived safety-related defects in your vehicle.
Reporting safety defects in the U.S.
If you believe that your vehicle has a defect which could cause a crash or could cause injury or death, you should immediately inform the National Highway Traffic Safety Administration (NHTSA) in addition to notifying Volvo Car USA, LLC. If NHTSA receives similar complaints, it may open an investigation, and if it finds that a safety defect exists in a group of vehicles, it may order a recall and remedy campaign. However, NHTSA cannot become involved in individual problems between you, your retailer, or Volvo Car USA, LLC. To contact NHTSA, you may either call the Auto Safety Hotline tollfree at
1-888-327-4236
(TTY: 1-800-424-9153) or write to: NHTSA, U.S. Department of Transportation, Washington D.C. 20590.
44

You can also obtain other information about motor vehicle safety from http:// www.safercar.gov, where you can also enter your vehicle’s VIN (Vehicle Identification Number) to see if it has any open recalls.
Volvo strongly recommends that if your vehicle is covered under a service campaign, safety or emission recall or similar action, it should be completed as soon as possible. Please check with your local retailer or Volvo Car USA, LLC if your vehicle is covered under these conditions.
NHTSA can be reached at: Internet: http://www.nhtsa.gov Telephone:
1-888-DASH-2-DOT (1-888-327-4236).
Reporting safety defects in Canada
If you believe your vehicle has a defect that could cause a crash or could cause injury or death, you should immediately inform Transport Canada in addition to notifying Volvo Car Canada Ltd.
Transport Canada can be contacted at:
1-800-333-0510
Teletypewriter (TTY): 613 990-4500 Fax: 1-819-994-3372
Mailing Address: Transport Canada — Road Safety, 80 rue Noël, Gatineau, (Quebec) J8Z 0A1
Related information
•Safety (p. 42)
•Occupant safety (p. 43)
•Recall information (p. 45)
•Viewing the Vehicle Identification Number (VIN) (p. 38)
SAFETY
Recall information
On our website, select the «Own» tab on the upper left side of the screen and click the heading «Recall Information» on the right side of the screen. Enter your Vehicle Identification Number (VIN) for your vehicle (found at the base of the windshield). If your vehicle has any open Recalls, they will be displayed on this page.
You can also enter the Vehicle Identification Number in the search field on the National Highway Traffic Safety Administration’s (NHTSA) website at: www.nhtsa.gov.
Volvo customers in Canada
For any questions regarding open recalls for your vehicle, please contact your authorized Volvo retailer. If your retailer is unable to answer your questions, please contact Volvo Customer Relations at 800-663-8255, Monday through Friday, 8:30 A.M. to 5:00 P.M. EST or volvocars.com/ca. You may also write us at:
Volvo Car Canada Ltd.
Customer Care Centre
9130 Leslie Street, Suite 101
Richmond Hill, Ontario L4B 0B9 www.tc.gc.ca
}}
45

SAFETY
||Related information
•Safety (p. 42)
•Reporting safety defects (p. 44)
•Occupant safety (p. 43)
Whiplash Protection System
The Whiplash Protection System (WHIPS) is designed to help reduce the risk of whiplashtype injuries. The system consists of energy absorbing backrests and seat cushions as well as specially designed head restraints in the front seats.
WHIPS is activated in the event of a rear-end collision and adapted to the angle and speed of the collision and to the characteristics of the colliding vehicle.
When WHIPS is activated, the front seat backrests move rearward and the seat cushions move downward to change the seating positions of the driver and front seat passenger. This movement helps absorb some of the forces that could result in whiplash.
WARNING
WHIPS is a supplement to the seat belt. Always wear your seat belt.
WARNING
Do not attempt to alter or repair the seat or WHIPS on your own. Volvo recommends contacting an authorized Volvo workshop.
If the front seats have been subjected to severe stress, e.g. in a collision, the seats must be replaced. Even if the seats appear undamaged, some of their protective properties may have been lost.
Do not place any objects on the floor behind or under the front seats or on the rear seat that could prevent WHIPS from functioning correctly.
46

SAFETY
|
WARNING |
• Rear Collision Warning (p. 324) |
Seat belts |
|
Do not squeeze box-like cargo between the rear seat cushion and the front seat backrest.
If the rear seat backrests are folded down, cargo must be secured to prevent it from sliding forward against the front seat backrests in the event of a collision.
Seat belts should always be worn by all occupants in your vehicle. Children should be properly restrained using an infant seat, adjustable child seat or booster cushion as determined by age, weight and height.
Most states and provinces make it mandatory for occupants of a vehicle to use seat belts.
WARNING
If a rear seat backrest is folded down or if a rear-facing child restraint is being used in the rear seat, the seat in front must be moved forward so that it does not come into contact with the backrest or child restraint.
Seat belt maintenance
Check periodically that the seat belts are in good condition. Use water and a mild detergent for cleaning. Check the seat belt mechanism’s function as follows: attach the seat belt and pull rapidly on the strap.
Seating position
For WHIPS to provide optimal protection, the driver and passenger must be seated correctly and the system’s function must not be impeded in any way.
Set the front seat to the correct seating position before starting to drive.
The driver and the front seat passenger should sit in the center of the seat with their heads as close as possible to the head restraints.
Related information
•Safety (p. 42)
•Manual front seats (p. 172)
•Power* front seats (p. 173)
}}
* Option/accessory. 47

SAFETY
|| WARNING
•Never repair the belt yourself. Repairs should only be performed by a trained and qualified Volvo service technician.
•Any device used to induce slack into the shoulder belt portion of the three-point belt system will have a detrimental effect on the amount of protection available in the event of a collision.
•The seat back should not be tilted too far back. The shoulder belt must be taut in order to function properly.
•Do not use any type of child restraint in the front passenger seat. We recommend that children who have outgrown these devices sit in the rear seat with the seat belt properly fastened.
Related information
•Safety (p. 42)
•Seat belt tensioners (p. 50)
•Buckling and unbuckling seat belts (p. 48)
•Door and seat belt reminders (p. 51)
Buckling and unbuckling seat belts
Make sure that all passengers have buckled their seat belts before starting to drive.
Buckling seat belts
1.Pull out the belt slowly and make sure it is not twisted or damaged.
NOTE
Each seat belt is equipped with a retractor that will lock up in the following situations:
•if the belt is pulled out rapidly
•during braking and acceleration
•if the vehicle is leaning excessively
•when driving in turns
•if the automatic locking retractor/emergency locking retractor (ALR/ELR) is activated. Each seat belt (except for the driver’s) is equipped with an ALR function, which is designed to keep the seat belt taut when installing a child restraint. ALR is activated when the seat belt is pulled out as far as possible. If this is done, a sound from the seat belt retractor will be audible, which is normal. The seat belt can now only be fed into the retractor, not pulled out. This function is automatically disabled when the seat belt is unbuckled and fully retracted.
2.Buckle the seat belt by pushing the latch plate into the receptacle.
>A distinct «click» indicates that the belt is locked into place.
WARNING
Always insert the seat belt latch plate into the belt buckle on the correct side. Failure to do so could cause the seat belts and belt buckles to malfunction in a collision. There is a risk of serious injury.
48
 Loading…
ValunN54
Новичок
- Регистрация
- 18 Ноя 2020
- Сообщения
- 1
- Реакции
- 1
- Ваш город
-
СПб
-
XC40
- Ваше имя
- Владимир
Покушаем, потусуем, потанцуем и тд)))! Айда с нами!

Владимир1
Участник Клуба
- Регистрация
- 11 Янв 2020
- Сообщения
- 227
- Реакции
- 111
- Ваш город
-
Санкт-Петербург
- XC40, D4
-
XC-40, D4.
- Ваше имя
- Владимир
-
#2
Вот, думаю, может распечатать себе это руководство? Правда, страниц многовато! Но зато, всегда будут в наличии….

Егерь
Товарищ Админ
Команда форума
- Регистрация
- 24 Май 2015
- Сообщения
- 20,134
- Реакции
- 9,403
- Ваш город
-
Москва, Отрадное
- XC90R T5 Polestar
- Ваше имя
- Егор
- Номер Клубной Карты
- 001
-
#3
А книжки не дали при покупке???
View the manual for the Volvo XC40 (2023) here, for free. This manual comes under the category cars and has been rated by 4 people with an average of a 8.4. This manual is available in the following languages: English. Do you have a question about the Volvo XC40 (2023) or do you need help? Ask your question here
The Volvo XC40 (2023) is a compact luxury SUV that offers a sleek and modern design, suitable for urban driving. It features a spacious interior with high-quality materials and advanced technology, providing a comfortable and luxurious driving experience.
The XC40 (2023) is equipped with a range of safety features, including collision avoidance and driver assistance systems, ensuring the well-being of both the driver and passengers. The vehicle’s strong build and powerful engine provide a smooth and efficient performance, while maintaining a low environmental impact.
The XC40 (2023) is available with various engine options, including gasoline, diesel, and hybrid variants. Its powertrain delivers solid acceleration and a responsive driving experience. Additionally, the vehicle offers excellent fuel efficiency, making it an environmentally responsible choice.
Inside the XC40 (2023), occupants can enjoy the convenience of advanced connectivity features, including a touchscreen infotainment system and smartphone integration. The interior space is designed to maximize comfort and practicality, featuring ample storage compartments and flexible seating arrangements.
Furthermore, the XC40 (2023) offers a range of customization options, allowing customers to personalize their vehicle according to their preferences. From exterior colors to interior finishes, Volvo provides a wide array of choices to suit individual tastes.
In summary, the Volvo XC40 (2023) is a compact luxury SUV that combines style, performance, and safety into a well-rounded package. With its advanced technology and versatility, it is a desirable option for those seeking a modern and refined vehicle.
General
| Volvo | |
| XC40 (2023) | |
| car | |
| English | |
| User manual (PDF) |
Can’t find the answer to your question in the manual? You may find the answer to your question in the FAQs about the Volvo XC40 (2023) below.
How do I convert miles into kilometres?
1 mile equals 1.609344 kilometers and 1 kilometer equals 0.62137119 miles.
Where can I find the VIN number of my Volvo?
The location of the VIN number of the car differs per brand and type of car. The code may be stamped on the frame of the car or mounted on a plate. It is best to consult the manual of the Volvo XC40 (2023)for the exact location of the VIN number.
What is a VIN number?
The VIN number of a car is an identification number unique to each car. The abbreviation VIN therefore stands for Vehicle Identification Number.
When does my Volvo need maintenance?
Regular maintenance is necessary for every car. How often the car needs maintenance and what exactly needs to be done can be found in the maintenance instructions. For major periodic service, this should generally be done every 2 years or after 30,000 kilometres.
When should I change the brake fluid of my Volvo?
It is recommended to change the brake fluid every two years.
What is the difference between E10 and E5 petrol?
E10 petrol consists of up to ten per cent ethanol while E5 petrol will contain less than five per cent ethanol. As a result, the percentage of E10 petrol is lower than that of E5 petrol, making it less bad for the environment.
One or more doors won’t open from the inside. Now what?
The lock is most likely set to the child safety lock so it cannot be opened from the inside. How to unset the child safety lock differs per brand and type.
My car radio does not turn on, now what?
If your car radio does not turn on, it will not receive any power. Check that the red wire is connected to the contact power supply and the yellow wire to the constant power supply.
How do I adjust the seat position in my Volvo XC40 (2023)?
To adjust the seat position in your Volvo XC40 (2023), locate the seat adjustment controls on the side of the seat. Use the forward/backward and up/down buttons to find your desired position. Remember to ensure that you have a comfortable and safe driving position, with proper visibility and easy access to the controls.
How can I pair my smartphone with the Volvo XC40’s infotainment system?
To pair your smartphone with the Volvo XC40 (2023)’s infotainment system, go to the «Bluetooth» menu on the infotainment display. Enable Bluetooth on your smartphone and select the «Search for new devices» option on the display. Once your smartphone is discovered, select it and follow the on-screen instructions to complete the pairing process. Remember to grant any necessary permissions on your smartphone for a seamless connection.
What is the recommended tire pressure for my Volvo XC40 (2023)?
The recommended tire pressure for your Volvo XC40 (2023) can be found on a sticker located inside the driver’s side door jamb. Open the driver’s door and look for a label that indicates the proper tire pressure for both the front and rear tires. It is crucial to maintain the recommended tire pressure for optimal handling, fuel efficiency, and overall tire performance.
How do I activate the cruise control feature in my Volvo XC40 (2023)?
To activate the cruise control feature in your Volvo XC40 (2023), locate the cruise control buttons on the steering wheel. Press the button with the cruise control icon to turn on the system. Once activated, use the buttons labeled with «+» and «-» to set your desired speed. Remember to always pay attention to the road conditions and adjust your speed accordingly.
How can I adjust the climate controls in my Volvo XC40 (2023)?
To adjust the climate controls in your Volvo XC40 (2023), start by locating the climate control panel on the center console. There, you’ll find various buttons and dials to control the temperature, fan speed, and airflow distribution. Adjust the temperature by turning the temperature dial or pressing the temperature up/down buttons. Control the fan speed and airflow by using the fan speed dial or pressing the fan speed buttons. Experiment with different settings to find your desired climate comfort level. Remember to consider the conditions both inside and outside the vehicle for an optimal driving experience.
Is the manual of the Volvo XC40 (2023) available in English?
Yes, the manual of the Volvo XC40 (2023) is available in English .
Is your question not listed? Ask your question here